Inflight Magazine no. 11
· 8 min read

Developer Advocate at Wing Cloud
The 11th issue of the Wing Inflight Magazine.
The 11th issue of the Wing Inflight Magazine.

Hello Wingnuts!
We recently updated the project's roadmap to share more details about our vision for the project. As the Wing language and toolchain has an ambitious goal, we're hoping this gives you a better idea of what to expect in the coming months.
We want to stabilize as many of the items below as possible and we're eagerly interested in you feedback and collaboration, either through GitHub or our Discord server.
We want to provide a robust CLI for people to compile, test, and perform other essential functions with their Wing code.
We want the CLI to be easy to install, update, and set up on a variety of systems.
Dependency management should be simple and insulated from problems specific to individual Node package managers (e.g npm, pnpm, yarn).
The Wing toolchain makes it easy to create and publish Wing libraries (winglibs) with automatically generated API docs, and it doesn't require existing knowledge of node package managers.
Wing Platforms allow you to specify a layer of infrastructure customizations that apply to all application code written in Wing. It should be simple to create new Wing platforms or extend existing platforms.
With Wing Platforms it's possible to specify both multi-cloud abstractions in Wing as well as the actual platform (for example, the implementation of cloud.Bucket) in Wing.
Wing lets you easily write tests that run both locally and on the cloud.
Wing test runner can be customized per platform.
Tests in Wing can be run in a variety of means -- via the CLI, via the Wing Console, and in CI/CD.
The design of the test system should make it easy for developers to write reproducible (or deterministic) tests, and also provide facilities for debugging.
Wing's syntax and type system is robust, well documented, and easy for developers to learn.
Developers coming from other mainstream languages with C-like syntax (Java, C++, TypeScript) should feel right at home.
Most Wing code is statically typed in order to support automatic permissions.
Wing should be able to interoperate with a vast majority of TypeScript libraries.
It should be straightforward to import libraries that are available on npm and automatically have corresponding Wing types generated for them based on the TypeScript type information.
The language also has mechanisms for more advanced users to use custom JavaScript code in Wing.
We want Wing to have friendly, easy to understand error messages that point users towards how to fix their problems.
Wing has a built-in language server that gives users a first-class editing and refactoring experience in their IDEs.
Wing provides a batteries-included experience for performing common programming tasks like working with data structures, file systems, calculations, random number generation, HTTP requests, and other common needs.
Wing also has a ecosystem of Wing libraries ("winglibs") that make it easy to write cloud applications by providing easy-to-use abstractions over popular cloud resources.
This includes a []cloud module](/docs/api/category/cloud) that is an opinionated set of resources for writing applications on the most popular public clouds.
The cloud primitives are designed to be cloud-agnostic (we aren't biased towards a specific cloud provider).
These cloud primitives all can be run to a high degree of fidelity and performance with the local simulator.
Not all winglibs may be fully stable when the language reaches 1.0.
We want to provide a first class local development experience for Wing that makes it easy and fast to test your applications locally.
It gives you observability into your running application and interact live with different components.
It gives you a clearer picture of your infrastructure graph and how preflight and inflight code are related.
It complements the experience of writing code in a dedicated editor.
We want it to be easy for people to get exposed to Wing code and have ways to try applications without having to install Wing locally.
The Wing docs should provide content appealing to different kinds of developers trying to acquire different kinds of information at different stages -- from tutorials to references to how-to-guides (documentation quadrants)
Wing docs need to have content for both the personas of developers writing their own applications and platform engineers aiming to provide simpler abstractions and tools for their teams.
We want to provide hundreds of examples and code snippets to make it easy to learn the syntax of the language and easy to see how to solve common use cases.
If you have any questions, would like to contribute feel free to reach out to us and join us on our mission to make cloud development easier for everyone.
- The Wing Team
The 10th issue of the Wing Inflight Magazine.

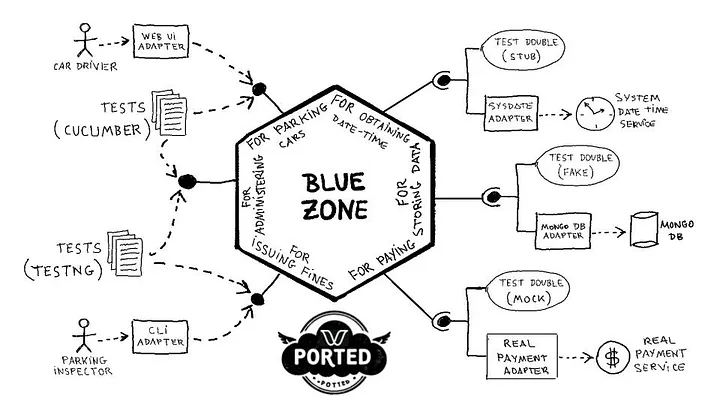
Fig 1: The “Blue Zone” Application Ported to Cloud with Wing
Directly porting software applications to the cloud often results in inefficient and hard-to-maintain code. However, using the new cloud-oriented programming language Wing in combination with Hexagonal Architecture has proven to be a winning combination. This approach strikes the right balance between cost, performance, flexibility, and security.
In this series, I will share my experiences migrating various applications from mainstream programming languages to Winglang. My first experience implementing the Hexagonal Architecture in Wing was reported in the article "Hello, Winglang Hexagon!”. While it was enough to acquire confidence in this combination, it was built on an oversimplified "Hello, World" greeting service, and as such lacked some essential ingredients and was insufficient to prove the ability of such an approach to work at scale.
In Part One, I focus on porting the “Blue Zone” application, featured in the recently published book “Hexagonal Architecture Explained”, from Java to Wing. The “Blue Zone” application brings in a substantial code base, still not too huge to dive into unmanageable complexity, yet representative of a large class of applications. Also, the fact that it was originally written in mainstream Java brings an interesting case study of creating a cloud-native variant of such applications.
This report also serves as a tribute to Juan Manuel Garrido de Paz, the book's co-author, who sadly passed away in April 2024.
Before we proceed, let's recap the fundamentals of the Hexagonal Architecture pattern.
Refer to Chapter Two of the “Hexagonal Architecture Explained” book for a detailed and formal pattern description. Here, I will bring an abridged recap of the main sense of the pattern in my own words.
The Hexagonal Architecture pattern suggests a simple yet practical approach to separate concerns in software. Why is the separation of concerns important? Because the software code base quickly grows even for a modest in terms of delivered value application. There are too many things to take care of. Preserving cognitive control requires a high-level organization in groups or categories. To confront this challenge the Hexagonal Architecture pattern suggests splitting all elements involved in a particular software application into five distinct categories and dealing with each one separately:
“Hexagonal Architecture” has served well as a hook to the pattern. It’s easy to remember and generates conversation. However, in this book we want to be correct: The name of the pattern is “Ports & Adapters”, because there really are ports, and there really are adapters, and your architecture will show them.
External Actors that communicate with or are communicated by the Application. These could be human end users, electronic devices, or other Applications. The original pattern suggests further separation into Primary (or Driving) Actors - those who initiate an interaction with the Application, and Secondary (or Driven) Actors - those with whom the Application initiates communication.
Ports - a fancy name for formal specification of Interfaces the Primary Actors could use (aka Driving Ports) or Secondary Actors need to implement (aka Driven Ports) to communicate with the Application. In addition to the formal specification of the interface verbs (e.g. BuyParkingTicket) Ports also provide detailed specifications of data structures that are exchanged through these interfaces.
Adapters fill the gaps between External Actors and Ports. As the name suggests, Adapters are not supposed to perform any meaningful computations, but rather basically convert data from/to formats the Actors understand to/from data ****the Application understands.
Configurator pulls everything together by connecting External Actors to the Application through Ports using corresponding Adapters. Depending on the architectural decisions made and price/performance/flexibility requirements these decisions were trying to address, a specific Configuration can be produced statically before the Application deployment or dynamically during the Application run.
Contrary to popular belief, the pattern does not imply that one category, e.g. Application, is more important than others, nor does it suggest ultimately that one should be larger while others smaller. Without Ports and Adapters, no Application could be practically used. Relative sizes are often determined by non-functional requirements such as scalability, performance, cost, availability, and security.
The pattern suggests reducing complexity and risk by focusing on one problem at a time, temporally ignoring other aspects. It also suggests a practical way to ensure the existence of multiple configurations of the same computation each one addressing some specific needs be it test automation or operation in different environments.
The picture below from “Hexagonal Architecture Explained” book nicely summarizes all main elements of the pattern:
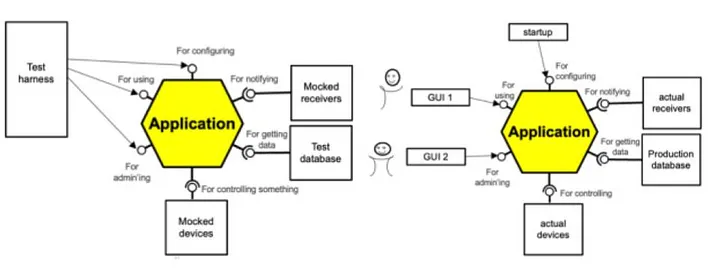
Fig 2: The Hexagonal Architecture Patterns in a Nutshell
From the application README:
BlueZone allows car drivers to pay remotely for parking cars at regulated zones in a city, instead of paying with coins using parking meters.
I chose this application for two primary reasons. First, it was recommended by the “Hexagonal Architecture Explained” book as a canonical example. Second, it was originally developed in Java. I was curious to see what is involved in porting a non-trivial Java application to the cloud using the Wing programming language.
The “Hexagonal Architecture Explained” book provides reasonable recommendations in Chapter 4.9, “What is development sequence?”. It makes sense to start with “Test-to-Test” and proceed further. However, I did what most software engineers normally do— starting with translating the Java code to Wing. Within a couple of part-time days, I reached a stage where I had something working locally in Wing with all external interfaces simulated.
While technically it worked, the resulting code was far too big relative to the size of the application, hard to understand even for me, aesthetically unappealing, and completely non-Wingish. Then, I embarked on a two-week refactoring cycle, looking for the most idiomatic expression of the core pattern ideas adapted to the Wing language and cloud environment specifics.
What comes next is different from how I worked. It was a long series of chaotic back-and-forth movements with large portions of code produced, evaluated, and scrapped. This usually happens in software development when dealing with unfamiliar technology and domains.
Finally, I’ve come up with something that hopefully could be gradually codified into a more structured and systematic process so that it will be less painful and more productive the next time. Therefore, I will present my findings in the conceptually desirable sequence to be used next time, rather than how it happened in reality.
To be more accurate, the best and most cost-effective way is to start with a series of acceptance tests for the system's architecturally essential use cases. Chapter 5.1 of the “Hexagonal Architecture Explained” book, titled “How does this relate to use cases?”, elaborates on the deep connection between use case modeling and Hexagonal Architecture. It’s worth reading carefully.
Even the previous statement wasn’t 100% accurate. We are supposed to start with identifying Primary External Actors and their most characteristic ways of interacting with the system. In the case of the “Blue Zone” application, there are two Primary External Actors:
For the Car Drive actor, her primary use case would be “Buy Ticket”; for the Parking Inspector, his primary use case would be “Check Car”. By elaborating on these use cases’ implementation we will identify Secondary External Actors and the rest of the elements.
The preliminary use case model resulting from this analysis is presented below:
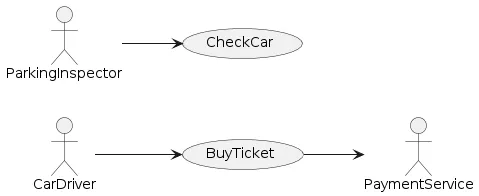
Fig 3: “Blues Zone” Application Use Case Mode
Notice that the diagram above contains only one Secondary Actor - the Payment Service and does not include any internal Secondary Actors such as a database. While these technology elements will eventually be isolated from the Application by corresponding Driven Ports they do not represent any Use Case External Actor, at least in traditional interpretation of Use Case Actors.
Specifying use case acceptance criteria before starting the development is a very effective technique to ensure system stability while performing internal restructurings. In the case of the “Blue Zone” application, the use case acceptance tests were specified in Gherkin language using the Cucumber for Java framework.
Currently, a Cucumber framework for Wing does not exist for an obvious reason - it’s a very young language. While an official Cucumber for JavaScript does exist, and there is a TypeScript Cucumber Tutorial I decided to postpone the investigation of this technology and try to reproduce a couple of tests directly in Wing.
Surprisingly, it was possible and worked fairly well, at least for my purposes. Here is an example of the Buy Ticket use case happy path acceptance test specified completely in Wing:
bring "../src" as src;
bring "./steps" as steps;

/*
Use Case: Buy Ticket
  AS
  a car driver
  I WANT TO
  a) obtain a list of available rates
  b) submit a "buy a ticket" request with the selected rate
  SO THAT
  I can park the car without being fined
*/
let _configurator = new src.Configurator("BuyTicketFeatureTest");
let _testFixture = _configurator.getForAdministering();
let _systemUnderTest = _configurator.getForParkingCars();
let _ = new steps.BuyTicketTestSteps(_testFixture, _systemUnderTest);

test "Buy ticket for 2 hours; no error" {
    /* Given */
        ["name",    "eurosPerHour"],
        ["Blue",    "0.80"],
        ["Green",   "0.85"],
        ["Orange",  "0.75"]
    ]);
    _.next_ticket_code_is("1234567890");
    _.current_datetime_is("2024/01/02 17:00");
    _.no_error_occurs_while_paying();
    /* When */
    _.I_do_a_get_available_rates_request();
    /* Then */
    _.I_should_obtain_these_rates([
        ["name",    "eurosPerHour"],
        ["Blue",    "0.80"],
        ["Green",   "0.85"],
        ["Orange",  "0.75"]
    ]);
    /* When */
    _.I_submit_this_buy_ticket_request([
        ["carPlate", "rateName", "euros", "card"],
        ["6989GPJ",  "Green",    "1.70",  "1234567890123456-123-062027"]
    ]);
    /* Then */
    _.this_pay_request_should_have_been_done([
        ["euros", "card"],
        ["1.70",  "1234567890123456-123-062027"]
    ]);
    /* And */
    _.this_ticket_should_be_returned([
        ["ticketCode", "carPlate", "rateName", "startingDateTime", "endingDateTime",   "price"],
        ["1234567890", "6989GPJ",  "Green",    "2024/01/02 17:00", "2024/01/02 19:00", "1.70"]
    ]);
    /* And */
    _.the_buy_ticket_response_should_be_the_ticket_stored_with_code("1234567890");
}
While it’s not a truly human-readable text, it’s close enough and not hard to understand. There are quite a few things to unpack here. Let’s proceed with them one by one.
The test above assumes a particular project folder structure and reflects the Wing module and import conventions, which states
It's also possible to import a directory as a module. The module will contain all public types defined in the directory's files. If the directory has subdirectories, they will be available under the corresponding names.
From the first two lines, we can conclude that the project has two main folders: src where all source code is located, and test where all tests are located. Further, there is a test\steps subfolder where individual test step implementations are kept.
The next three lines allocate a preflight Configurator object and extract from it two pointers:
_testFixture pointing to a preflight class responsible for the test setup_systemUnderTest which points to a Primary Port Interface intended for Car Drivers.Within the “Buy ticket for 2 hours; no errors”, we allocate an inflight BuyTicketTestSteps object responsible for implementing individual steps. Conventionally, this object gets an almost invisible name underscore, which improves the overall test readability. This is a common technique for developing a Domain-Specific Language (DSL) embedded in a general-purpose host language.
It’s important to stress, that while it did not happen in my case, it’s fully conceivable to start the project with a simple src and test\steps folder structure and a simple test setup to drive other architectural decisions.
Of course, with no steps implemented, the test will not even pass compilation. To make progress, we need to look inside the BuyTicketTestSteps class.
The test steps class for the Buy Ticket Use Case is presented below:
bring expect;
bring "./Parser.w" as parse;
bring "./TestStepsBase.w" as base;
bring "../../src/application/ports" as ports;

pub class BuyTicketTestSteps extends base.TestStepsBase {
    _systemUnderTest: ports.ForParkingCars;
    inflight var _currentAvailableRates: Set<ports.Rate>;
    inflight var _currentBoughtTicket: ports.Ticket?;

    new(
        testFixture: ports.ForAdministering,
        systemUnderTest: ports.ForParkingCars
    ) {
        super(testFixture);
        this._systemUnderTest = systemUnderTest;
    }

    inflight new() {
        this._currentBoughtTicket = nil;
        this._currentAvailableRates = Set<ports.Rate>[];
    }

    pub inflight the_existing_rates_in_the_repository_are(
        sRates: Array<Array<str>>
    ): void {
        this.testFixture.initializeRates(parse.Rates(sRates).toArray());
    }

    pub inflight next_ticket_code_is(ticketCode: str): void {
        this.testFixture.changeNextTicketCode(ticketCode);
    }

    pub inflight no_error_occurs_while_paying(): void {
        this.testFixture.setPaymentError(ports.PaymentError.NONE);
    }

    pub inflight I_do_a_get_available_rates_request(): void {
        this._currentAvailableRates = this._systemUnderTest.getAvailableRates();
    }

    pub inflight I_should_obtain_these_rates(sRates: Array<Array<str>>): void {
        let expected = parse.Rates(sRates);
        expect.equal(this._currentAvailableRates, expected);
    }

    pub inflight I_submit_this_buy_ticket_request(sRequest: Array<Array<str>>): void {
        let request = parse.BuyRequest(sRequest);
        this.setCurrentThrownException(nil);
        this._currentBoughtTicket = nil;
        try {
            this._currentBoughtTicket = this._systemUnderTest.buyTicket(request);
        } catch err {
            this.setCurrentThrownException(err);
        }
    }

    pub inflight this_ticket_should_be_returned(sTicket: Array<Array<str>>): void {
        let sTicketFull = Array<Array<str>>[
            sTicket.at(0).concat(["paymentId"]),
            sTicket.at(1).concat([this.testFixture.getLastPayResponse()])
        ];
        let expected = parse.Ticket(sTicketFull);
        expect.equal(this._currentBoughtTicket, expected);
    }

    pub inflight this_pay_request_should_have_been_done(sRequest: Array<Array<str>>): void {
        let expected = parse.PayRequest(sRequest);
        let actual = this.testFixture.getLastPayRequest();
        expect.equal(actual, expected);
    }

    pub inflight the_buy_ticket_response_should_be_the_ticket_stored_with_code(code: str): void {
        let actual = this.testFixture.getStoredTicket(code);
        expect.equal(actual, this._currentBoughtTicket);
    }

    pub inflight an_error_occurs_while_paying(error: str): void {
        this.testFixture.setPaymentError(parse.PaymentError(error));
    }

    pub inflight a_PayErrorException_with_the_error_code_that_occurred_should_have_been_thrown(code: str): void {
        //TODO: make it more specific
        let err = this.getCurrentThrownException()!;
        log(err);
        expect.ok(err.contains(code));
    }

    pub inflight no_ticket_with_code_should_have_been_stored(code: str): void {
        try {
            this.testFixture.getStoredTicket(code);
            expect.ok(false, "Should never get there");
        } catch err {
            expect.ok(err.contains("KeyError"));
        }
    }
}
This class is straightforward: it parses the input data, uniformly presented as Array<Array<str>>, into application-specific data structures, sends them to either testFixture or _systemUnderTest objects, keeps intermediate results, and compares expected vs actual results where appropriate.
The only specifics to pay attention to are the proper handling of preflight and inflight definitions. I’m grateful to Cristian Pallares, who helped me to make it right.
We have three additional elements with clearly delineated responsibilities:
Let’s take a closer look at each one.
The source code of the Parser module is presented below:
bring structx;
bring datetimex;
bring "../../src/application/ports" as ports;

pub class Util {
    pub inflight static Rates(sRates: Array<Array<str>>): Set<ports.Rate> {
        return unsafeCast(
            structx.fromFieldArray(
                sRates,
                ports.Rate.schema()
            )
        );
    }

    pub inflight static BuyRequest(
	    sRequest: Array<Array<str>>
	  ): ports.BuyTicketRequest {
        let requestSet: Set<ports.BuyTicketRequest> = unsafeCast(
            structx.fromFieldArray(
                sRequest,
                ports.BuyTicketRequest.schema()
            )
        );
        return requestSet.toArray().at(0);
    }

    pub inflight static Tickets(
	    sTickets: Array<Array<str>>
	  ): Set<ports.Ticket> {
        return unsafeCast(
            structx.fromFieldArray(
                sTickets,
                ports.Ticket.schema(),
                datetimex.DatetimeFormat.YYYYMMDD_HHMM
            )
        );
    }

    pub inflight static Ticket(sTicket: Array<Array<str>>): ports.Ticket {
        return Util.Tickets(sTicket).toArray().at(0);
    }

    pub inflight static PayRequest(
	    sRequest: Array<Array<str>>
	  ): ports.PayRequest {
        let requestSet: Set<ports.PayRequest> = unsafeCast(
            structx.fromFieldArray(
                sRequest,
                ports.PayRequest.schema()
            )
        );
        return requestSet.toArray().at(0);
    }

    pub inflight static CheckCarRequest(
	    sRequest: Array<Array<str>>
	  ): ports.CheckCarRequest {
        let requestSet: Set<ports.CheckCarRequest> = unsafeCast(
            structx.fromFieldArray(
                sRequest,
                ports.CheckCarRequest.schema()
            )
        );
        return requestSet.toArray().at(0);
    }

    pub inflight static CheckCarResult(
	    sResult: Array<Array<str>>
	  ): ports.CheckCarResult {
        let resultSet: Set<ports.CheckCarResult> = unsafeCast(
            structx.fromFieldArray(
                sResult, ports.CheckCarResult.schema()
            )
        );
        return resultSet.toArray().at(0);
    }

    pub inflight static DateTime(dateTime: str): std.Datetime {
        return datetimex.parse(
            dateTime,
            datetimex.DatetimeFormat.YYYYMMDD_HHMM
        );
    }

    pub inflight static PaymentError(error: str): ports.PaymentError {
        return Map<ports.PaymentError>{
            "NONE" => ports.PaymentError.NONE,
            "GENERIC_ERROR" => ports.PaymentError.GENERIC_ERROR,
            "CARD_DECLINED" => ports.PaymentError.CARD_DECLINED
        }.get(error);
    }
}
This class, while not sophisticated from the algorithmic point of view, reflects some important architectural decisions with far-reaching consequences.
First, it announces a dependency on the system Ports located in the src\application\ports folder. Chapter 4.8 of the “Hexagonal Architecture Explained” book, titled “Where do I put my files?”, makes a clear statement:
The folder structure is not covered by the pattern, nor is it the same in all languages. Some languages (Java), require interface definitions. Some (Python, Ruby) don't. And some, such as Smalltalk, don't even have the concept of files!
It warns, however, that “we’ve observed that folder structures that don't match the intentions of the pattern end up causing damage”. For strongly typed languages like Java, it recommends keeping specifications of Driving and Driven Ports in separate folders.
I started with such a structure, but very soon realized that it just enlarges the size of the code and prevents it from taking full advantage of the Wing module and import conventions. Based on this I decided to keep all Ports in one dedicated folder. Considering the current size of the application, this decision looks justified.
Second, it exploits an undocumented Wing module and import feature that makes all public static inflight methods of a class named Util directly accessible by the client modules, which improves the code readability.
Third, it uses two Wing Standard Library extensions, datetimex, and structx developed to compensate for some features I needed. These extensions were part of my “In Search for Winglang Middleware” project endor.w, I reported about here, here, and here.
Justification for these extensions will be clarified when we look at the core architectural decision about representing the Port Interfaces and Data.
Traditional strongly typed Object-Oriented languages like Java advocate encapsulating all domain elements as objects. If I followed this advice, the Ticket object would look something like this:
pub inflight class Ticket {
  pub ticketCode: str;
  pub carPlate: str;
  pub rateName: str;
  pub startingDateTime: std.Datetime;
  pub endingDateTime: std.Datetime;
  pub price: num;
  pub paymentId: str;

  new (ticketCode: str, ...) {
    this.ticketCode = ticketCode;
    ...
  }
  pub toJson(): Json {
    return Json {
       ticketCode = this.ticketCode,
       ...
  }
  pub static fromJson(data: Json): Ticket {
    return new Ticket(
      data.get("ticketCode").asStr(),
      ...
   );
  }
  pub toFieldArray(): Array<str> {
    return [
      this.ticketCode,
      ...
    ];
  }
  pub static fromFieldArray(records: Array<Array<str>>): Set<Ticket> {
    let result = new MutSet<Ticket>[];
    for record in records {
      result.add(new Ticket(
        record.at(0),
        ...
      );
    }
    return result.copy();
 }
} such
Such an approach introduces 6 extra lines of code per data field for initialization and conversation plus some fixed overhead of method definition. This creates a significant boilerplate overhead.
Mainstream languages like Java and Python try alleviating this pain with various meta-programming automation tools, such as decorators, abstract base classes, or meta-classes.
In Wing, all this proved to be sub-optimal and unnecessary, provided minor adjustments were made to the Wing Standard Library.
Here is how the Ticket data structure can be defined:
pub struct Ticket {                 //Data structure representing objects
																		//with the data of a parking ticket:
    ticketCode: str;                //Unique identifier of the ticket;
                                    //It is a 10-digit number with leading zeros
                                    //if necessary
    carPlate: str;                  //Plate of the car that has been parked
    rateName: str;                  //Rate name of the zone where
																    //the car is parked at
    startingDateTime: std.Datetime; //When the parking period begins
    endingDateTime: std.Datetime;   //When the parking period expires
    price: num;                     //Amount of euros paid for the ticket
    paymentId: str;                 //Unique identifier of the payment
																    //made to get the ticket.
}
In Wing, structures are immutable by default, and that eliminates a lot of access control problems.
Without any change, the Wing Standard Library will support out-of-the-box Json.stringify(ticket) serialization to Json string and Ticket.fromJson(data) de-serialization. That’s not enough for the following reasons:
Ticket objects to Json rather than a Json stringJson serialization and de-serialization functions need to handle the std.Datetime fields correctly. Currently the Json.stringify() will convert any std.Datetime to an ISO string, but Ticket.fromJson() will fail.std.Datetime. For example, the “Blue Zone” application uses the YYYYMM HH:MM format.All these additional needs were addressed in two Trusted Wing Libraries: datetimex and struct. While the implementation was not trivial and required a good understanding of how Wing and TypeScript interoperability works, it was doable with reasonable effort. Hopefully, these extensions can be included in future versions of the Wing Standard Library.
The special, unsafeCast function helped to overcome the Wing strong type checking limitations. To provide better support for actual vs expected comparison in tests, I decided that fromFieldArray(...) will return Set<...> objects. Occasionally it required toArray() conversion, but I found this affordable.
Now, let’s take a look at the main _systemUnderTest object.
Following the “Hexagonal Architecture Explained” book recommendations, port naming adopts the ForActorName convention. Here is how it is defined for the ParkingCar External Actor:
pub struct BuyTicketRequest { 	//Input data needed for buying a ticket
																//to park a car:
		carPlate: str;		//Plate of the car that has been parked
    rateName: str;		//Rate name of the zone where the car is parked at
    euros: num;				//Euros amount to be paid
    card: str;				//Card used for paying, in the format 'n-c-mmyyyy', where
	              			//	'n' is the card number (16 digits)
	              			//	'c' is the verification code (3 digits),
	              			//	'mmyyyy' is the expiration month and year (6 digits)
}

/**
 * DRIVING PORT (Provided Interface)
 */
pub inflight interface ForParkingCars {
	/**
	 * @return	A set with the existing rates for parking a car in regulated
	 * zones of the city.
	 * If no rates exist, an empty set is returned.
	 */
     getAvailableRates(): Set<rate.Rate>;

    /**
	 * Pay for a ticket to park a car at a zone regulated by a rate,
	 * and save the ticket in the repository.
	 * The validity period of the ticket begins at the current date-time,
	 * and its duration is calculated in minutes by applying the rate,
	 * based on the amount of euros paid.
	 * @param request	Input data needed for buying a ticket.
	 * 					@see BuyTicketRequest
	 * @return	A ticket valid for parking the car at a zone regulated by the rate,
	 * 			paying the euros amount using the card.
	 * 			The ticket holds a reference to the identifier of the payment
	 *      that was made.
	 * @throws	BuyTicketRequestException
	 * 			If any input data in the request is not valid.
	 * @throws	PayErrorException
	 * 			If any error occurred while paying.
	 */
	buyTicket (request: BuyTicketRequest): ticket.Ticket;
}
As with Ticket and Rate objects, the BuyTicketRequest object is defined as a plain Wing struct relying on the automatic conversion infrastructure described above.
The ForParkingCars is defined as the Wing interface. Unlike the original “Blue Zone” implementation, this one does not include BuyTicketRequest validation in the port specification. This was done on purpose.
While strong object encapsulation would encourage including the validate() method in the BuyTicketRequest class, with open immutable data structures like the ones adopted here, it could be done where it belongs - in the use case implementation. On the other hand, including the request validation logic in port specification brings in too many implementation details, too early.
This one is used for providing testFixture functionality, and while it is long, it is also completely straightforward:
bring "./Rate.w" as rate;
bring "./Ticket.w" as ticket;
bring "./ForPaying.w" as forPaying;

/**
 * DRIVING PORT (Provided Interface)
 * For doing administration tasks like initializing, load data in the repositories,
 * configuring the services used by the app, etc.
 * Typically, it is used by:
 *      - Tests (driving actors) for setting up the test-fixture (driven actors).
 *      - The start-up for initializing the app.
 */
 pub inflight interface ForAdministering {

    /**
    * Load the given rates into the data repository,
    * deleting previously existing rates if any.
    */
    initializeRates(newRates: Array<rate.Rate>): void;

    /**
    * Load the given tickets into the data repository,
    * deleting previously existing tickets if any.
    */
    initializeTickets(newTickets: Array<ticket.Ticket>): void;

    /**
    * Make the given ticket code the next to be returned when asking for it.
    */
    changeNextTicketCode(newNextTicketCode: str): void;

    /**
    * Return the ticket stored in the repository with the given code
    */
    getStoredTicket(ticketCode: str): ticket.Ticket;

    /**
    * Return the last request done to the "pay" method
    */
    getLastPayRequest(): forPaying.PayRequest;

    /**
    * Return the last response returned by the "pay" method.
    * It is an identifier of the payment made.
    */
    getLastPayResponse(): str;

    /**
    * Make the probability of a payment error the "percentage" given as a parameter
    */
    setPaymentError(errorCode: forPaying.PaymentError): void;

    /**
    * Return the code of the error that occurred when running the "pay" method
    */
    getPaymentError(): forPaying.PaymentError;

    /**
    * Set the given date-time as the current date-time
    */
    changeCurrentDateTime(newCurrentDateTime: std.Datetime): void;

}
Now, we need to dive one level deeper and look at the application logic implementation.
bring "../../application/ports" as ports;
bring "../../application/usecases" as usecases;

pub class ForParkingCarsBackend impl ports.ForParkingCars {
    _buyTicket: usecases.BuyTicket;
    _getAvailableRates: usecases.GetAvailableRates;

    new(
        dataRepository: ports.ForStoringData,
        paymentService: ports.ForPaying,
        dateTimeService: ports.ForObtainingDateTime
    ) {
        this._buyTicket = new usecases.BuyTicket(dataRepository, paymentService, dateTimeService);
        this._getAvailableRates = new usecases.GetAvailableRates(dataRepository);
    }

    pub inflight getAvailableRates(): Set<ports.Rate> {
        return this._getAvailableRates.apply();
    }

    pub inflight buyTicket(request: ports.BuyTicketRequest): ports.Ticket {
        return this._buyTicket.apply(request);
    }
}
This class resides in the src/outside/backend folder and provides an implementation of the ports.ForParkingCars interface that is suitable for a direct function call. As we can see, it assumes two additional Secondary Ports: ports.ForStoringData and ports.ForObtainingTime and delegates actual implementation to two Use Case implementations: BuyTicket and GetAvailableRates. The BuyTicket Use Case implementation is where the core system logic resides, so let’s look at it.
bring math;
bring datetimex;
bring exception;
bring "../ports" as ports;
bring "./Verifier.w" as validate;

pub class BuyTicket {
    _dataRepository: ports.ForStoringData;
    _paymentService: ports.ForPaying;
    _dateTimeService: ports.ForObtainingDateTime;

    new(
        dataRepository: ports.ForStoringData,
        paymentService: ports.ForPaying,
        dateTimeService: ports.ForObtainingDateTime
    ) {
        this._dataRepository = dataRepository;
        this._paymentService = paymentService;
        this._dateTimeService = dateTimeService;
    }

    pub inflight apply(request: ports.BuyTicketRequest): ports.Ticket {
        let currentDateTime = this._dateTimeService.getCurrentDateTime();
        this._validateRequest(request, currentDateTime);
        let paymentId = this._paymentService.pay(
            euros: request.euros,
            card: request.card
        );
        let ticket = this._buildTicket(request, paymentId, currentDateTime);
        this._dataRepository.saveTicket(ticket);
        return ticket;
    }

    inflight _validateRequest(request: ports.BuyTicketRequest, currentDateTime: std.Datetime): void {
        let requestErrors = validate.BuyTicketRequest(request, currentDateTime);
        if requestErrors.length > 0 {
            throw exception.ValueError(
                "Buy ticket request is not valid",
                requestErrors
            );
        }
    }

    inflight _buildTicket(
        request: ports.BuyTicketRequest,
        paymentId: str,
        currentDateTime: std.Datetime
    ): ports.Ticket {
        let ticketCode = this._dataRepository.nextTicketCode();
        let rate = this._dataRepository.getRateByName(request.rateName);
        let endingDateTime = BuyTicket._calculateEndingDateTime(
            currentDateTime,
            request.euros,
            rate.eurosPerHour
        );
        return ports.Ticket {
            ticketCode: ticketCode,
            carPlate: request.carPlate,
            rateName: request.rateName,
            startingDateTime: currentDateTime,
            endingDateTime: endingDateTime,
            price: request.euros,
            paymentId: paymentId
        };
    }

    /**
     * minutes = (euros * minutesPerHour) / eurosPerHour
     * endingDateTime = startingDateTime + minutes
     */
     static inflight _calculateEndingDateTime(
        startingDateTime: std.Datetime,
        euros: num,
        eurosPerHour: num
    ): std.Datetime {
        let MINUTES_PER_HOUR = 60;
        let minutes = math.round((MINUTES_PER_HOUR * euros) / eurosPerHour);
        return datetimex.plus(startingDateTime, duration.fromMinutes(minutes));
    }
}
The “Buy Ticket” Use Case implementation class resides within the src/application/usescases folder. It returns an inflight function responsible for executing the Use Case logic:
TicketTicket recordTicket record in the databaseThe main reason for implementing Use Cases as inflight functions is that all Wing event handlers are inflight functions. While direct function calls are useful for local testing, they will typically be HTTP REST or GraphQL API calls in a real deployment.
The actual validation of the BuyTicketRequest is delegated to an auxiliary Util class within the Verifier.w module. The main reason is that individual field validation might be very detailed and involve many low-level specifics, contributing little to the overall use case logic understanding.
Following the “Hexagonal Architecture Explained” book recommendations, this is implemented within a Configurator class as follows:
bring util;
bring endor;
bring "./outside" as outside;
bring "./application/ports" as ports;

enum ApiType {
    DIRECT_CALL,
    HTTP_REST
}

enum ProgramType {
    UNKNOWN,
    TEST,
    SERVICE
}

pub class Configurator impl outside.BlueZoneApiFactory {
    _apiFactory: outside.BlueZoneApiFactory;

    new(name: str) {
        let mockService = new outside.mock.MockDataRepository();
        let programType = this._getProgramType(name);
        let mode = this._getMode(programType);
        let apiType = this._getApiType(programType, mode);
        this._apiFactory = this._getApiFactory(
            name,
            mode,
            apiType,
            mockService,
            mockService,
            mockService
        );
    }

    _getProgramType(name: str): ProgramType { //TODO: migrate to endor??
        if name.endsWith("Test") {
            return ProgramType.TEST;
        } elif name.endsWith("Service") || name.endsWith("Application") {
            return ProgramType.SERVICE;
        } elif std.Node.of(this).app.isTestEnvironment {
            return ProgramType.TEST;
        }
        return ProgramType.UNKNOWN;
    }

    _getMode(programType: ProgramType): endor.Mode {
        if let mode = util.tryEnv("MODE") {
            return Map<endor.Mode>{ //TODO Migrate this function to endor
                "DEV" => endor.Mode.DEV,
                "TEST" => endor.Mode.TEST,
                "STAGE" => endor.Mode.STAGE,
                "PROD" => endor.Mode.PROD
            }.get(mode);
        } elif programType == ProgramType.TEST {
            return endor.Mode.TEST;
        } elif programType == ProgramType.SERVICE {
            return endor.Mode.STAGE;
        }
        return endor.Mode.DEV;
    }

    _getApiType(
        programType: ProgramType,
        mode: endor.Mode,
    ): ApiType {
        if let apiType = util.tryEnv("API_TYPE") {
            return Map<ApiType>{
                "DIRECT_CALL" => ApiType.DIRECT_CALL,
                "HTTP_REST" => ApiType.HTTP_REST
            }.get(apiType);
        } elif programType == ProgramType.SERVICE {
            return ApiType.HTTP_REST;
        }
        let target = util.env("WING_TARGET");
        if target.contains("sim") {
            return ApiType.DIRECT_CALL;
        }
        return ApiType.HTTP_REST;
    }

    _getApiFactory(
        name: str,
        mode: endor.Mode,
        apiType: ApiType,
        dataService: ports.ForStoringData,
        paymentService: ports.ForPaying,
        dateTimeService: ports.ForObtainingDateTime
    ): outside.BlueZoneApiFactory {
        let directCall = new outside.DirectCallApiFactory(
            dataService,
            paymentService,
            dateTimeService
        );
        if apiType == ApiType.DIRECT_CALL {
            return directCall;
        } elif apiType == ApiType.HTTP_REST {
            return new outside.HttpRestApiFactory(
                name,
                mode,
                directCall
            );
        }
    }

    pub getForAdministering(): ports.ForAdministering {
        return this._apiFactory.getForAdministering();
    }

    pub getForParkingCars(): ports.ForParkingCars {
        return this._apiFactory.getForParkingCars();
    }

    pub getForIssuingFines(): ports.ForIssuingFines {
        return this._apiFactory.getForIssuingFines();
    }

}
This is an experimental, still not final, implementation, but it could be extended to address the production deployment needs. It adopts a static system configuration by exploiting the Wing preflight machinery.
In this implementation, a special MockDataStore object implements all three Secondary Ports: data service, paying service, and date-time service. It does not have to be this way and was created to save time during the scaffolding development.
The main responsibility of the Configuratior class is to determine which type of API should be used:
The actual API creation is delegated to corresponding ApiFactory classes.
What is remarkable about such an implementation is that the same test suite is used for all configurations, except for real HTML-based UI mode. The latter could also be achieved but would require some HTML test drivers like Selenium.
It is the first time I have achieved such a level of code reuse. As a result, I run local direct call configuration most of the time, especially when I perform code structure refactoring, with full confidence that it will run in a remote test and production environment without a change. This proves that the Wing cloud-oriented programming language and Hexagonal Architecture is truly a winning combination.
Including the full source code of every module would increase this article's size too much. Access to the GitHub repository for this project is available on demand.
Instead, I will present the overall folder structure, two UML class diagrams, and a cloud resources diagram reflecting the main program elements and their relationships.
├── src
│   ├── application
│   │   ├── ports
│   │   │   ├── ForAdministering.w
│   │   │   ├── ForIssuingFines.w
│   │   │   ├── ForObtainingDateTime.w
│   │   │   ├── ForParkingCars.w
│   │   │   ├── ForPaying.w
│   │   │   ├── ForStoringData.w
│   │   │   ├── Rate.w
│   │   │   └── Ticket.w
│   │   ├── usecases
│   │   │   ├── BuyTicket.w
│   │   │   ├── CheckCar.w
│   │   │   ├── GetAvailableRates.w
│   │   │   └── Veryfier.w
│   ├── outside
│   │   ├── backend
│   │   │   ├── ForAdministeringBackend.w
│   │   │   ├── ForIssuingFinesBackend.w
│   │   │   └── ForParkingCarsBackend.w
│   │   ├── http
│   │   │   ├── html
│   │   │   │    ├── _htmlForParkingCarsFormatter.ts
│   │   │   │    └── htmlForParkingCarsFormatter.w
│   │   │   ├── json
│   │   │   │    ├── jsonForIssuingFinesFormatter.w
│   │   │   │    └── jsonForParkingCarsFormatter.w
│   │   │   ├── ForIssuingFinesClient.w
│   │   │   ├── ForIssuingFinesController.w
│   │   │   ├── ForParkingCarsClient.w
│   │   │   ├── ForParkingCarsController.w
│   │   │   └── middleware.w
│   │   ├── mock
│   │   │   └── MockDataRepository.w
│   │   ├── ApiFactory.w
│   │   ├── BlueZoneAplication.main.w
│   │   ├── DirectCallApiFactory.w
│   │   └── HttpRestApiFactory.w
│   └── Configurator.w
├── test
│   ├── steps
│   │   ├── BuyTicketTestSteps.w
│   │   ├── CheckCarTestSteps.w
│   │   ├── Parser.w
│   │   └── TestStepsBase.w
│   ├── usecase.BuyTicketTest.w
│   └── usecase.CheckCarTest.w
├── .gitignore
├── LICENSE
├── Makefile
├── README.md
├── package-lock.json
├── package.json
└── tsconfig.json
Fig 4: Folder Structure
Application logic-wise the project is small. Yet, it is already sizable to pose enough challenges for cognitive control over its structure. The current version attempts to strike a reasonable balance between multiple criteria:
While computing all sets of desirable metrics is beyond the scope of this publication, one back-of-envelope calculation could be performed here and now manually: the percentage of files under the application and outside folders, including intermediate folders (let’s call “value”) and the total number of files and folders (let’s call it “stuff”). In the current version, the numbers are:
Total: 55
src/application: 16
src/: 41
Files: 43
Strict Value to Stuff Ratio: 16*100/55 = 29.09%
Extended Value to Stuff Ratio: (15+19)*100/42 = 74.55%
Is it big or little? Good or Bad? It’s hard to say at the moment. The initial impression is that the numbers are healthy, yet coming up with more founded conclusions needs additional research and experimentation. A real production system will require a significantly larger number of tests.
From the cognitive load perspective, 43 files is a large number exceeding the famous 7 +/- 2 limit of human communication channels and short memory. It requires some organization. In the current version, the maximal number of files at one level is 8 - within the limit.
The presented hierarchical diagram only partially reflects the real graph picture - cross-file dependencies resulting from the bring statement are not visible. Also, the __node_files__ folder reflecting external dependencies and having an impact on resulting package size is omitted as well.
In short, without additional investment in tooling and methodology of metrics, the picture is only partial.
We still can formulate some desirable direction: we prefer to deal as much as possible with assets generating the direct value and as little as possible with supporting stuff required to make it work. Ideally, a healthy Value to Stuff ratio would come from language and library support. Automatic code generation, including that performed by Generative AI, would reduce the typing but not the overall cognitive load.
Depicting all “Blue Zone” application elements in a single UML Class Diagram would be impractical. Among other things, UML does not support directly separate representation of preflight and inflight elements. We can visualize separately the most important parts of the system. For example, here is a UML Class Diagram for the application part:
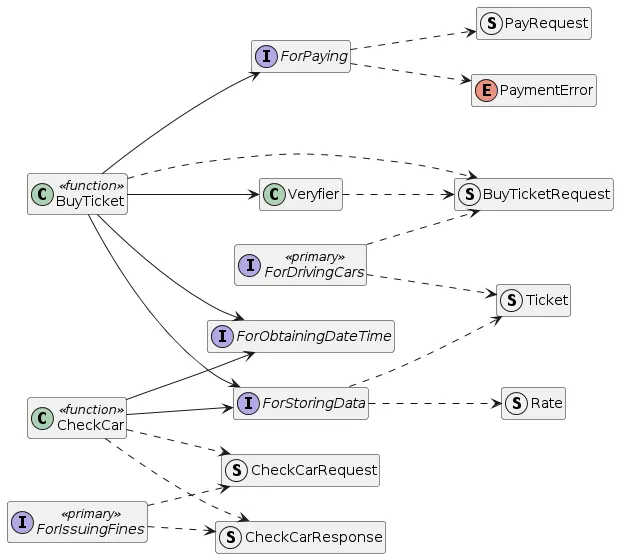
Fig 5: `src/application` Class Diagram
DO NOT PUBLISH
@startuml

left to right direction
hide members
struct Ticket
struct Rate
struct BuyTicketRequest
interface ForDrivingCars <<primary>>
ForDrivingCars ..> BuyTicketRequest
ForDrivingCars ..> Ticket
interface ForStoringData
ForStoringData ..> Rate
ForStoringData ..> Ticket
struct PayRequest
enum PaymentError
interface ForPaying
ForPaying ..> PayRequest
ForPaying ..> PaymentError
interface ForObtainingDateTime
class BuyTicket <<function>>
class Veryfier
Veryfier ..> BuyTicketRequest
BuyTicket --> Veryfier
BuyTicket ..> BuyTicketRequest
BuyTicket --> ForObtainingDateTime
BuyTicket --> ForStoringData
BuyTicket --> ForPaying
interface ForIssuingFines <<primary>>
struct CheckCarRequest
struct CheckCarResponse
ForIssuingFines ..> CheckCarRequest
ForIssuingFines ..> CheckCarResponse
class CheckCar <<function>>
CheckCar --> ForStoringData
CheckCar --> ForObtainingDateTime
CheckCar ..> CheckCarRequest
CheckCar ..> CheckCarResponse
@enduml
Notice that the IForParkingCars and ForIssuingFines primary interfaces are named differently from the Car Driver and Parking Inspector primary actors and BuyTicket and CheckCar use cases. This is not a mistake. Primary Port Interface names should reflect the Primary Actor role in a particular use case. There are no automatic rules for such a naming. Hopefully, the selected names are intuitive enough.
Notice also, that the Primary Interfaces are not directly implemented within the application module and there is a disconnect between these interfaces and use case implementations.
This is also not a mistake. The concrete connection between the Primary Interface and the corresponding use case implementation depends on configuration, as reflected in the UML Class Diagram Below:
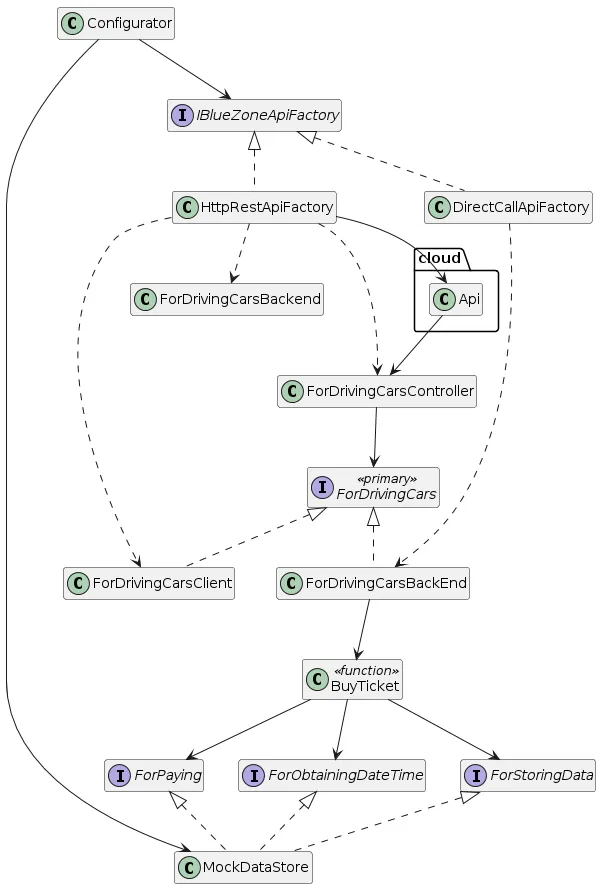
Fig 6: Configurator Class Diagram (”Buy Ticket” Use Case only)
DO NOT PUBLISH
@startuml

hide members
interface ForDrivingCars <<primary>>
interface ForStoringData
interface ForPaying
interface ForObtainingDateTime
class BuyTicket <<function>>
BuyTicket --> ForObtainingDateTime
BuyTicket --> ForStoringData
BuyTicket --> ForPaying
class ForDrivingCarsBackEnd implements ForDrivingCars
ForDrivingCarsBackEnd --> BuyTicket
class ForDrivingCarsClient implements ForDrivingCars
class ForDrivingCarsController
ForDrivingCarsController --> ForDrivingCars
class MockDataStore implements ForStoringData, ForPaying, ForObtainingDateTime
interface IBlueZoneApiFactory
class DirectCallApiFactory implements IBlueZoneApiFactory
DirectCallApiFactory ..> ForDrivingCarsBackEnd
class HttpRestApiFactory implements IBlueZoneApiFactory
class cloud.Api
cloud.Api --> ForDrivingCarsController
HttpRestApiFactory --> cloud.Api
HttpRestApiFactory ..> ForDrivingCarsController
HttpRestApiFactory ..> ForDrivingCarsClient
HttpRestApiFactory ..> ForDrivingCarsBackend
class Configurator
Configurator --> IBlueZoneApiFactory
Configurator --> MockDataStore
@enduml
Only elements related to the “Buy Ticket” Use Case implementation and essential connections are depicted to avoid clutter.
According to the class diagram above the Configurator will decide which IBlueZoneApiFactory implementation to use: DirectApiCallFactory for local testing purposes or HttpRestApiFactory for both local and remote testing via HTTP and production deployment.
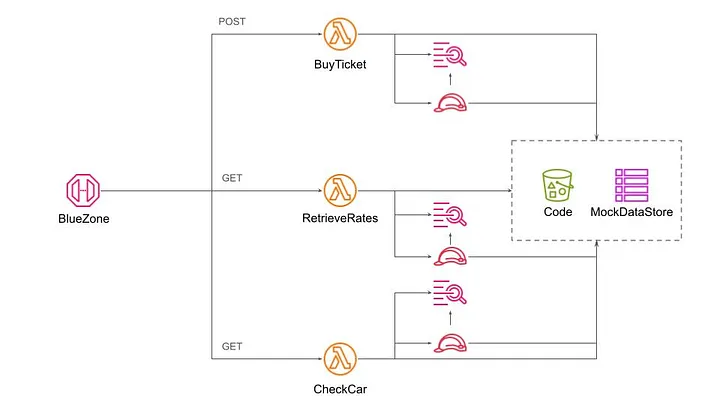
Fig 7: Cloud Resources
The cloud resources diagram presented above reflects the outcome of the Wing compilation to the AWS target platform. It is quite different from the UML Class Diagram presented above and we have to conclude that various types of diagrams complement each other. The Cloud Resources diagram is important for understanding and controlling the system's operational aspects like cost, performance, reliability, resilience, and security.
The main challenge, as with previous diagrams, is the scale. With more cloud resources, the diagram will quickly be cluttered with too many details.
The current versions of all diagrams are more like useful illustrations than formal blueprints. Striking the right balance between accuracy and comprehension is a subject for future research. I addressed this issue in one of my early publications. Probably, it’s time to come back to this research topic.
The experience of porting the “Blue Zone” application, featured in the recently published book “Hexagonal Architecture Explained”, from Java to Wing led to the following interim conclusions
Throughout the preparation of this publication, I utilized several key tools to enhance the draft and ensure its quality.
The initial draft was crafted with the organizational capabilities of Notion's free subscription, facilitating the structuring and development of ideas.
For grammar and spelling review, the free version of Grammarly proved useful for identifying and correcting basic errors, ensuring the readability of the text.
The enhancement of stylistic expression and the narrative coherence checks were performed using the paid version of ChatGPT 4o. The ChatGPT 4o tool was also used to develop critical portions of the Trusted Wing Libraries: datetimex and struct in TypeScript.
UML Class Diagrams were produced with the free version of the PlantText UML online tool.
Java version of the “Blue Zone” application was developed by Juan Manuel Garrido de Paz, the book’s co-author. Juan Manuel Garrido de Paz sadly passed away in April 2024. May his memory be blessed and this report serves as a tribute to him.
While all advanced tools and resources significantly contributed to the preparation process, the concepts, solutions, and final decisions presented in this article are entirely my own, for which I bear full responsibility.

In this tutorial, we will build an AI-powered Q&A bot for your website documentation.
🌐 Create a user-friendly Next.js app to accept questions and URLs
🔧 Set up a Wing backend to handle all the requests
💡 Incorporate Langchain for AI-driven answers by scraping and analyzing documentation using RAG
🔄 Complete the connection between the frontend input and AI-processed responses.

Wing is an open-source framework for the cloud.
It allows you to create your application's infrastructure and code combined as a single unit and deploy them safely to your preferred cloud providers.
Wing gives you complete control over how your application's infrastructure is configured. In addition to its easy-to-learn programming language, Wing also supports Typescript.
In this tutorial, we'll use TypeScript. So, don't worry—your JavaScript and React knowledge is more than enough to understand this tutorial.

Here, you’ll create a simple form that accepts the documentation URL and the user’s question and then returns a response based on the data available on the website.
First, create a folder containing two sub-folders - frontend and backend. The frontend folder contains the Next.js app, and the backend folder is for Wing.
mkdir qa-bot && cd qa-bot
mkdir frontend backend
Within the frontend folder, create a Next.js project by running the following code snippet:
cd frontend
npx create-next-app ./

Copy the code snippet below into the app/page.tsx file to create the form that accepts the user’s question and the documentation URL:
"use client";
import { useState } from "react";

export default function Home() {
	const [documentationURL, setDocumentationURL] = useState<string>("");
	const [question, setQuestion] = useState<string>("");
	const [disable, setDisable] = useState<boolean>(false);
	const [response, setResponse] = useState<string | null>(null);

	const handleUserQuery = async (e: React.FormEvent) => {
		e.preventDefault();
		setDisable(true);
		console.log({ question, documentationURL });
	};

	return (
		<main className='w-full md:px-8 px-3 py-8'>
			<h2 className='font-bold text-2xl mb-8 text-center text-blue-600'>
				Documentation Bot with Wing & LangChain
			</h2>

			<form onSubmit={handleUserQuery} className='mb-8'>
				<label className='block mb-2 text-sm text-gray-500'>Webpage URL</label>
				<input
					type='url'
					className='w-full mb-4 p-4 rounded-md border text-sm border-gray-300'
					placeholder='https://www.winglang.io/docs/concepts/why-wing'
					required
					value={documentationURL}
					onChange={(e) => setDocumentationURL(e.target.value)}
				/>

				<label className='block mb-2 text-sm text-gray-500'>
					Ask any questions related to the page URL above
				</label>
				<textarea
					rows={5}
					className='w-full mb-4 p-4 text-sm rounded-md border border-gray-300'
					placeholder='What is Winglang? OR Why should I use Winglang? OR How does Winglang work?'
					required
					value={question}
					onChange={(e) => setQuestion(e.target.value)}
				/>

				<button
					type='submit'
					disabled={disable}
					className='bg-blue-500 text-white px-8 py-3 rounded'
				>
					{disable ? "Loading..." : "Ask Question"}
				</button>
			</form>

			{response && (
				<div className='bg-gray-100 w-full p-8 rounded-sm shadow-md'>
					<p className='text-gray-600'>{response}</p>
				</div>
			)}
		</main>
	);
}
The code snippet above displays a form that accepts the user’s question and the documentation URL, and logs them to the console for now.

Perfect! 🎉You’ve completed the application's user interface. Next, let’s set up the Wing backend.
Wing provides a CLI that enables you to perform various actions within your projects.
It also provides VSCode and IntelliJ extensions that enhance the developer experience with features like syntax highlighting, compiler diagnostics, code completion and snippets, and many others.
Before we proceed, stop your Next.js development server for now and install the Winglang CLI by running the code snippet below in your terminal.
npm install -g winglang@latest
Run the following code snippet to ensure that the Winglang CLI is installed and working as expected:
wing --version
Next, navigate to the backend folder and create an empty Wing Typescript project. Ensure you select the empty template and Typescript as the language.
wing new

Copy the code snippet below into the backend/main.ts file.
import { cloud, inflight, lift, main } from "@wingcloud/framework";

main((root, test) => {
	const fn = new cloud.Function(
		root,
		"Function",
		inflight(async () => {
			return "hello, world";
		})
	);
});
The main() function serves as the entry point to Wing.
It creates a cloud function and executes at compile time. The inflight function, on the other hand, runs at runtime and returns a Hello, world! text.
Start the Wing development server by running the code snippet below. It automatically opens the Wing Console in your browser at http://localhost:3000.
wing it

You've successfully installed Wing on your computer.
From the previous sections, you've created the Next.js frontend app within the frontend folder and the Wing backend within the backend folder.
In this section, you'll learn how to communicate and send data back and forth between the Next.js app and the Winglang backend.
First, install the Winglang React library within the backend folder by running the code below:
npm install @winglibs/react
Next, update the main.ts file as shown below:
import { main, cloud, inflight, lift } from "@wingcloud/framework";
import React from "@winglibs/react";

main((root, test) => {
	const api = new cloud.Api(root, "api", { cors: true })
	;

	//👇🏻 create an API route
	api.get(
		"/test",
		inflight(async () => {
			return {
				status: 200,
				body: "Hello world",
			};
		})
	);

	//👉🏻 placeholder for the POST request endpoint

	//👇🏻 connects to the Next.js project
	const react = new React.App(root, "react", { projectPath: "../frontend" });
	//👇🏻 an environment variable
	react.addEnvironment("api_url", api.url);
});
The code snippet above creates an API endpoint (/test) that accepts GET requests and returns a Hello world text. The main function also connects to the Next.js project and adds the api_url as an environment variable.
The API URL contained in the environment variable enables us to send requests to the Wing API route. Now, how do we retrieve the API URL within the Next.js app and make these requests?
Update the RootLayout component within the Next.js app/layout.tsx file as done below:
export default function RootLayout({
	children,
}: Readonly<{
	children: React.ReactNode;
}>) {
	return (
		<html lang='en'>
			<head>
				{/** ---👇🏻  Adds this script tag 👇🏻 ---*/}
				<script src='./wing.js' defer />
			</head>
			<body className={inter.className}>{children}</body>
		</html>
	);
}
Re-build the Next.js project by running npm run build.
Finally, start the Wing development server. It automatically starts the Next.js server, which can be accessed at http://localhost:3001 in your browser.

You've successfully connected the Next.js to Wing. You can also access data within the environment variables using window.wingEnv.<attribute_name>.

In this section, you'll learn how to send requests to Wing, process these requests with LangChain and OpenAI, and display the results on the Next.js frontend.
First, let's update the Next.js app/page.tsx file to retrieve the API URL and send user's data to a Wing API endpoint.
To do this, extend the JavaScript window object by adding the following code snippet at the top of the page.tsx file.
"use client";
import { useState } from "react";
interface WingEnv {
	api_url: string;
}
declare global {
	interface Window {
		wingEnv: WingEnv;
	}
}
Next, update the handleUserQuery function to send a POST request containing the user's question and website's URL to a Wing API endpoint.
//👇🏻 sends data to the api url
const [response, setResponse] = useState<string | null>(null);

	const handleUserQuery = async (e: React.FormEvent) => {
		e.preventDefault();
		setDisable(true);
		try {
			const request = await fetch(`${window.wingEnv.api_url}/api`, {
				method: "POST",
				headers: {
					"Content-Type": "application/json",
				},
				body: JSON.stringify({ question, pageURL: documentationURL }),
			});
			const response = await request.text();
			setResponse(response);
			setDisable(false);
		} catch (err) {
			console.error(err);
			setDisable(false);
		}
	};
Before you create the Wing endpoint that accepts the POST request, install the following packages within the backend folder:
npm install @langchain/community @langchain/openai langchain cheerio
Cheerio enables us to scrape the software documentation webpage, while the LangChain packages allow us to access its various functionalities.
The LangChain OpenAI integration package uses the OpenAI language model; therefore, you'll need a valid API key. You can get yours from the OpenAI Developer's Platform.

Next, let’s create the /api endpoint that handle incoming requests.
The endpoint will:
First, import the following into the main.ts file:
import { main, cloud, inflight, lift } from "@wingcloud/framework";
import { ChatOpenAI, OpenAIEmbeddings } from "@langchain/openai";
import { ChatPromptTemplate } from "@langchain/core/prompts";
import { createStuffDocumentsChain } from "langchain/chains/combine_documents";
import { CheerioWebBaseLoader } from "@langchain/community/document_loaders/web/cheerio";
import { RecursiveCharacterTextSplitter } from "langchain/text_splitter";
import { MemoryVectorStore } from "langchain/vectorstores/memory";
import { createRetrievalChain } from "langchain/chains/retrieval";
import React from "@winglibs/react";
Add the code snippet below within the main() function to create the /api endpoint:
	api.post(
		"/api",
		inflight(async (ctx, request) => {
			//👇🏻 accept user inputs from Next.js
			const { question, pageURL } = JSON.parse(request.body!);

			//👇🏻 initialize OpenAI Chat for LLM interactions
			const chatModel = new ChatOpenAI({
				apiKey: "<YOUR_OPENAI_API_KEY>",
				model: "gpt-3.5-turbo-1106",
			});
			//👇🏻 initialize OpenAI Embeddings for Vector Store data transformation
			const embeddings = new OpenAIEmbeddings({
				apiKey: "<YOUR_OPENAI_API_KEY>",
			});

			//👇🏻 creates a text splitter function that splits the OpenAI result chunk size
			const splitter = new RecursiveCharacterTextSplitter({
				chunkSize: 200, //👉🏻 characters per chunk
				chunkOverlap: 20,
			});

			//👇🏻 creates a document loader, loads, and scraps the page
			const loader = new CheerioWebBaseLoader(pageURL);
			const docs = await loader.load();

			//👇🏻 splits the document into chunks
			const splitDocs = await splitter.splitDocuments(docs);

			//👇🏻 creates a Vector store containing the split documents
			const vectorStore = await MemoryVectorStore.fromDocuments(
				splitDocs,
				embeddings //👉🏻 transforms the data to the Vector Store format
			);

			//👇🏻 creates a document retriever that retrieves results that answers the user's questions
			const retriever = vectorStore.asRetriever({
				k: 1, //👉🏻  number of documents to retrieve (default is 2)
			});

			//👇🏻 creates a prompt template for the request
			const prompt = ChatPromptTemplate.fromTemplate(`
				Answer this question.
				Context: {context}
				Question: {input}
				`);

			//👇🏻 creates a chain containing the OpenAI chatModel and prompt
			const chain = await createStuffDocumentsChain({
				llm: chatModel,
				prompt: prompt,
			});

			//👇🏻 creates a retrieval chain that combines the documents and the retriever function
			const retrievalChain = await createRetrievalChain({
				combineDocsChain: chain,
				retriever,
			});

			//👇🏻 invokes the retrieval Chain and returns the user's answer
			const response = await retrievalChain.invoke({
				input: `${question}`,
			});

			if (response) {
				return {
					status: 200,
					body: response.answer,
				};
			}

			return undefined;
		})
	);
The API endpoint accepts the user’s question and the page URL from the Next.js application, initialises ChatOpenAI and OpenAIEmbeddings, loads the documentation page, and retrieves the answers to the user’s query in the form of documents.
Then, splits the documents into chunks, saves the chunks in the MemoryVectorStore, and enables us to fetch answers to the question using LangChain retrievers.
From the code snippet above, the OpenAI API key is entered directly into the code; this could lead to security breaches, making the API key accessible to attackers. To prevent this data leak, Winglang allows you to save private keys and credentials in variables called secrets.
When you create a secret, Wing saves this data in a .env file, ensuring it is secured and accessible.
Update the main() function to fetch the OpenAI API key from the Wing Secret.
main((root, test) => {
	const api = new cloud.Api(root, "api", { cors: true });
	//👇🏻 creates the secret variable
	const secret = new cloud.Secret(root, "OpenAPISecret", {
		name: "open-ai-key",
	});

	api.post(
		"/api",
		lift({ secret })
			.grant({ secret: ["value"] })
			.inflight(async (ctx, request) => {
				const apiKey = await ctx.secret.value();

				const chatModel = new ChatOpenAI({
					apiKey,
					model: "gpt-3.5-turbo-1106",
				});

				const embeddings = new OpenAIEmbeddings({
					apiKey,
				});

				//👉🏻 other code snippets & configurations
	);

	const react = new React.App(root, "react", { projectPath: "../frontend" });
	react.addEnvironment("api_url", api.url);
});
secret variable declares a name for the secret (OpenAI API key).lift().grant() grants the API endpoint access to the secret value stored in the Wing Secret.inflight() function accepts the context and request object as parameters, makes a request to LangChain, and returns the result.apiKey using the ctx.secret.value() function.Finally, save the OpenAI API key as a secret by running this command in your terminal.

Great, now our secrets are stored and we can interact with our application. Let's take a look at it in action!
Here is a brief demo:

Let's dig a little bit deeper into the Winglang docs to see what data our AI bot can extract.

So far, we have gone over the following:
Wing aims to bring back your creative flow and close the gap between imagination and creation. Another great advantage of Wing is that it is open-source. Therefore, if you are looking forward to building distributed systems that leverage cloud services or contribute to the future of cloud development, Wing is your best choice.
Feel free to contribute to the GitHub repository, and share your thoughts with the team and the large community of developrs.
The source code for this tutorial is available here.
Thank you for reading! 🎉
Winglang provides a solution for contributing to its Winglibs project. This is the way to go if you only need to wrap a particular cloud resource on one or more platforms. Just follow the guidelines. However, while developing the initial version of the Endor middleware framework, I had different needs.
First, the Endor library is in a very initial exploratory phase—far from a maturity level to be considered a contribution candidate for publishing in the public NPM Registry.
Second, it includes several supplementary and still immature tool libraries, such as Exceptions and Logging. These tools need to be published separately (see explanation below). Therefore, I needed a solution for managing multiple NPM Packages in one project.
Third, I wanted to explore how prospective Winglang customers will be able to manage their internal libraries.
For that goal, I decided to experiment with the AWS CodeArtifact service configured to play the role of my internal NPM Registry.
This publication is an experience report about the first phase, primarily focused on the developer’s experience with my Multi-Account, Multi-Platform, Multi-User (MAPU) environment, which I reported about here, here, and here. Specifically, I configured the AWS CodeArtifact Domain and Repository within my working account and postponed a more elaborate enterprise-grade system architecture to later stages. Let’s start with the overall solution overview.
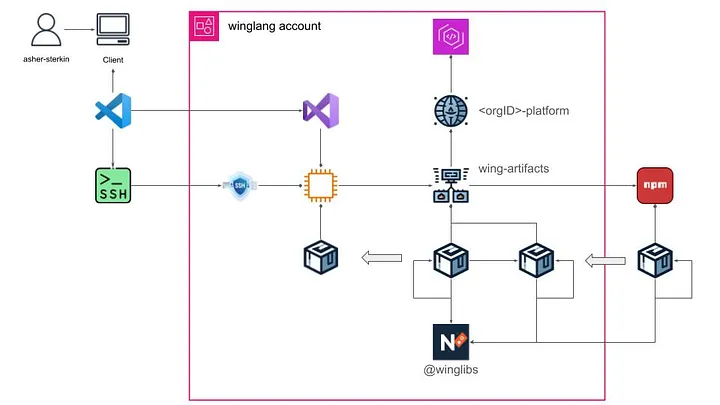
Here is a brief description of the solution:
winglang account, I created an AWS CodeArtifact Domain tentatively named <organizationID>-platform.winglang-artifacts.@winglibs NPM Namespace. At the moment, this is a requirement determined by how the Winglang import system works.I found this arrangement suitable for a solo developer and researcher. A real organization, even of a middle size, will require some substantial adjustments — subject to further investigation.
Let’s now look at some technical implementation details.
Using Cloud Formation templates is always my preferred option. In this case, I created two simple Cloud Formation templates. One for creating an AWS CodeArtifact Domain resource:
{
    "AWSTemplateFormatVersion": "2010-09-09",
    "Description": "Template to create a CodeArtifact Domain; to be a part of platform template",
    "Resources": {
        "ArtifactDomain": {
            "Type" : "AWS::CodeArtifact::Domain",
            "Properties" : {
                "DomainName" : "o-4e7dgfcrpx-platform"
            }
        }
    }
}
And another - for creating an AWS CodeArtifact Repository resource:
{
    "AWSTemplateFormatVersion": "2010-09-09",
    "Description": "Template to create a CodeArtifact repository; to be a part of account template",
    "Resources": {
        "ArtifactRespository": {
            "Type" : "AWS::CodeArtifact::Repository",
            "Properties" : {
                "Description" : "artifact repository for this <winglang> account",
                "DomainName" : "o-4e7dgfcrpx-platform",
                "RepositoryName": "winglang-artifacts",
                "ExternalConnections" : [ "public:npmjs" ]
              }
          }
    }
}
These templates are mere placeholders for future, more serious, development.
The same could be achieved with Winglang, as follows:
https://gist.github.com/eladb/5e1ddd1bd90c53d90b2195d080397381
Many thanks to Elad Ben-Israel for bringing this option to my attention. Currently, the whole MAPU system is implemented in Python and CloudFormation. Re-implementing it completely in Winglang would be a fascinating case study.
I followed the official guidelines and created the following Bash script:
export CODEARTIFACT_AUTH_TOKEN=$(\
	aws codeartifact get-authorization-token \
	--domain o-4e7dgfcrpx-platform \
	--domain-owner 851725645964 \
	--query authorizationToken \
	--output text)
export REPOSITORY_ENDPOINT=$(\
	aws codeartifact get-repository-endpoint \
	--domain o-4e7dgfcrpx-platform \
	--domain-owner 851725645964 \
	--repository winglang-artifacts \
	--format npm \
	--query repositoryEndpoint \
	--output text)
export REGISTRY=$(echo "$REPOSITORY_ENDPOINT" | sed 's|https:||')
npm config set registry=$REPOSITORY_ENDPOINT
npm config set $REGISTRY:_authToken=$CODEARTIFACT_AUTH_TOKEN
Here is a brief description of the script’s logic:
config command to set the endpoint.config command to set up session authentication.Placing this script in the [/etc/profile.d](https://www.linuxfromscratch.org/blfs/view/11.0/postlfs/profile.html) ensures that it will be automatically executed at every user login thus making the whole communication with AWS CodeArtifact instead of the official [npmjs](https://docs.npmjs.com/cli/v8/using-npm/registry) repository completely transparent for the end user.
Implementing this operation while addressing my specific needs required a more sophisticated logic reflected in the following script:
#!/bin/bash
set -euo pipefail

# Function to clean up tarball and extracted package
cleanup() {
    rm *.tgz
    rm -fR package
}

# Function to calculate the checksum of a package tarball
calculate_checksum() {
    local tarball=$(ls *.tgz | head -n 1)
    tar -xzf "$tarball"
    cd package || exit 1
    local checksum=$(\
	    tar \
	    --exclude='$lib' \
	    --sort=name \
	    --mtime='UTC 1970-01-01' \
	    --owner=0 \
	    --group=0 \
	    --numeric-owner -cf - . | sha256sum | awk '{print $1}')
    cd ..
    cleanup
    echo "$checksum"
}

get_version() {
    PACKAGE_VERSION=$(jq -r '.version' package.json)
}

publish() {
    echo "Publishing new version: $PACKAGE_VERSION"
    npm publish --access public --tag latest *.tgz
    cleanup
    exit 0
}

# Step 1: Read the package version from package.json
get_version
PACKAGE_NAME=$(jq -r '.name' package.json)

# Step 2: Check the latest version in the npm registry
LATEST_VERSION=$(npm show "$PACKAGE_NAME" version 2>/dev/null || echo "")

# Step 3: Prepare wing package
wing pack

# Step 4: If the versions are not equal, publish the new version
if [[ "$PACKAGE_VERSION" != "$LATEST_VERSION" ]]; then
    publish
else
    CURRENT_CHECKSUM=$(calculate_checksum)
    # Download the latest package tarball
    npm pack "$PACKAGE_NAME@$LATEST_VERSION" > /dev/null 2>&1
    LATEST_CHECKSUM=$(calculate_checksum)
    # Step 5: Compare the checksums
    if [[ "$CURRENT_CHECKSUM" == "$LATEST_CHECKSUM" ]]; then
        echo "No changes detected. Checksum matches the latest published version."
        exit 0
    else
        echo $CURRENT_CHECKSUM
        echo $LATEST_CHECKSUM
        echo "Checksums do not match. Bumping patch version..."
        npm version patch
        wing pack
        get_version
        publish
    fi
fi
Here is a brief explanation of what happens in this script:
[jq](https://jqlang.github.io/jq/) command, extract the package name and version from the package.json file.[npm show](https://docs.npmjs.com/cli/v10/commands/npm-view) command, extract the package version number from the registry.[wing pack](https://www.winglang.io/docs/libraries) command, prepare the package .tgz file.[npm publish](https://docs.npmjs.com/cli/v10/commands/npm-publish) command.[npm version patch](https://docs.npmjs.com/cli/v10/commands/npm-version) command, automatically bump up the [patch](https://symver.org/) version number, rebuild the .tgz file, and publish the new version.Reliable checksum validation was the most challenging part of developing this script. The wing pack command creates a special @lib folder within the resulting .tgz archive. This folder introduces some randomness and can be affected by several factors, including Winglang compiler upgrades. Additionally, the .tgz file checksum calculation is sensitive to the order and timestamps of individual files. As a result, comparing the results of direct checksum calculation for the current and published packages was not an option.
To overcome these limitations, new archives are created with the @lib folder excluded and file order and timestamps normalized. The assistance of the ChatGPT 4o tool proved instrumental, especially in addressing this challenge.
In the current implementation, I keep this script in my home directory and invoke it from a common [Build.mk](http://Build.mk) Makefile used for all libraries (this might change in the future):
.PHONY: all compile-deps build-ts prepare test publish

all: publish

update-deps:
	npm install && npm update

compile-ts: update-deps
ifneq ($(wildcard tsconfig.json),)
	@echo "tsconfig.json found, running tsc..."
	tsc
else
	@echo "tsconfig.json not found, skipping TypeScript compilation."
endif

test: compile-ts
	wing test -t sim ./test/*.test.w

publish: test
	~/publish-npm.sh
To explain why I chose this particular way of publishing logic, I need to explain my overall project structure, illustrated in the diagram below:
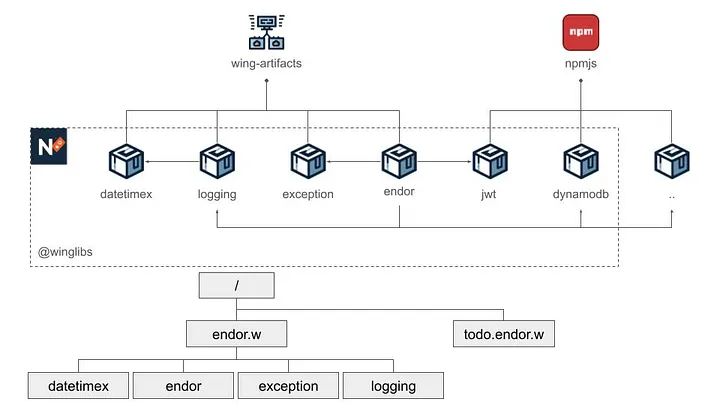
The top of the diagram above reflects the NMP packages involved and their dependencies are depicted at the top, while the bottom part reflects my project folder structure.
The endor package is the ultimate goal of this development activity: an exploratory middleware framework for the Winglang programming language. Its efficacy is validated by a separate todo.endor.w application. Initially, both modules were kept together. However, keeping pure application parts separate from the infrastructure became progressively challenging.
The endor package uses three auxiliary packages logging , exception, and datetimex. These three packages are potential candidates to be contributed to the Winglibs project. However, they are still under active experimentation and development and are kept within the same Github repository.
Additionally, the endor package depends on other packages published on the public [npmjs](https://docs.npmjs.com/cli/v8/using-npm/registry) registry. Some of these packages, such as dynamodb and jwt belong to the same @winglibs namespace, while others do not.
I face a mixed-case challenge: the system already has a modular structure, but all components are under intensive development, requiring instant propagation of changes. As a solo developer and researcher, I still do not need more sophisticated CI/CD solutions, but rather employ a master Makefile to pull everything together:
.PHONY: all \
			  update_npm \
			  update_wing \
			  update_tsc \
			  make_datetimex \
			  make_exception \
			  make_logging \
			  make_endor

all:  update_wing make_endor

update_npm:
	sudo npm update -g npm

update_tsc: update_npm
	sudo npm update -g tsc

update_wing: update_tsc
	sudo npm update -g winglang

make_datetimex:
	$(MAKE) -C ./datetimex -f ../Build.mk

make_logging: make_datetimex
	$(MAKE) -C ./logging -f ../Build.mk

make_exception:
	$(MAKE) -C ./exception -f ../Build.mk

make_endor: make_exception make_logging
	$(MAKE) -C ./endor -f ../Build.mk
The todo.endor.w Makefile looks like this:
.PHONY: all update_wing install_endor test_local

cloud ?= aws
target := target/main.tf$(cloud)

update_npm:
	sudo npm update -g npm

update_wing: update_npm
	sudo npm update -g winglang

install_endor:
	npm install && npm update

build_ts:
	tsc

test_local: update_wing install_endor build_ts test_app

test_app:
	wing test -t sim ./test/*.w

test_remote:
	wing test -t tf-$(cloud) ./test/service.test.w

run_local:
	wing run -t sim ./dev.main.w

compile:
	wing compile ./main.w -t tf-$(cloud)

tf-init: compile
	( \
		cd $(target) ;\
		terraform init \
	)

deploy: tf-init
	( \
		cd $(target) ;\
		terraform apply -auto-approve \
	)

destroy:
	( \
		cd $(target) ;\
		terraform destroy -auto-approve \
	)
This arrangement allows me to keep modules isolated, make changes in several places where appropriate, and perform fully automated build and verification without needing manual version updates within multiple package.json files.
Specifying cross-package dependencies is another point to pay attention to. Here is the endor package specification:
{
  "name": "@winglibs/endor",
  "description": "Wing middleware framework library",
  "repository": {
    "type": "git",
    "url": "https://github.com/asterkin/endor.w.git",
    "directory": "endor"
  },
  "version": "0.0.19",
  "author": {
    "email": "asher.sterkin@gmail.com",
    "name": "Asher Sterkin"
  },
  "license": "MIT",
  "peerDependencies": {
    "@authenio/samlify-node-xmllint": "2.x.x",
    "@winglibs/dynamodb": "0.x.x",
    "@winglibs/jwt": "0.x.x",
    "qs": "6.x.x",
    "samlify": "2.x.x",
    "ws": "8.x.x",
    "inflection": "3.x.x",
    "@winglibs/exception": "0.x.x",
    "@winglibs/logging": "0.x.x"
  }
}
Notice that, unlike traditional formats, all dependencies are specified using the x placeholder without the leading ^ symbol. This is because, with the ^ prefix included, the most up-to-date versions are brought in only for the final todo.endor.w application, whereas I needed them to be used in the dependent modules' unit tests. Using the x placeholder instead does the job.
In summary, while not final, the described solution provides good enough treatment for all essential requirements at the current stage of the system evolution. As the system grows, adequate adjustments will be implemented and reported. Stay tuned.
Throughout the preparation of this publication, I utilized several key tools to enhance the draft and ensure its quality.
The initial draft was crafted with the organizational capabilities of Notion's free subscription, facilitating the structuring and development of ideas.
For grammar and spelling review, the free version of Grammarly proved useful for identifying and correcting basic errors, ensuring the readability of the text.
The enhancement of stylistic expression and the narrative coherence checks were performed using the paid version of ChatGPT 4o. The ChatGPT 4o tool was also used for developing the package publishing script and creation of NMP elements icons.
While these advanced tools and resources significantly contributed to the preparation process, the concepts, solutions, and final decisions presented in this article are entirely my own, for which I bear full responsibility.
By the end of this article, you will build and deploy a ChatGPT Client using Wing and Next.js.
This application can run locally (in a local cloud simulator) or deploy it to your own cloud provider.

Building a ChatGPT client and deploying it to your own cloud infrastructure is a good way to ensure control over your data.
Deploying LLMs to your own cloud infrastructure provides you with both privacy and security for your project.
Sometimes, you may have concerns about your data being stored or processed on remote servers when using proprietary LLM platforms like OpenAI’s ChatGPT, either due to the sensitivity of the data being fed into the platform or for other privacy reasons.
In this case, self-hosting an LLM to your cloud infrastructure or running it locally on your machine gives you greater control over the privacy and security of your data.
Wing is a cloud-oriented programming language that lets you build and deploy cloud-based applications without worrying about the underlying infrastructure. It simplifies the way you build on the cloud by allowing you to define and manage your cloud infrastructure and your application code within the same language. Wing is cloud agnostic - applications built with it can be compiled and deployed to various cloud platforms.
To follow along, you need to:
To get started, you need to install Wing on your machine. Run the following command:
npm install -g winglang
Confirm the installation by checking the version:
wing --version
mkdir assistant
cd assistant
npx create-next-app@latest frontend
mkdir backend && cd backend
wing new empty
We have successfully created our Wing and Next.js projects inside the assistant directory. The name of our ChatGPT Client is Assistant. Sounds cool, right?
The frontend and backend directories contain our Next and Wing apps, respectively. wing new empty creates three files: package.json, package-lock.json, and main.w. The latter is the app’s entry point.
The Wing simulator allows you to run your code, write unit tests, and debug your code inside your local machine without needing to deploy to an actual cloud provider, helping you iterate faster.
Use the following command to run your Wing app locally:
wing it
Your Wing app will run on localhost:3000.
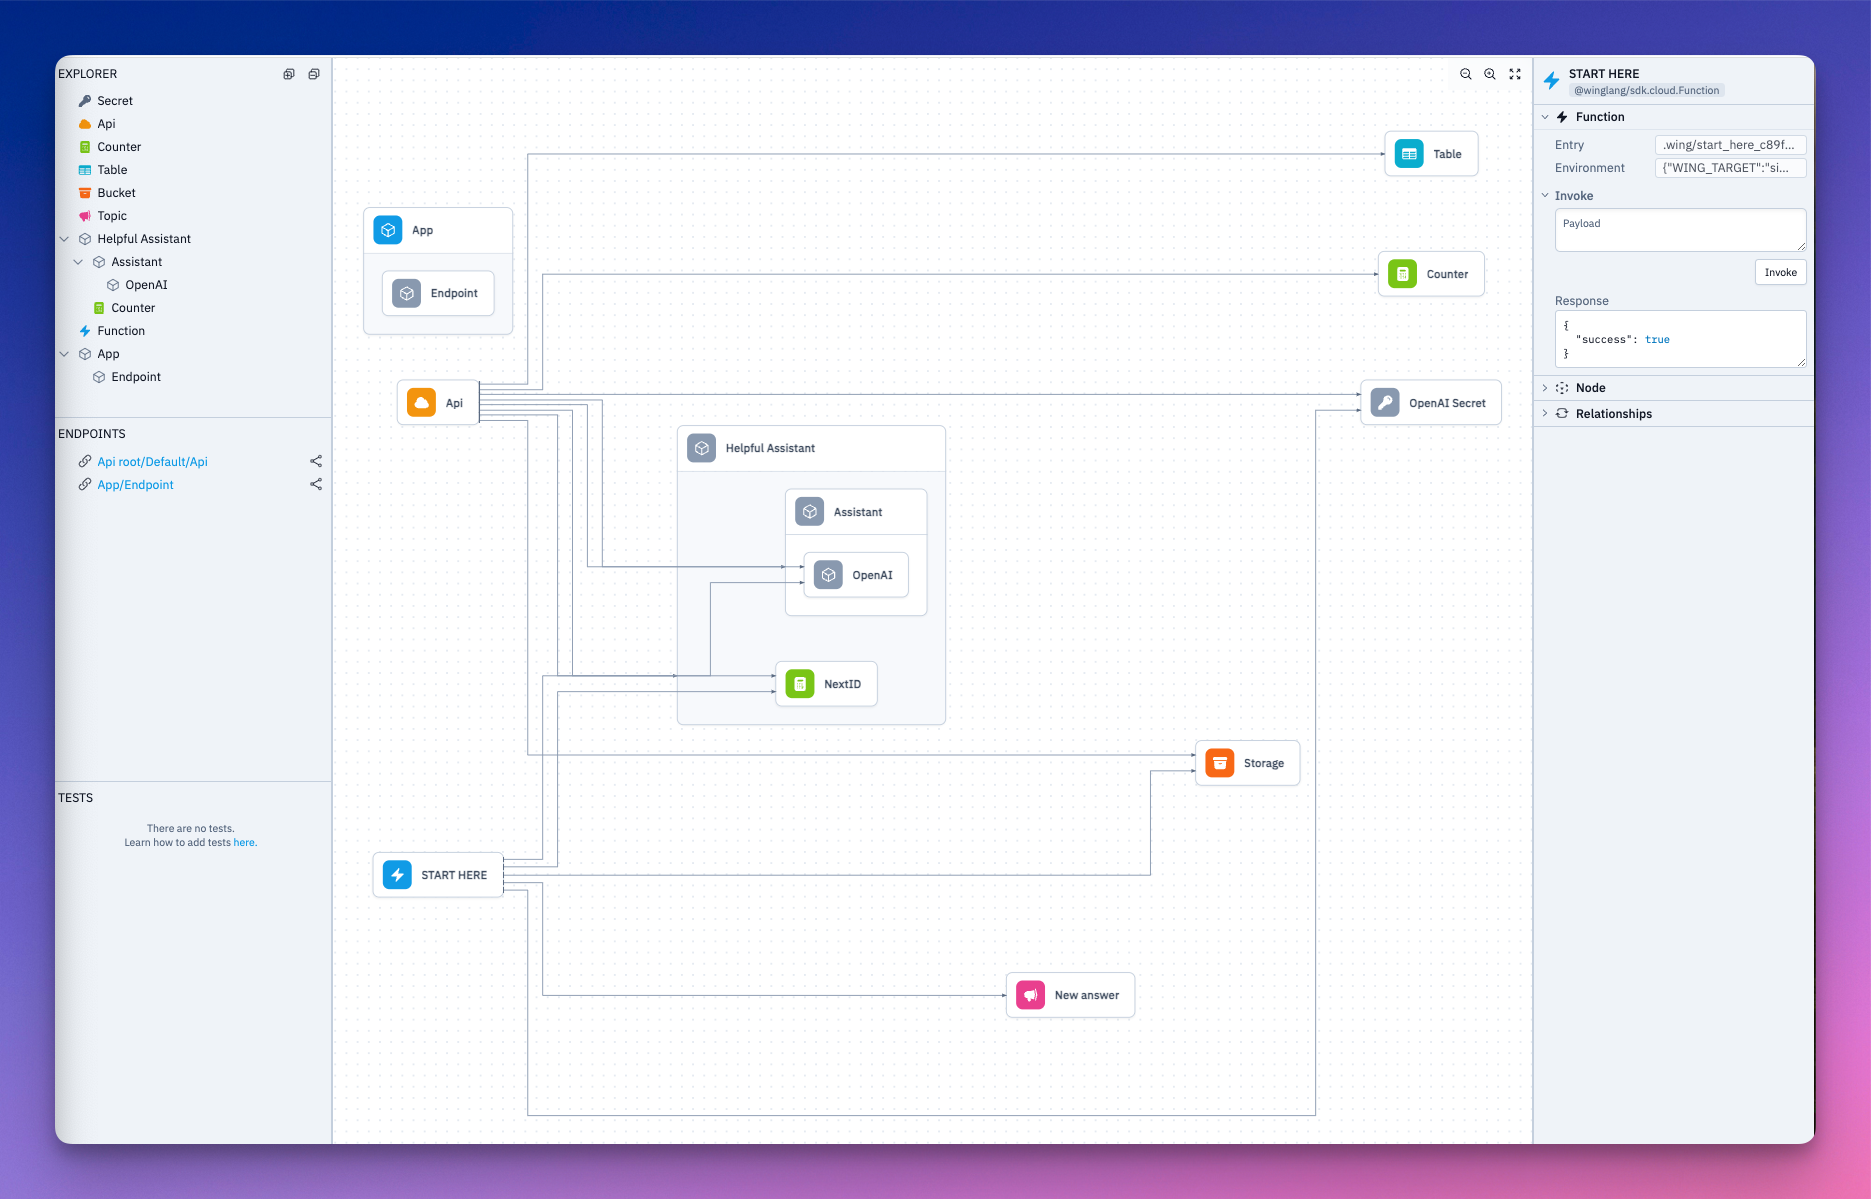
npm i @winglibs/openai @winglibs/react
main.w file. Let's also import all the other libraries we’ll need.bring openai
bring react
bring cloud
bring ex
bring http
bring is the import statement in Wing. Think of it this way, Wing uses bring to achieve the same functionality as import in JavaScript.
cloud is Wing’s Cloud library. It exposes a standard interface for Cloud API, Bucket, Counter, Domain, Endpoint, Function and many more cloud resources. ex is a standard library for interfacing with Tables and cloud Redis database, and http is for calling different HTTP methods - sending and retrieving information from remote resources.
We will use gpt-4-turbo for our app but you can use any OpenAI model.
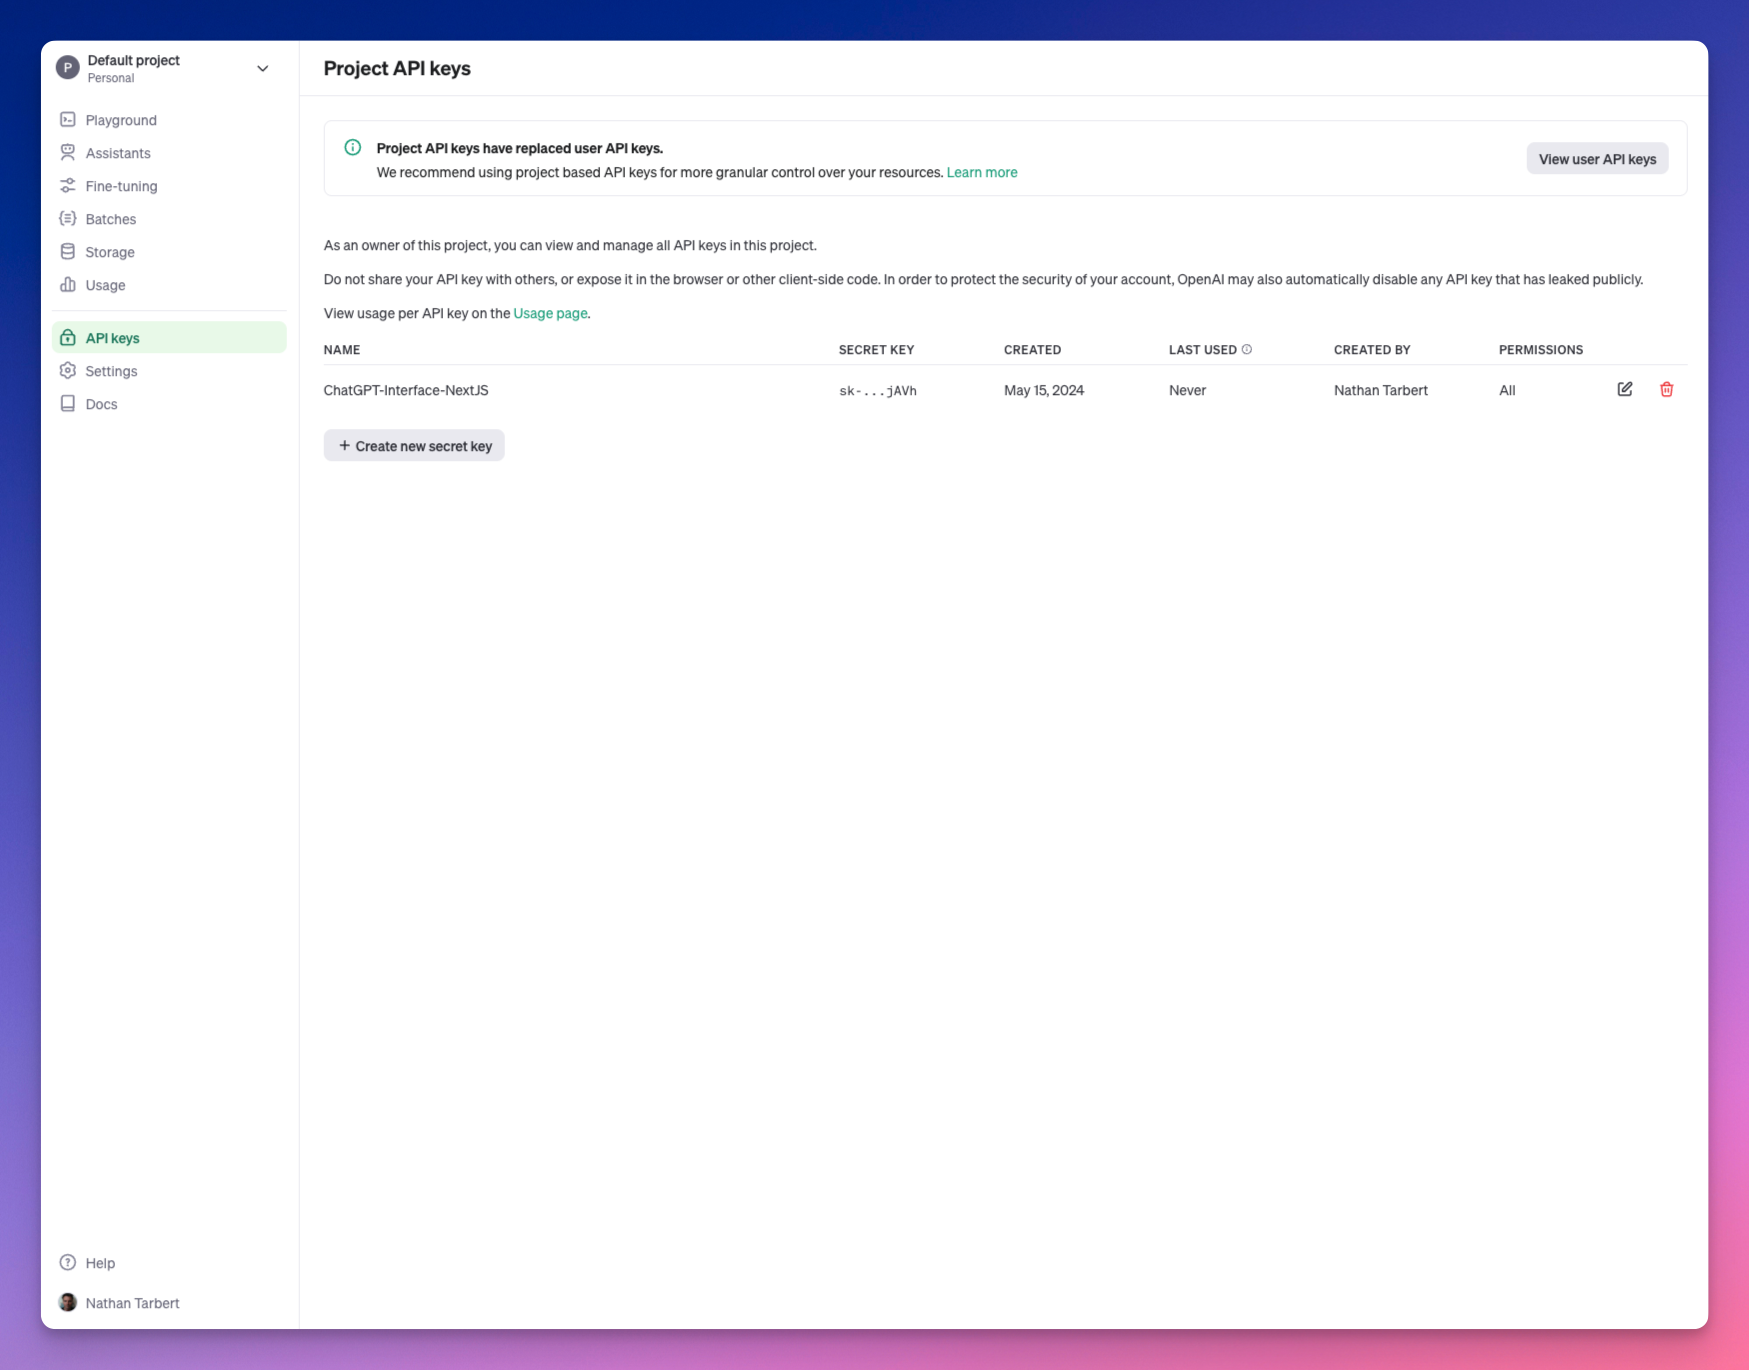
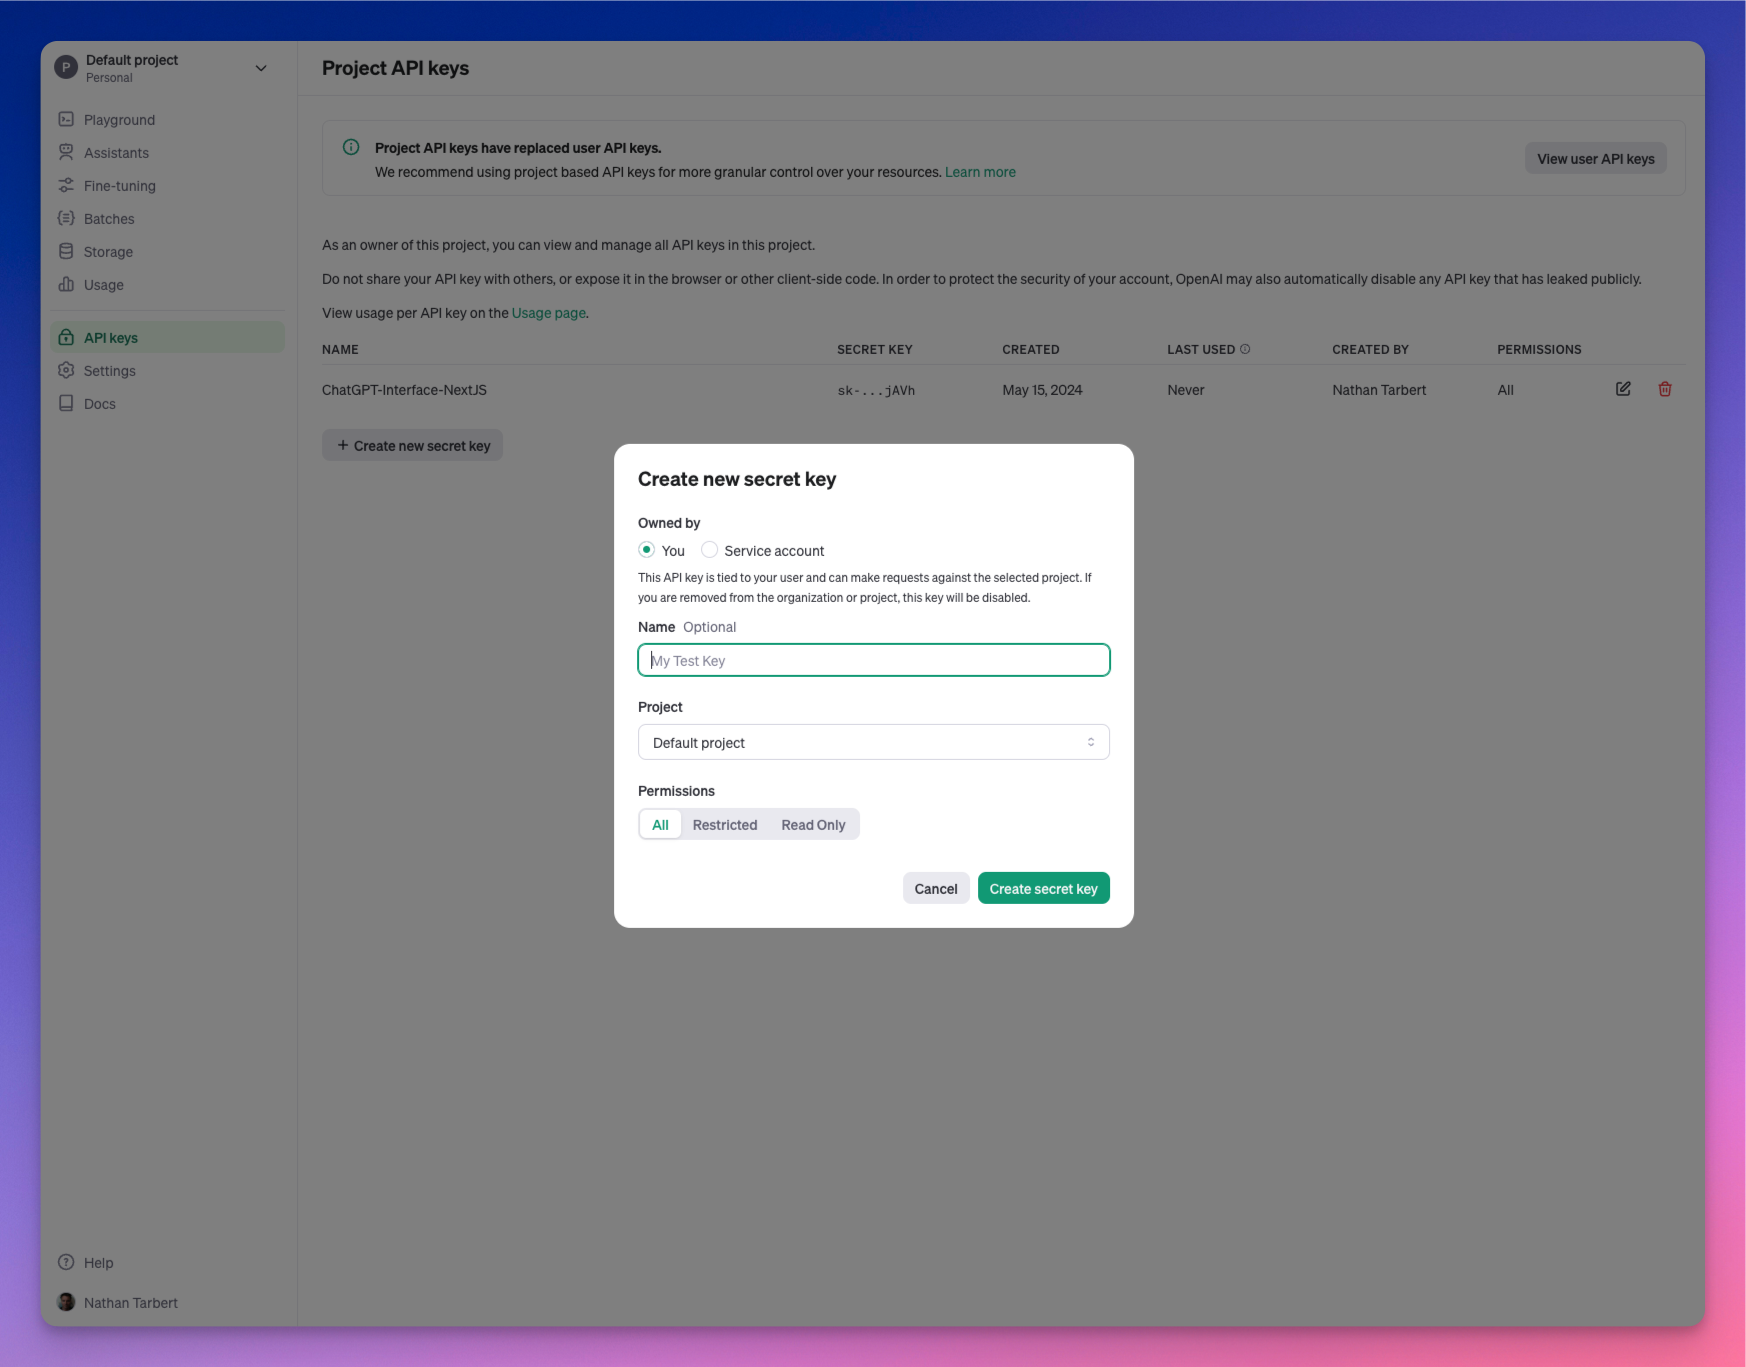
Create a Class to initialize your OpenAI API. We want this to be reusable.
We will add a personality to our Assistant class so that we can dictate the personality of our AI assistant when passing a prompt to it.
let apiKeySecret = new cloud.Secret(name: "OAIAPIKey") as "OpenAI Secret";

class Assistant {
    personality: str;
    openai: openai.OpenAI;

    new(personality: str) {
        this.openai = new openai.OpenAI(apiKeySecret: apiKeySecret);
        this.personality = personality;
    }

    pub inflight ask(question: str): str {
        let prompt = `you are an assistant with the following personality: ${this.personality}. ${question}`;
        let response = this.openai.createCompletion(prompt, model: "gpt-4-turbo");
        return response.trim();
    }
}
Wing unifies infrastructure definition and application logic using the preflight and inflight concepts respectively.
Preflight code (typically infrastructure definitions) runs once at compile time, while inflight code will run at runtime to implement your app’s behavior.
Cloud storage buckets, queues, and API endpoints are some examples of preflight. You don’t need to add the preflight keyword when defining a preflight, Wing knows this by default. But for an inflight block, you need to add the word “inflight” to it.
We have an inflight block in the code above. Inflight blocks are where you write asynchronous runtime code that can directly interact with resources through their inflight APIs.
Let's walk through how we will secure our API keys because we definitely want to take security into account.
Let's create a .env file in our backend’s root and pass in our API Key:
OAIAPIKey = Your_OpenAI_API_key
We can test our OpenAI API keys locally referencing our .env file, and then since we are planning to deploy to AWS, we will walk through setting up the AWS Secrets Manager.
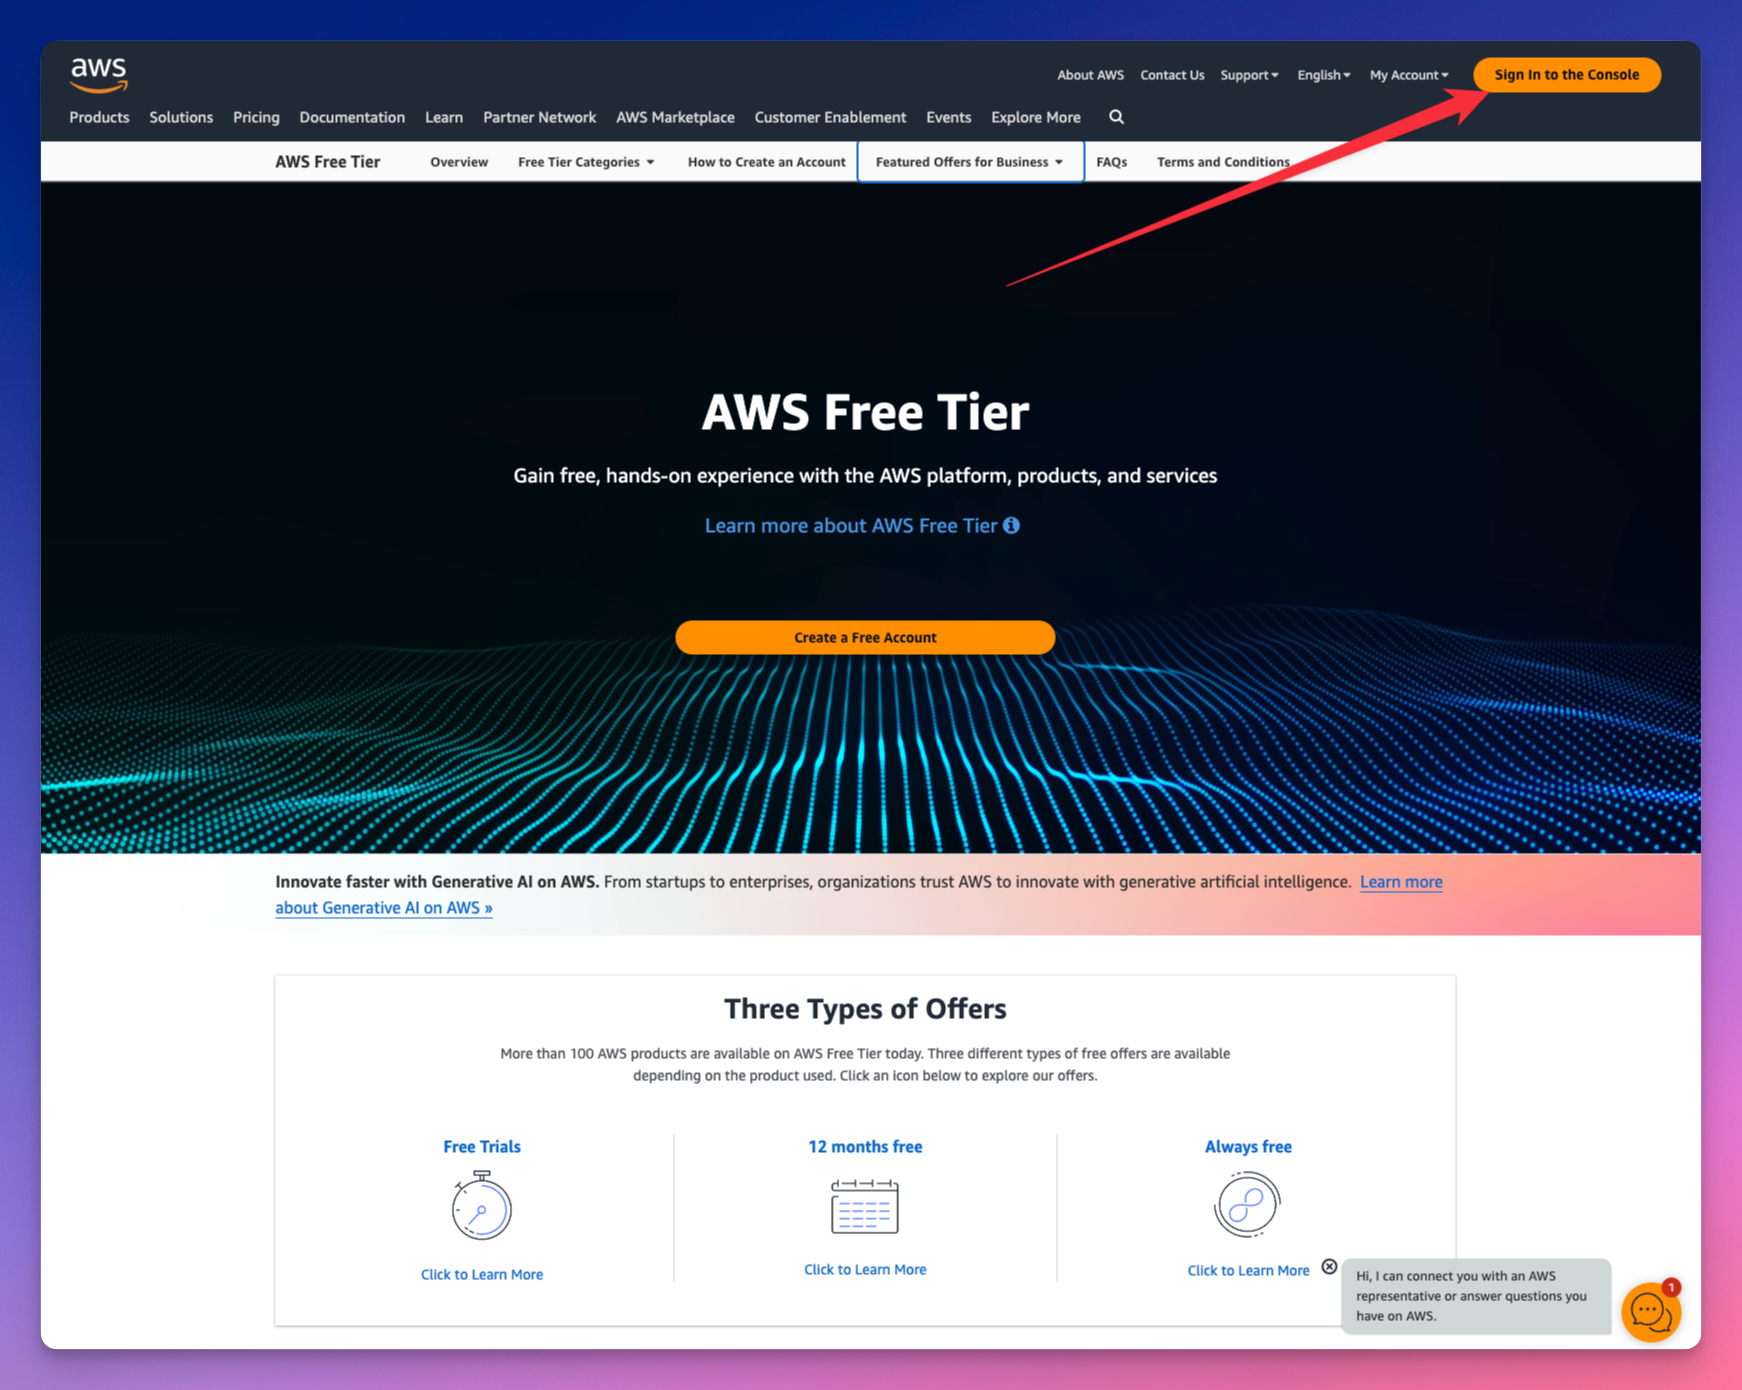
First, let's head over to AWS and sign into the Console. If you don't have an account, you can create one for free.
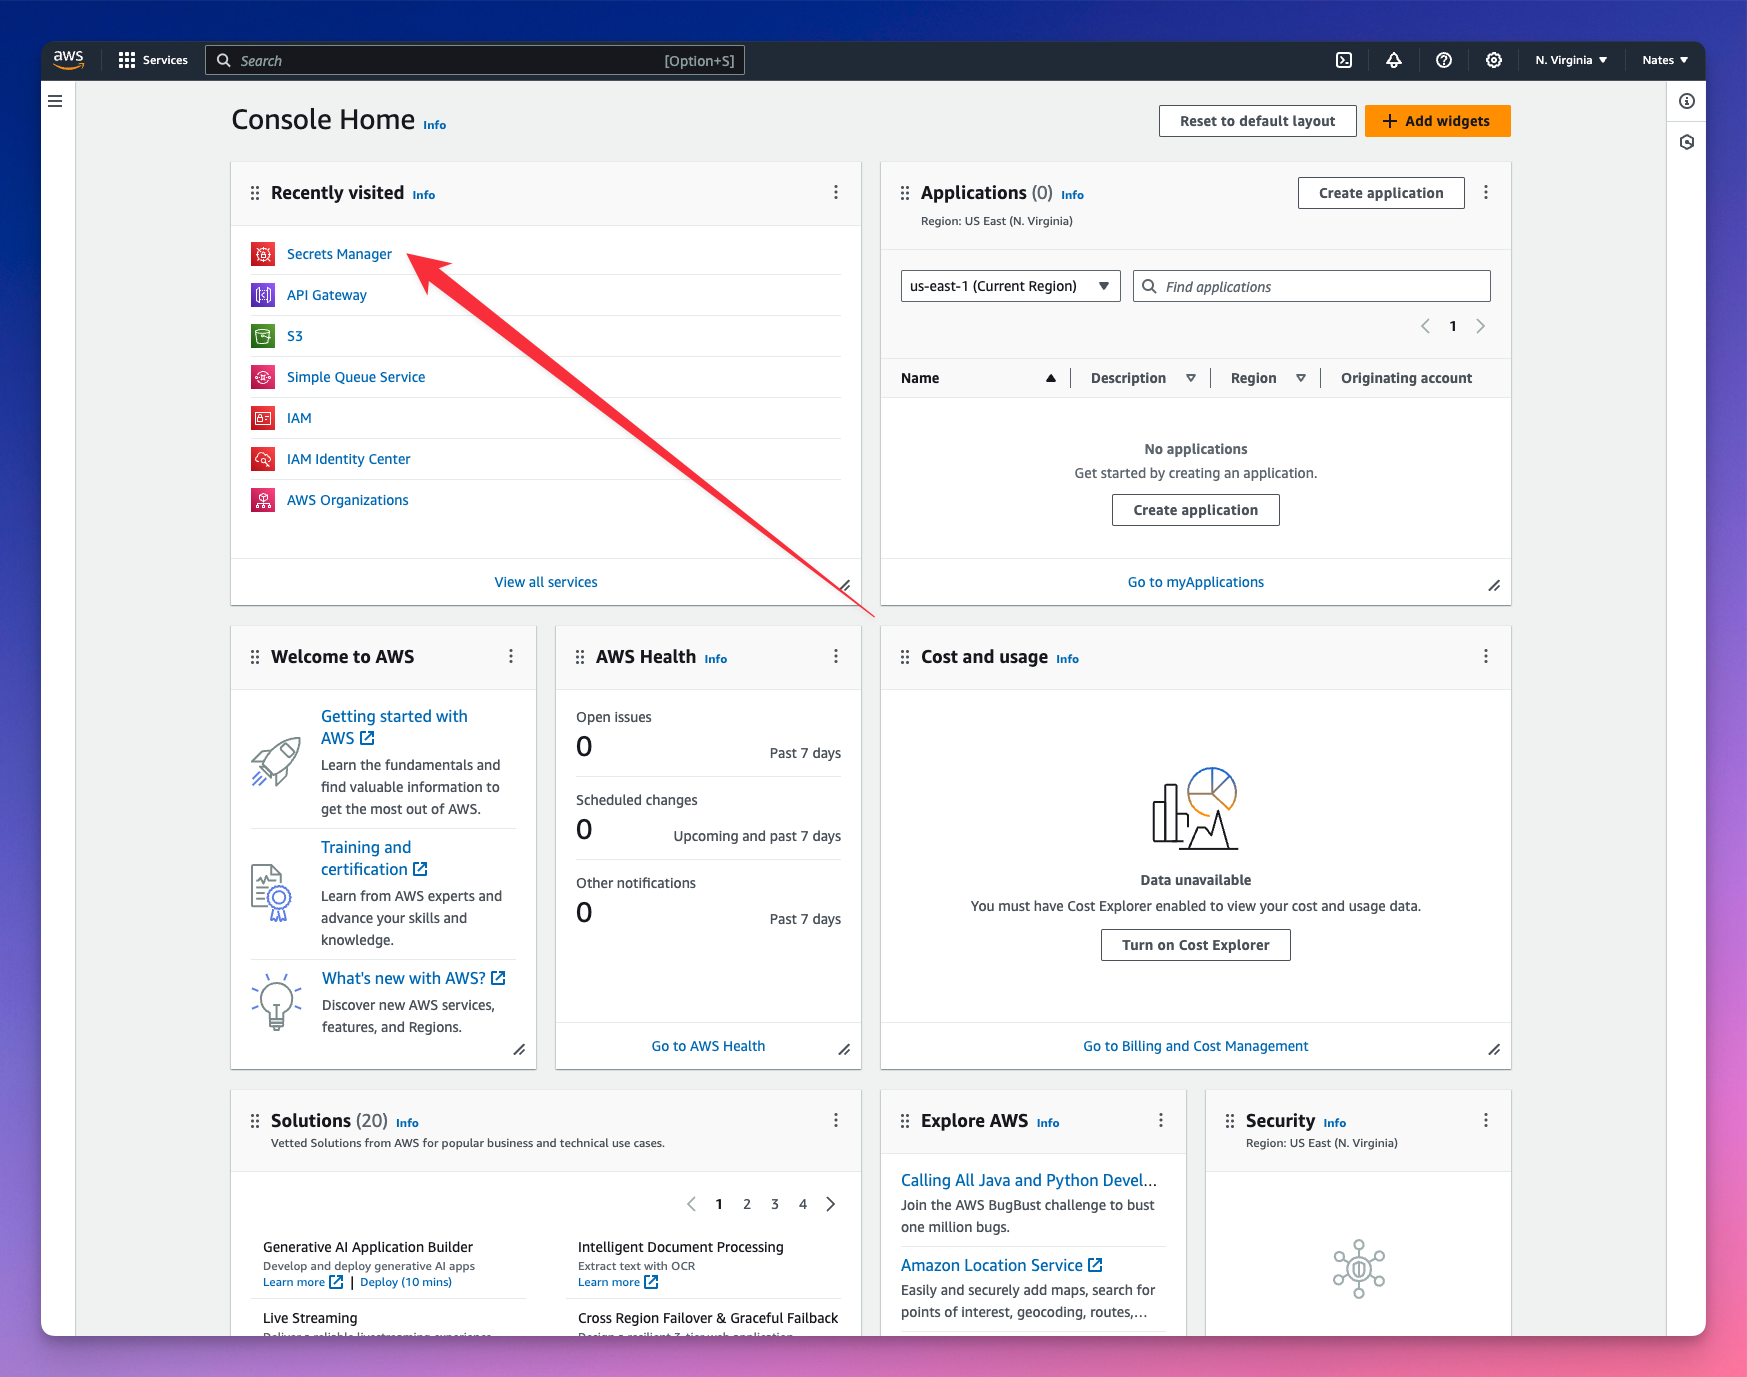
Navigate to the Secrets Manager and let's store our API key values.
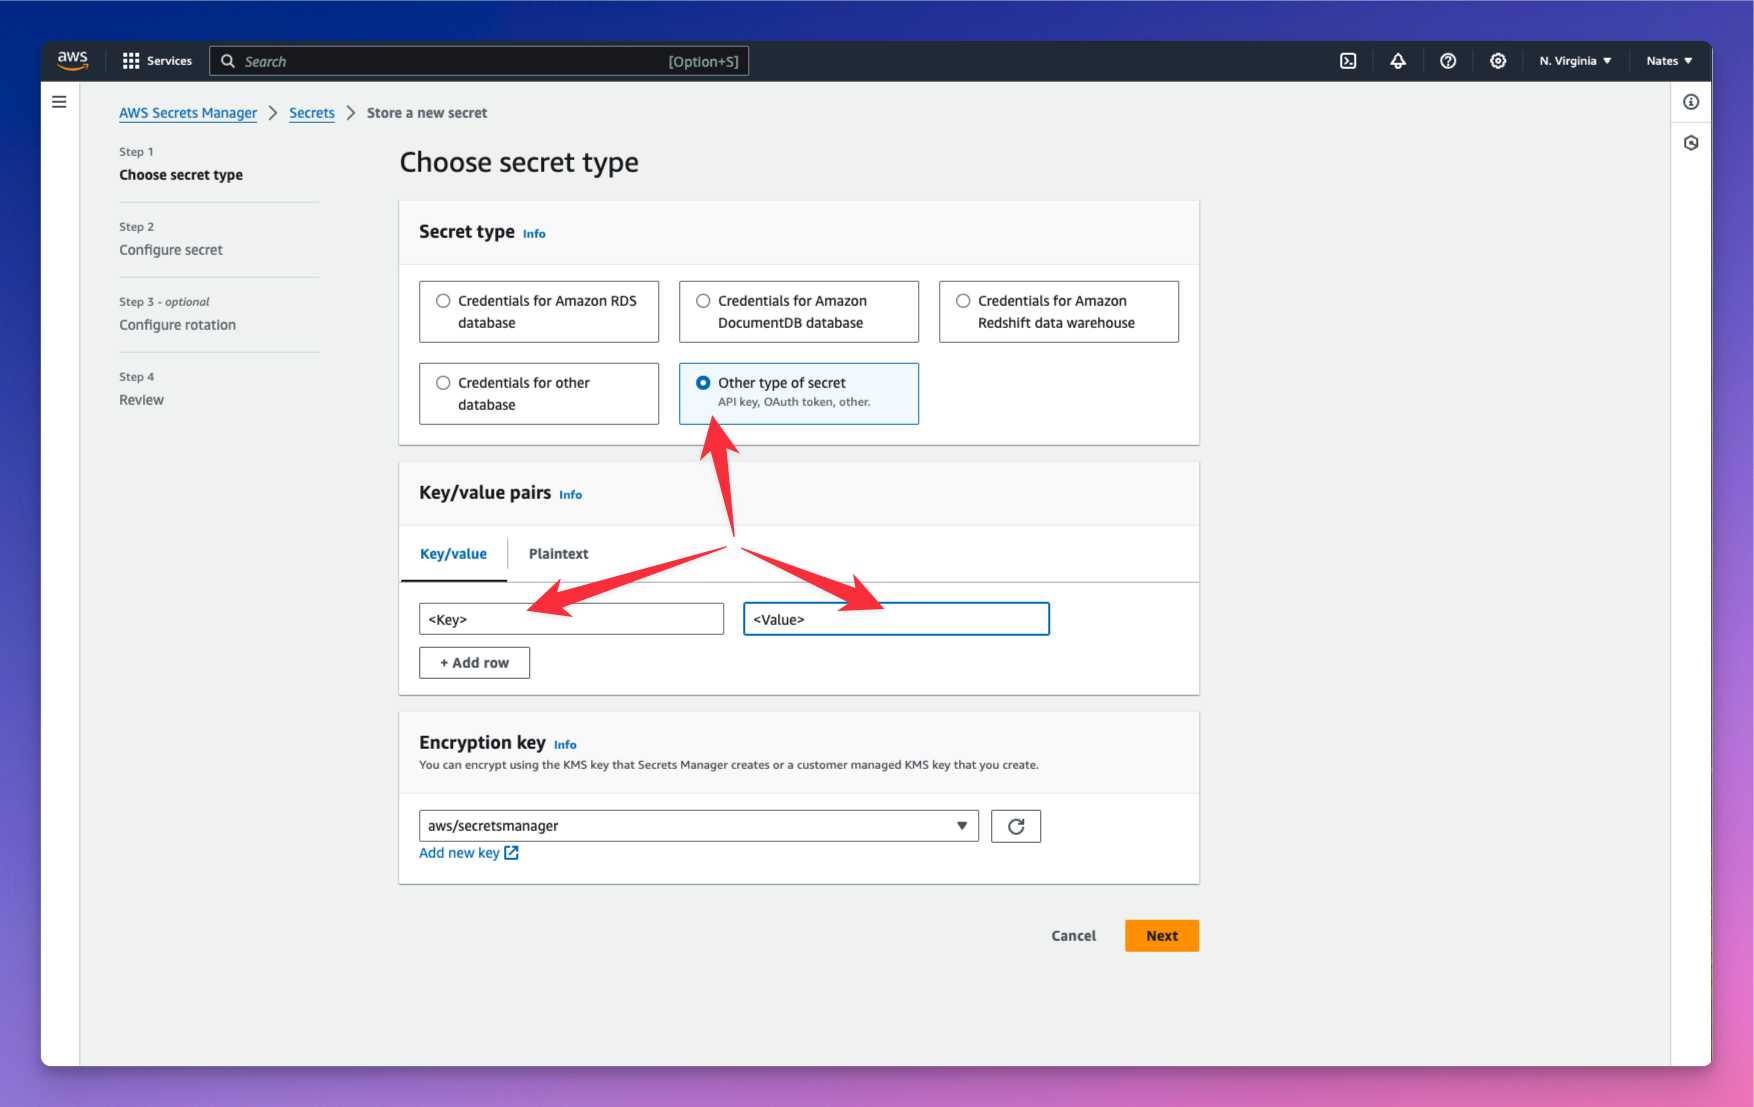
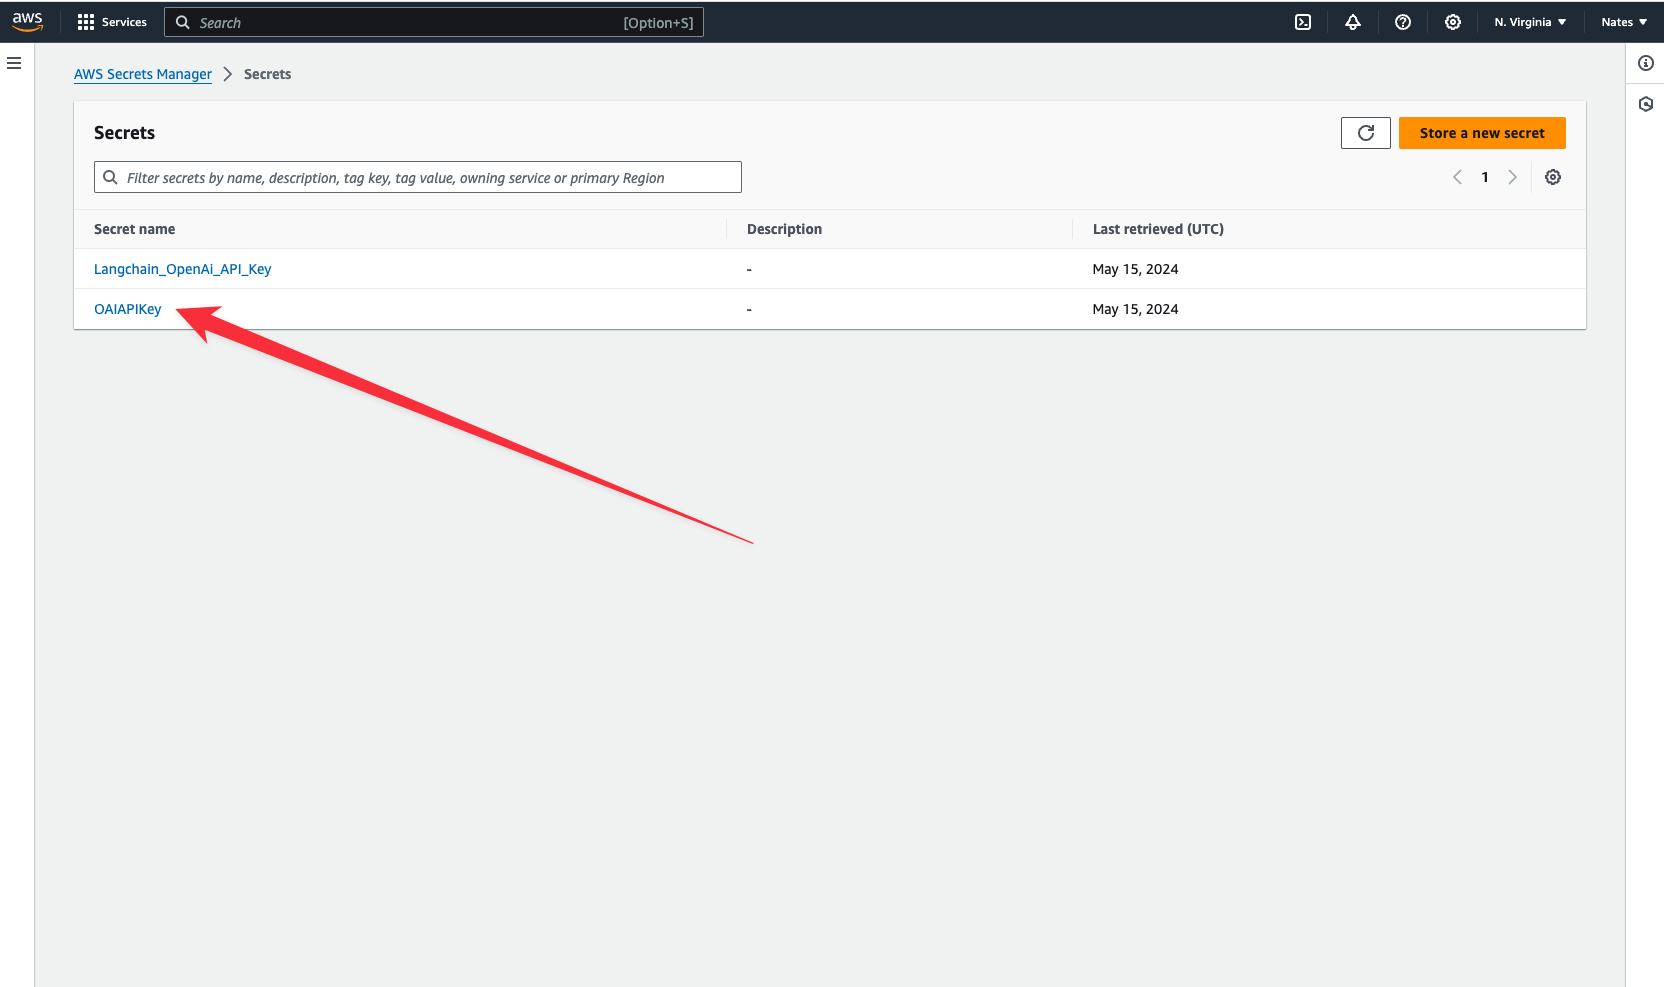
We have stored our API key in a cloud secret named OAIAPIKey. Copy your key and we will jump over to the terminal and connect to our secret that is now stored in the AWS Platform.
wing secrets
Now paste in your API Key as the value in the terminal. Your keys are now properly stored and we can start interacting with our app.
Storing your AI's responses in the cloud gives you control over your data. It resides on your own infrastructure, unlike proprietary platforms like ChatGPT, where your data lives on third-party servers that you don’t have control over. You can also retrieve these responses whenever you need them.
Let’s create another class that uses the Assistant class to pass in our AI’s personality and prompt. We would also store each model’s responses as txt files in a cloud bucket.
let counter = new cloud.Counter();

class RespondToQuestions {
    id: cloud.Counter;
    gpt: Assistant;
    store: cloud.Bucket;

    new(store: cloud.Bucket) {
        this.gpt = new Assistant("Respondent");
        this.id = new cloud.Counter() as "NextID";
        this.store = store;
    }

    pub inflight sendPrompt(question: str): str {
        let reply = this.gpt.ask("{question}");
        let n = this.id.inc();
        this.store.put("message-{n}.original.txt", reply);
        return reply;
    }
}
We gave our Assistant the personality “Respondent.” We want it to respond to questions. You could also let the user on the frontend dictate this personality when sending in their prompts.
Every time it generates a response, the counter increments, and the value of the counter is passed into the n variable used to store the model’s responses in the cloud. However, what we really want is to create a database to store both the user prompts coming from the frontend and our model’s responses.
Let's define our database.
Wing has ex.Table built-in - a NoSQL database to store and query data.
let db = new ex.Table({
    name: "assistant",
    primaryKey: "id",
    columns: {
        question: ex.ColumnType.STRING,
        answer: ex.ColumnType.STRING
    }
});
We added two columns in our database definition - the first to store user prompts and the second to store the model’s responses.
We want to be able to send and receive data in our backend. Let’s create POST and GET routes.
let api = new cloud.Api({ cors: true });

api.post("/assistant", inflight((request) => {
    // POST request logic goes here
}));

api.get("/assistant", inflight(() => {
    // GET request logic goes here
}));
let myAssistant = new RespondToQuestions(store) as "Helpful Assistant";

api.post("/assistant", inflight((request) => {
    let prompt = request.body;
    let response = myAssistant.sendPrompt(JSON.stringify(prompt));
    let id = counter.inc();

    // Insert prompt and response in the database
    db.insert(id, { question: prompt, answer: response });

    return cloud.ApiResponse({
        status: 200
    });
}));
In the POST route, we want to pass the user prompt received from the frontend into the model and get a response. Both prompt and response will be stored in the database. cloud.ApiResponse allows you to send a response for a user’s request.
Add the logic to retrieve the database items when the frontend makes a GET request.
Add the logic to retrieve the database items when the frontend makes a GET request.
api.get("/assistant", inflight(() => {
    let questionsAndAnswers = db.list();

    return cloud.ApiResponse({
        body: JSON.stringify(questionsAndAnswers),
        status: 200
    });
}));
Our backend is ready. Let's test it out in the local cloud simulator.
Run wing it.
Lets go over to localhost:3000 and ask our Assistant a question.
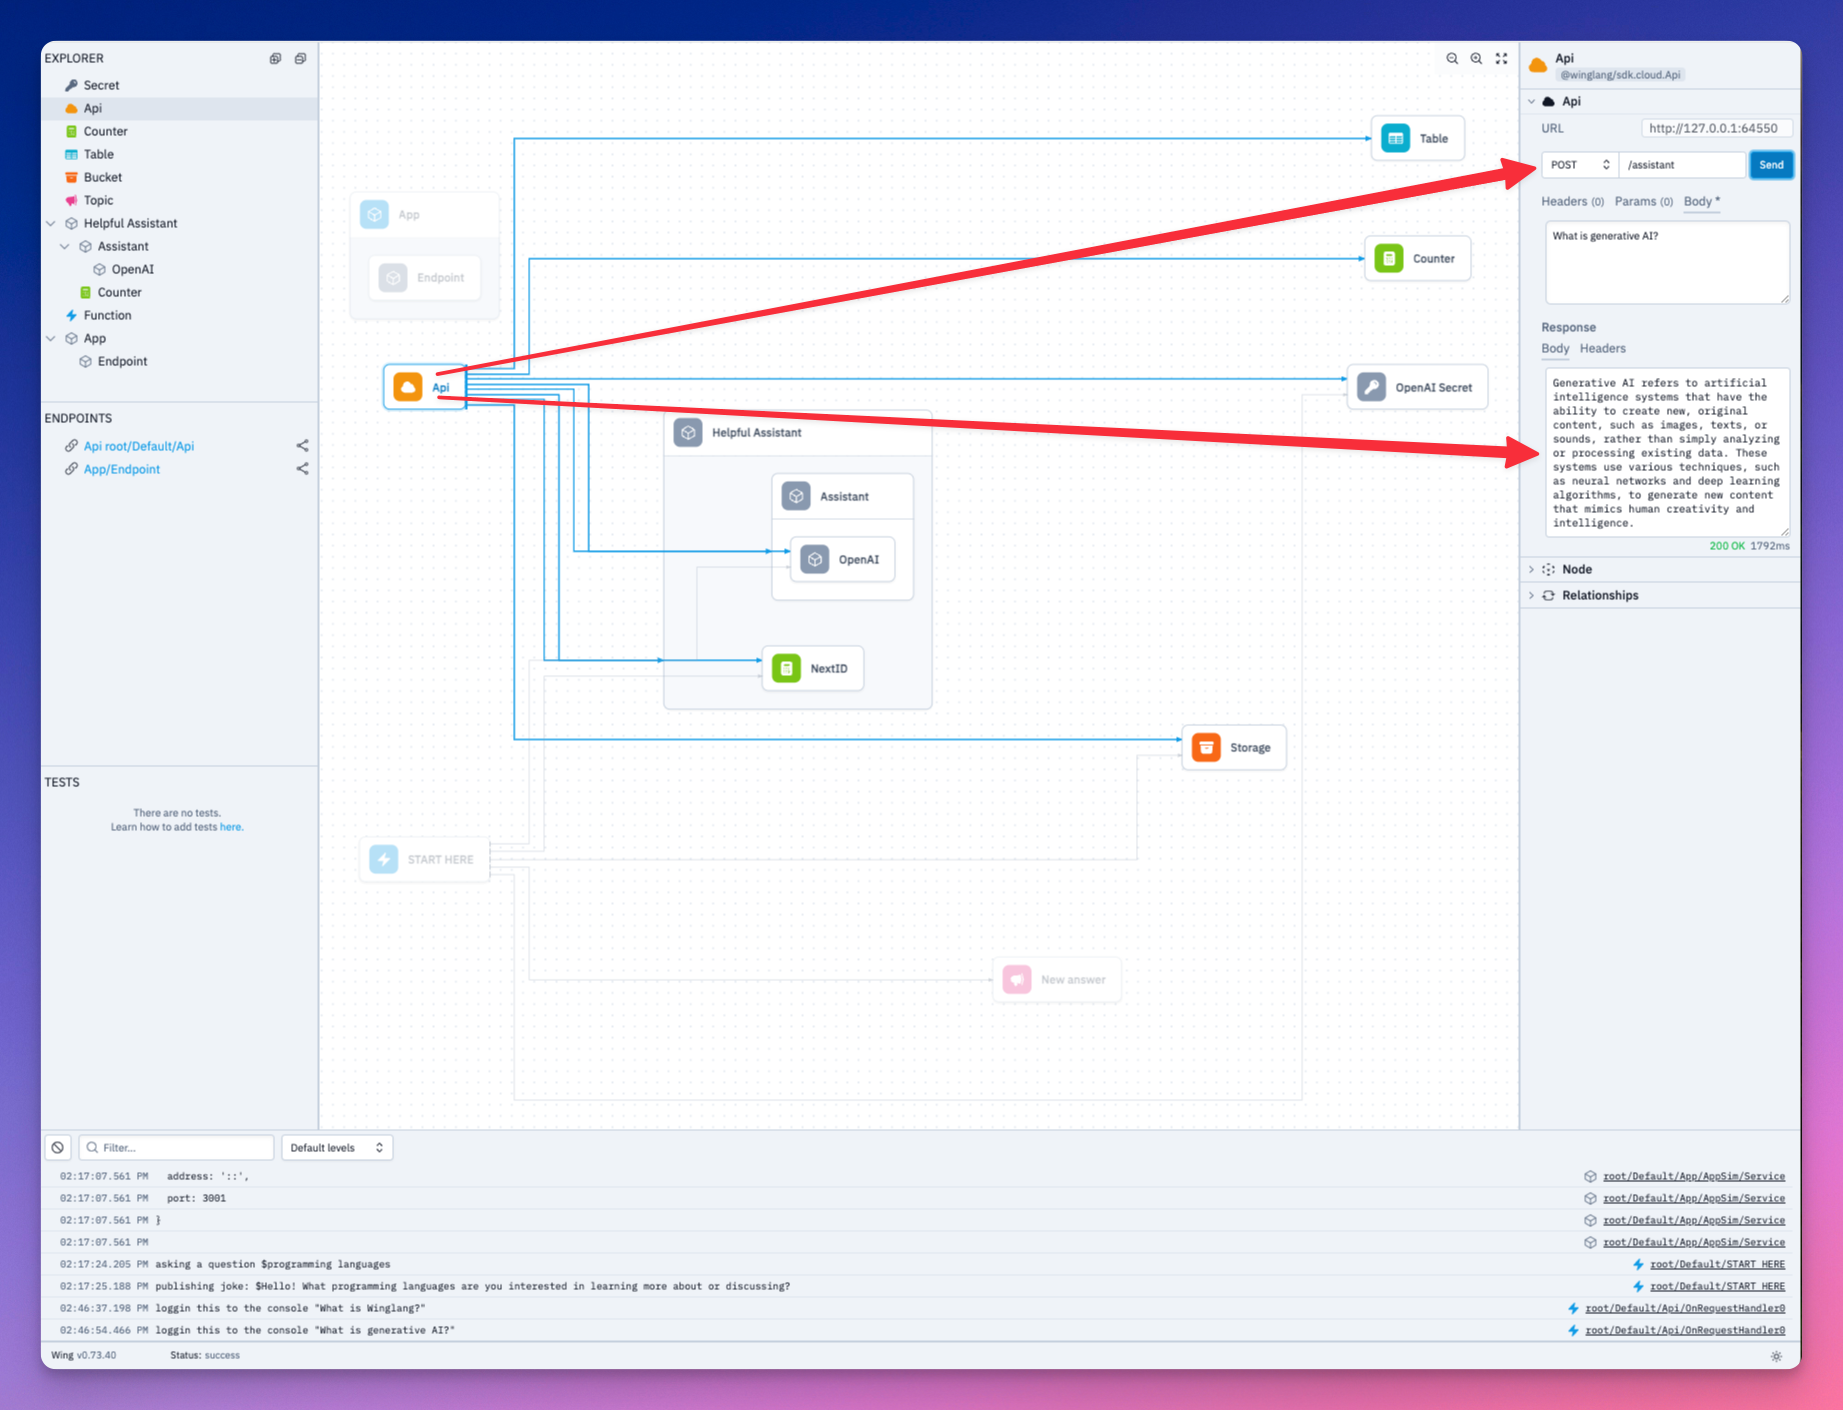
Both our question and the Assistant’s response has been saved to the database. Take a look.
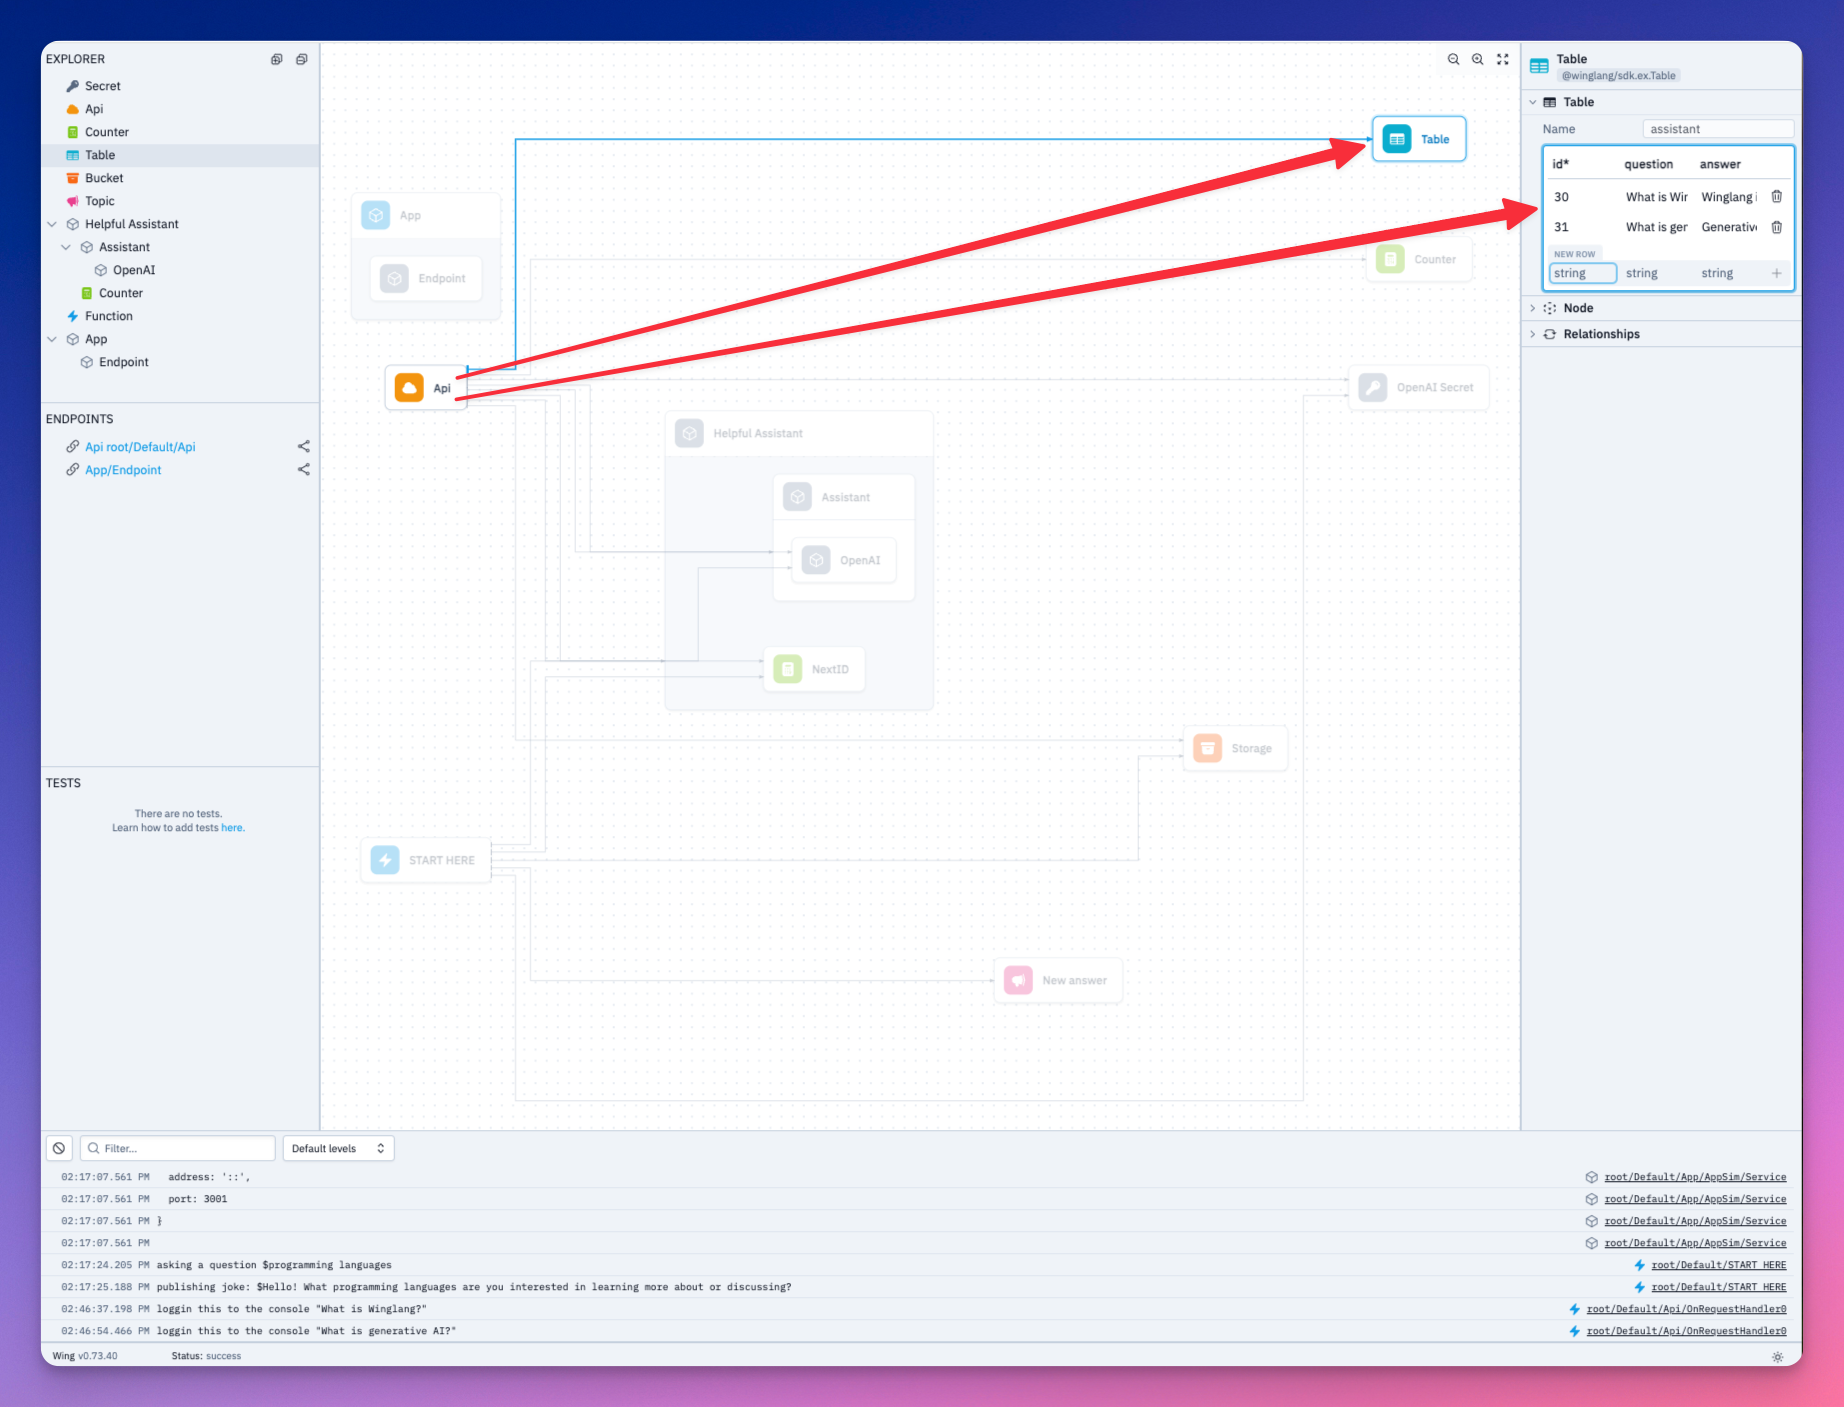
We need to expose the API URL of our backend to our Next frontend. This is where the react library installed earlier comes in handy.
let website = new react.App({
    projectPath: "../frontend",
    localPort: 4000
});

website.addEnvironment("API_URL", api.url);
Add the following to the layout.js of your Next app.
import { Inter } from "next/font/google";
import "./globals.css";

const inter = Inter({ subsets: ["latin"] });

export const metadata = {
    title: "Create Next App",
    description: "Generated by create next app",
};

export default function RootLayout({ children }) {
    return (
        <html lang="en">
	        <head>
            <script src="./wing.js" defer></script>
           </head>
            <body className={inter.className}>{children}</body>
        </html>
    );
}
We now have access to API_URL in our Next application.
Let’s implement the frontend logic to call our backend.
import { useEffect, useState, useCallback } from 'react';
import axios from 'axios';

function App() {

    const [isThinking, setIsThinking] = useState(false);
    const [input, setInput] = useState("");
    const [allInteractions, setAllInteractions] = useState([]);

    const retrieveAllInteractions = useCallback(async (api_url) => {
		    await axios ({
		      method: "GET",
		      url: `${api_url}/assistant`,
		    }).then(res => {
		      setAllInteractions(res.data)
		    })
  }, [])

    const handleSubmit = useCallback(async (e)=> {
	    e.preventDefault()

	    setIsThinking(!isThinking)


	    if(input.trim() === ""){
	      alert("Chat cannot be empty")
	      setIsThinking(true)

	    }

	      await axios({
	        method: "POST",
	        url: `${window.wingEnv.API_URL}/assistant`,
	        headers: {
	          "Content-Type": "application/json"
	        },
	        data: input
	      })
	      setInput("");
	      setIsThinking(false);
	      await retrieveAllInteractions(window.wingEnv.API_URL);

  })

    useEffect(() => {
        if (typeof window !== "undefined") {
            retrieveAllInteractions(window.wingEnv.API_URL);
        }
    }, []);

    // Here you would return your component's JSX
    return (
        // JSX content goes here
    );
}

export default App;
The retrieveAllInteractions function fetches all the questions and answers in the backend’s database. The handSubmit function sends the user’s prompt to the backend.
Let’s add the JSX implementation.
import { useEffect, useState } from 'react';
import axios from 'axios';
import './App.css';

function App() {
    // ...

    return (
        <div className="container">
            <div className="header">
                <h1>My Assistant</h1>
                <p>Ask anything...</p>
            </div>

            <div className="chat-area">
                <div className="chat-area-content">
                    {allInteractions.map((chat) => (
                        <div key={chat.id} className="user-bot-chat">
                            <p className='user-question'>{chat.question}</p>
                            <p className='response'>{chat.answer}</p>
                        </div>
                    ))}
                    <p className={isThinking ? "thinking" : "notThinking"}>Generating response...</p>
                </div>

                <div className="type-area">
                    <input
                        type="text"
                        placeholder="Ask me any question"
                        value={input}
                        onChange={(e) => setInput(e.target.value)}
                    />
                    <button onClick={handleSubmit}>Send</button>
                </div>
            </div>
        </div>
    );
}

export default App;
Navigate to your backend directory and run your Wing app locally using the following command
cd ~assistant/backend
wing it
Also run your Next.js frontend:
cd ~assistant/frontend
npm run dev
Let’s take a look at our application.
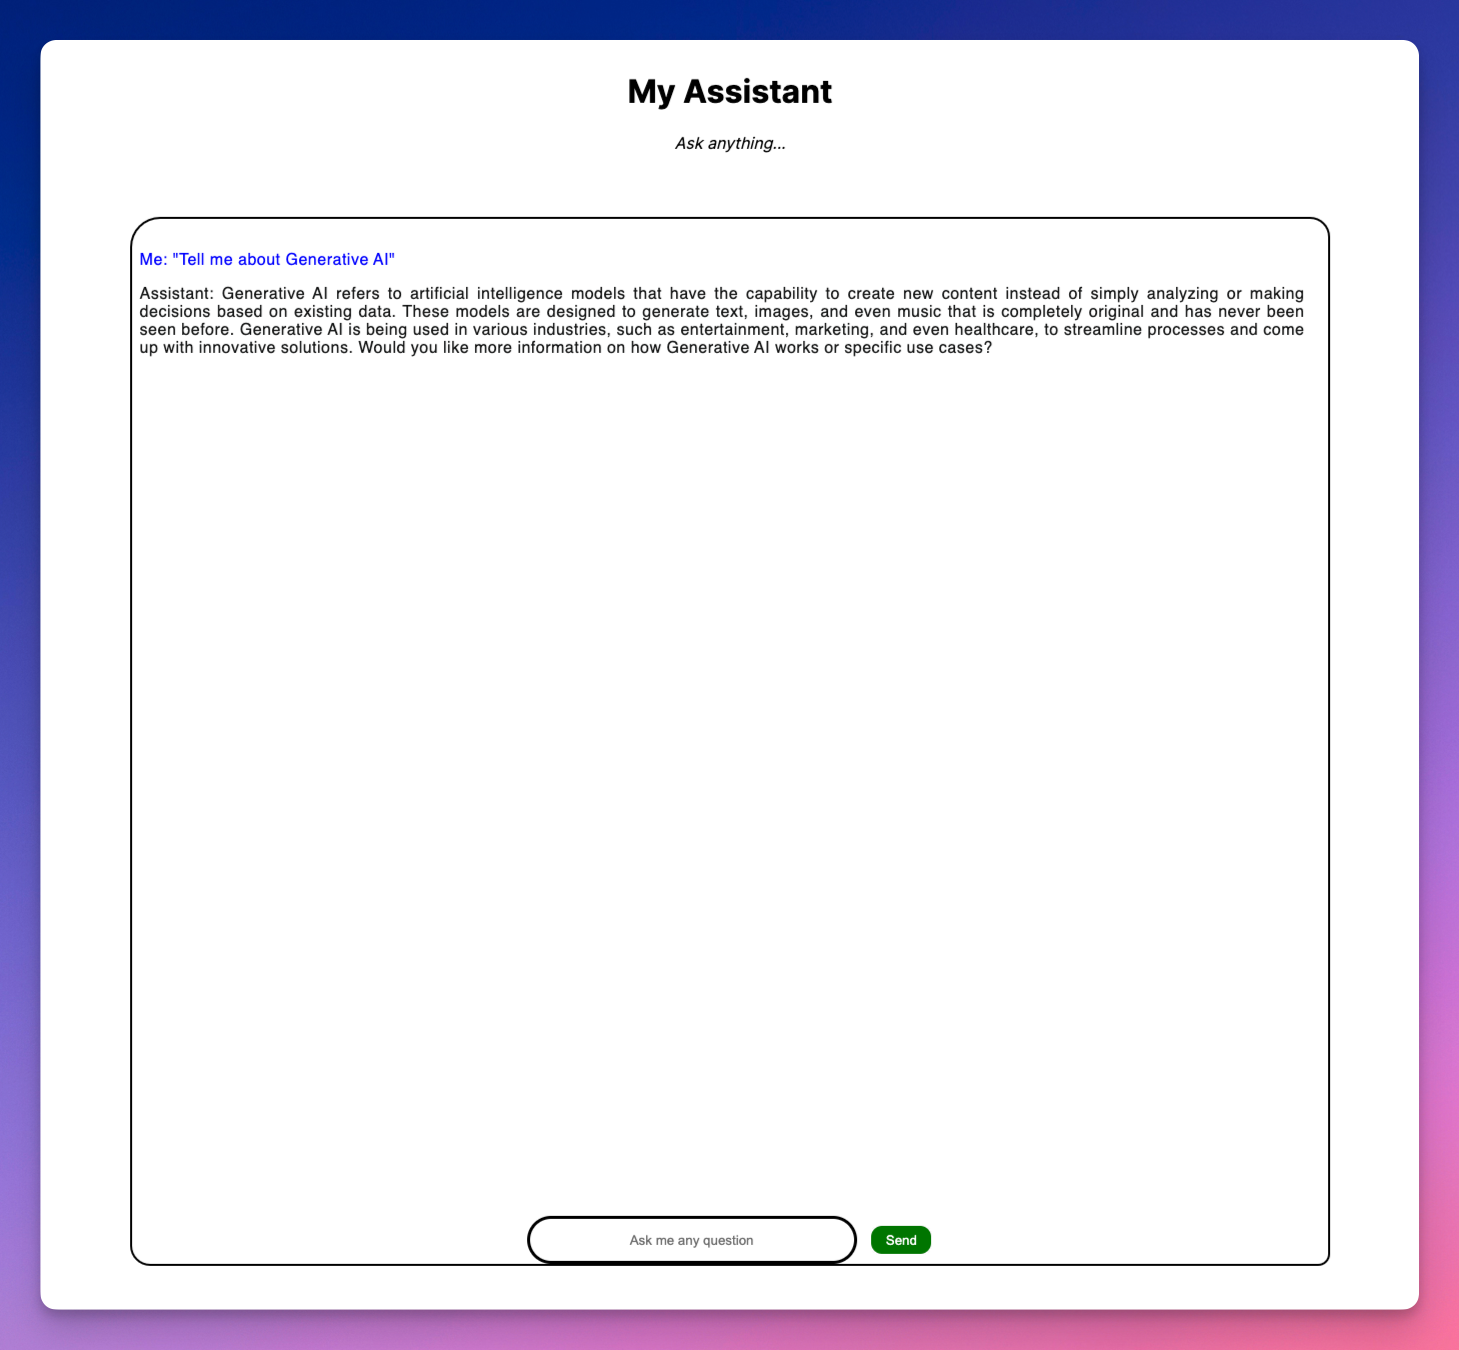
Let’s ask our AI Assistant a couple developer questions from our Next App.
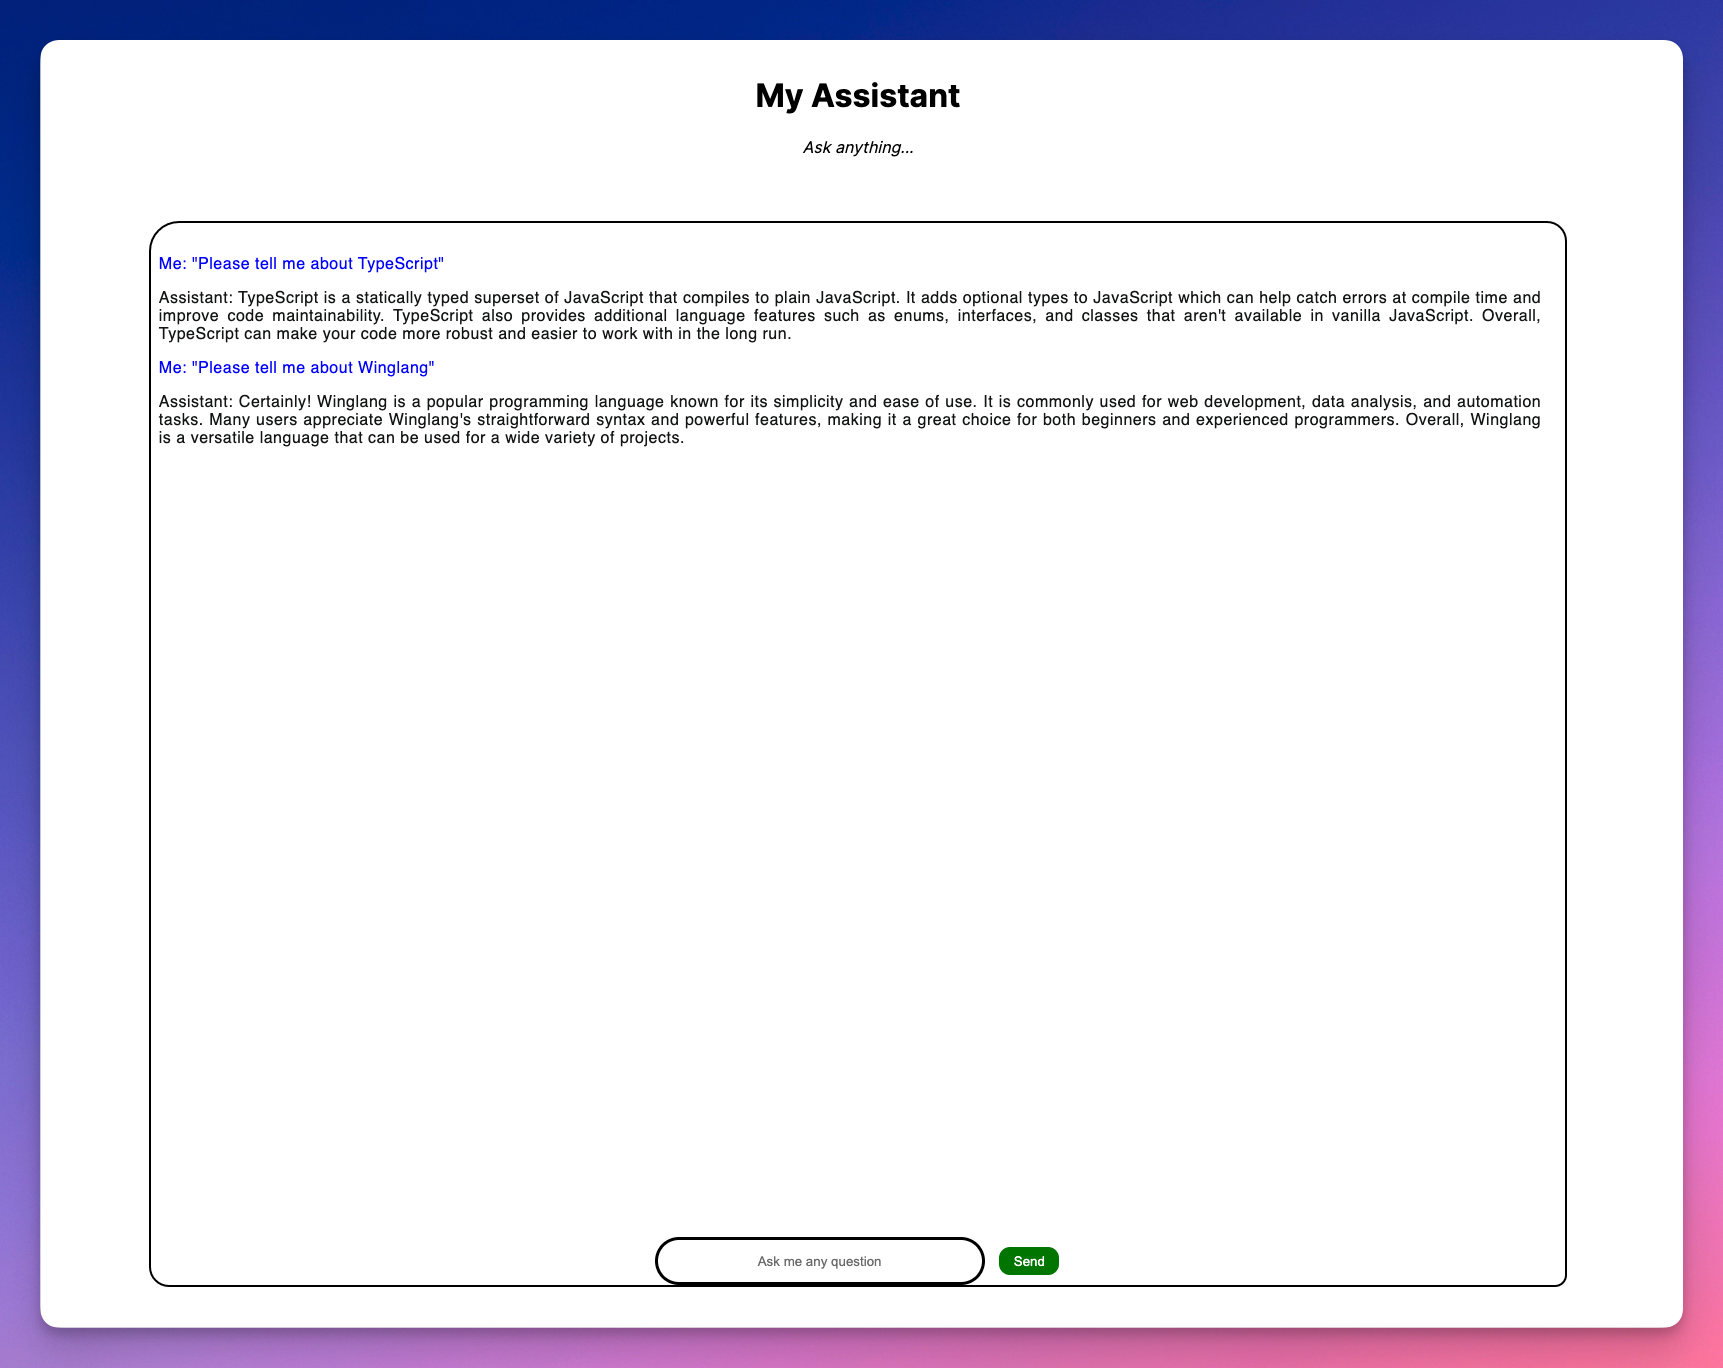
We’ve seen how our app can work locally. Wing also allows you to deploy to any cloud provider including AWS. To deploy to AWS, you need Terraform and AWS CLI configured with your credentials.
tf-aws. The command instructs the compiler to use Terraform as the provisioning engine to bind all our resources to the default set of AWS resources.cd ~/assistant/backend
wing compile --platform tf-aws main.w
cd ./target/main.tfaws
terraform init
terraform apply
Note: terraform apply takes some time to complete.
You can find the complete code for this tutorial here.
As I mentioned earlier, we should all be concerned with our apps security, building your own ChatGPT client and deploying it to your cloud infrastructure gives your app some very good safeguards.
We have demonstrated in this tutorial how Wing provides a straightforward approach to building scalable cloud applications without worrying about the underlying infrastructure.
If you are interested in building more cool stuff, Wing has an active community of developers, partnering in building a vision for the cloud. We'd love to see you there.
Just head over to our Discord and say hi!

Winglang's unique capability to uniformly handle both preflight (cloud resource configuration) and inflight (cloud events processing) logic opens up meta-programming possibilities akin to Lisp macros. This allows for the dynamic adjustment of service configurations to various deployment targets—such as DEV, TEST, STAGE, and PROD—at the build stage. By doing so, it optimizes cost, security, and performance without compromising the integrity of the core service logic, which remains largely insulated from middleware framework details. This level of flexibility is unmatched by more traditional cloud middleware libraries, such as PowerTools for AWS Lambda, which I explored in the first part of this series.
In this part, I will explore how a middleware framework can leverage the Template Method Design Pattern. This design pattern has proven instrumental in defining the common elements of the REST API Create/Retrieve/Update/Delete (CRUD) request handling flow, while still allowing enough flexibility to accommodate the specifics of each request.
Specifically, the application of the Template Method Design Pattern to define a common request-handling workflow has demonstrated the following benefits:
Nevertheless, this approach has limitations. A high number of deployment targets, services, resources, and function permutations may necessitate maintaining a large number of templates—a common challenge in any Engineering Platform based on blueprints.
Exploring whether these limitations can be surmounted using Winglang's unique capabilities will be the focus of future research.
As clarified in the previous publication,
Common middleware services augment distribution middleware by defining higher-level domain-independent reusable services that allow application developers to concentrate on programming business logic, without the need to write the “plumbing” code required to develop distributed applications via lower-level middleware directly.
In our pursuit, we specifically aim to define common service configurations that are adaptable to various development targets. Such configurations are not only reusable across multiple services and resources within the same team or organization but are also distinct enough not to be overgeneralized in the form of a framework but rather to merit integration into a tailored Engineering Platform. This balance ensures that while the configurations maintain a high level of generality, they remain sufficiently detailed to support the unique needs of different projects within the organization.
Here is an example of how common service configurations can be implemented using Winglang. Typically, this or a similar code snippet will be a part of a larger solution integrated into an organization's or team's engineering platform:
bring endor;
bring cloud;
bring logging;

//Could be a part of an organization or team engineering platform
pub class ServiceFactory impl endor.IRestApiHandlerTemplate {
    _tools: endor.ApiTools;
    _mode: endor.Mode;
    pub logger: logging.Logger;
    pub api: cloud.Api;

    _getLoggingLevel(mode: endor.Mode): logging.Level {
        if mode == endor.Mode.PROD {
            return logging.Level.INFO;
        } elif mode == endor.Mode.DEV {
            return logging.Level.TRACE;
        } else {
            return logging.Level.DEBUG;
        }
    }

    _getToolsOptions(
        mode: endor.Mode,
        logger: logging.Logger
    ): endor.ApiToolsOptions {
        if mode == endor.Mode.DEV {
            return endor.ApiToolsOptions{
                logger: logger,
                statusMessage: Map<str>{} // leave original error messages intact
            };
        }
        return endor.ApiToolsOptions{
            logger: logger
        }; // use defaults
    }

    new(serviceName: str, mode: endor.Mode) {
        this._mode = mode;
        this.logger = new logging.Logger(
            this._getLoggingLevel(mode),
            serviceName);
        this._tools = new endor.ApiTools(
            this._getToolsOptions(mode,
            this.logger));
        this.api = new cloud.Api();
    }

    _getProdApiBuilder(
        resource: endor.ApiResource,
        responseFormats: Array<str>,
        getHomePage: (inflight (Json, str): str)?
    ): endor.RestApiBuilder {
        let tokenFactory = new endor.FixedSecretTokenFiltersFactory();
        let cookieFactory = new endor.CookieAuthFiltersFactory(tokenFactory);
        let apiBuilder = new endor.RestApiBuilder(
            this.api,
            resource,
            this,
            cookieFactory,
            responseFormats);
        if getHomePage != nil {
            apiBuilder.samlLogin(cookieFactory, getHomePage!);
        }
        return apiBuilder;
    }
    _getDevApiBuilder(
        resource: endor.ApiResource,
        responseFormats: Array<str>,
        getHomePage: (inflight (Json, str): str)?
    ): endor.RestApiBuilder {
        let session = Json {
            userID: "test-user",
            fullName: "Test User"
        };
        let stubAuth = new endor.ApiStubAuthFactory(session);
        let apiBuilder = new endor.RestApiBuilder(
            this.api,
            resource,
            this,
            stubAuth,
            responseFormats);
        if getHomePage != nil {
            apiBuilder.stubLogin(session, getHomePage!);
        }
        return apiBuilder;
    }
    _getDefaultApiBuilder(
        resource: endor.ApiResource,
        responseFormats: Array<str>,
        password: str
    ): endor.RestApiBuilder {
        let basicAuth = new endor.ApiBasicAuthFactory(password);
        let apiBuilder = new endor.RestApiBuilder(
            this.api,
            resource,
            this,
            basicAuth,
            responseFormats);
        return apiBuilder;
    }
    pub getApiBuilder(
        resource: endor.ApiResource,
        responseFormats: Array<str>,
        getHomePage: (inflight (Json, str): str)?,
        password: str?
    ): endor.RestApiBuilder {
        if this._mode == endor.Mode.PROD {
            return this._getProdApiBuilder(
                resource,
                responseFormats,
                getHomePage);
        } elif this._mode == endor.Mode.DEV {
            return this._getDevApiBuilder(
                resource,
                responseFormats,
                getHomePage);
        } else {
            return this._getDefaultApiBuilder(
                resource,
                responseFormats,
                password!);
        }
    }

    pub makeRequestHandler(
        functionName: str,
        proc: inflight (cloud.ApiRequest): cloud.ApiResponse
    ): inflight(cloud.ApiRequest): cloud.ApiResponse {
        let handler = inflight (request: cloud.ApiRequest): cloud.ApiResponse => {
            let var response = cloud.ApiResponse{};
            try {
                this._tools.logRequest(functionName, request);
                response = proc(request);
            } catch err {
                response = this._tools.errorResponse(err);
            }
            this._tools.logResponse(functionName, response);
            response = this._tools.responseMessage(response);
            return response;
        };
        return handler;
    }

}
This example is quite detailed, so we will break it down section by section to fully understand its structure and functionality.
This module, by convention named middleware.w, features a Winglang preflight class called ServiceFactory. This class encapsulates the following public resources and methods, which are crucial for the middleware's operation:
api: [cloud.Api](https://www.winglang.io/docs/standard-library/cloud/api): resource from the Winglang Standard Librarylogger: logging.Logger: resource, extending the Winglang libraries, which was discussed previously in terms of its utility and possible implementation implementation heremakeRequestHandler(): Factory Method that applies the Template Method Design Pattern tailored to each request handlergetApiBuilder(): another Factory Method this time applying the Builder Design Pattern to configure specific resource API calls pub makeRequestHandler(
functionName: str,
proc: inflight (cloud.ApiRequest): cloud.ApiResponse
): inflight(cloud.ApiRequest): cloud.ApiResponse {
let handler = inflight (request: cloud.ApiRequest): cloud.ApiResponse => {
let var response = cloud.ApiResponse{};
try {
this._tools.logRequest(functionName, request);
response = proc(request);
} catch err {
response = this._tools.errorResponse(err);
}
this._tools.logResponse(functionName, response);
response = this._tools.responseMessage(response);
return response;
};
return handler;
}
This Factory Method plays a central role in implementing the Common Service Middleware. It is a Winglang preflight method that obtains two parameters:
functionName: The name of the function handling the API request, used for logging purposes.proc: a Winglang inflight function that transforms cloud.ApiRequest into a cloud.ApiResponseInternally, it defines a Winglang inflight function, called handler that encapsulates a typical API request processing workflow:
cloud.ApiRequest.proc function to obtain a cloud.ApiResponse.cloud.ApiResponse.cloud.ApiResponse.Operations for logging and error handling are managed using the auxiliary endor.ApiTools class, which we will explore in further detail later.
The getApiBuilder() method, another key component implemented as a Factory Method, dynamically creates a properly configured API Builder for a specific resource, depending on the deployment mode:
pub getApiBuilder(
        resource: endor.ApiResource,
        responseFormats: Array<str>,
        getHomePage: (inflight (Json, str): str)?,
        password: str?
    ): endor.RestApiBuilder {
        if this._mode == endor.Mode.PROD {
            return this._getProdApiBuilder(
                resource,
                responseFormats,
                getHomePage);
        } elif this._mode == endor.Mode.DEV {
            return this._getDevApiBuilder(
                resource,
                responseFormats,
                getHomePage);
        } else {
            return this._getDefaultApiBuilder(
                resource,
                responseFormats,
                password!);
        }
    }
This Winglang preflight method accepts four parameters:
resource: A Winglang Struct defining the API resource, including its names and HTTP paths for singular and plural operations.responseFormats: A Winglang Array specifying supported response formats, such as application/json, text/html, or text/plain.getHomePage: An optional Winglang inflight function to fetch the home page content using session data and the required format.password: An optional string for temporary use in HTTP Basic Authentication.Based on the _mode field, the method directs the construction of the appropriate builder:
_getProdApiBuilder for the PROD mode._getDevApiBuilder for the DEV mode._getDefaultApiBuilder in other cases.The main variability point that distinguishes these three options is the authentication strategy applied to each API request. Let's examine the specifics of each builder's implementation.
_getProdApiBuilder(
        resource: endor.ApiResource,
        responseFormats: Array<str>,
        getHomePage: (inflight (Json, str): str)?
    ): endor.RestApiBuilder {
        let tokenFactory = new endor.FixedSecretTokenFiltersFactory();
        let cookieFactory = new endor.CookieAuthFiltersFactory(tokenFactory);
        let apiBuilder = new endor.RestApiBuilder(
            this.api,
            resource,
            this,
            cookieFactory,
            responseFormats);
        if getHomePage != nil {
            apiBuilder.samlLogin(cookieFactory, getHomePage!);
        }
        return apiBuilder;
    }
For production environments, the security of API requests is paramount. This method implements stringent authentication protocols using JSON Web Tokens (JWT) embedded within Cookie HTTP Headers. The JWTs are signed with a fixed random key, a cost-effective measure that maintains robust security for services at this level.
This Winglang preflight method sets up the described security configuration. Additionally, if the getHomePage parameter is not nil, the method configures an extra HTTP request handler for SAML-based authentication, offering another layer of security and user verification (further details on this process can be found here).
_getDevApiBuilder(
        resource: endor.ApiResource,
        responseFormats: Array<str>,
        getHomePage: (inflight (Json, str): str)?
    ): endor.RestApiBuilder {
        let session = Json {
            userID: "test-user",
            fullName: "Test User"
        };
        let stubAuth = new endor.ApiStubAuthFactory(session);
        let apiBuilder = new endor.RestApiBuilder(
            this.api,
            resource,
            this,
            stubAuth,
            responseFormats);
        if getHomePage != nil {
            apiBuilder.stubLogin(session, getHomePage!);
        }
        return apiBuilder;
    }
For development purposes, especially when using the Winglang Simulator in interactive mode, security requirements can be relaxed. In this mode, authentic security is not required, allowing developers to focus on functionality and flow without the overhead of complex security protocols.
This Winglang preflight method implements such a setup. It uses a stub authentication system based on predefined user session data. Furthermore, if the getHomePage parameter is supplied and not nil, the method adds an HTTP request handler that simulates the login process, maintaining the integrity of the user experience even in a simulated environment.
_getDefaultApiBuilder(
        resource: endor.ApiResource,
        responseFormats: Array<str>,
        password: str
    ): endor.RestApiBuilder {
        let basicAuth = new endor.ApiBasicAuthFactory(password);
        let apiBuilder = new endor.RestApiBuilder(
            this.api,
            resource,
            this,
            basicAuth,
            responseFormats);
        return apiBuilder;
    }
For test and stage modes, where end-to-end testing is routinely performed, a balance between security, cost-efficiency, and performance is essential. Unlike local simulations that utilize stub authentication similar to the development environment, end-to-end tests in real cloud platforms like AWS require more robust security.
This Winglang preflight method achieves this by implementing HTTP Basic Authentication. It utilizes a dynamically generated password to ensure security while maintaining cost efficiency. The use of HTTP Basic Authentication, where credentials are passed directly in the header, eliminates the need for separate login request handling, streamlining the testing process.
Proper initialization of the ServiceFactory object is crucial for the functionality of its public methods and fields. Below is a detailed look into its initialization process:
bring endor;
bring cloud;
bring logging;

//Could be a part of organization or team engineering platform
pub class ServiceFactory impl endor.IRestApiHandlerTemplate {
    _tools: endor.ApiTools;
    _mode: endor.Mode;
    pub logger: logging.Logger;
    pub api: cloud.Api;

    _getLoggingLevel(mode: endor.Mode): logging.Level {
        if mode == endor.Mode.PROD {
            return logging.Level.INFO;
        } elif mode == endor.Mode.DEV {
            return logging.Level.TRACE;
        } else {
            return logging.Level.DEBUG;
        }
    }

    _getToolsOptions(
        mode: endor.Mode,
        logger: logging.Logger
    ): endor.ApiToolsOptions {
        if mode == endor.Mode.DEV {
            return endor.ApiToolsOptions{
                logger: logger,
                statusMessage: Map<str>{} // leave original error messages intact
            };
        }
        return endor.ApiToolsOptions{
            logger: logger
        }; // use defaults
    }

    new(serviceName: str, mode: endor.Mode) {
        this._mode = mode;
        this.logger = new logging.Logger(
            this._getLoggingLevel(mode),
            serviceName);
        this._tools = new endor.ApiTools(
            this._getToolsOptions(mode,
            this.logger));
        this.api = new cloud.Api();
    }
The new() constructor method is designed to take two parameters:
serviceName: Utilized in all log messages to identify service-specific operations.mode: Determines the appropriate configuration settings for different operational environments.The initialization sequence performs the following steps:
mode to dictate the behavior of the getApiBuilder() method.Logger object with a logging level based on mode:
endor.ApiTools object with settings influenced by mode:
This ServiceFactory class, by implementing the endor.IRestApiHandlerTemplate interface, seamlessly integrates with the endor.RestApiBuilder. This allows the latter to utilize the makeRequestHandler() method of ServiceFactory, thus ensuring consistent handling of all API requests.
The common middleware service configuration described previously hides a substantial portion of the system infrastructure complexity, allowing specific service configurations to be defined with ease and precision. A practical implementation of this approach can be seen in the TodoService, first introduced in the previous publication:
bring endor;
bring cloud;
bring logging;
bring "./core" as core;
bring "./adapters" as adapters;
bring "./middleware.w" as middleware;

pub class TodoService {
    _api: cloud.Api;

    //TODO: true content negotiation; unit test?; move to adapters??
    _getResponseFormatters(
		    mode: endor.Mode,
		    resource: endor.ApiResource
		): Map<core.ITodoFormatter> {
        if mode == endor.Mode.TEST {
            return Map<core.ITodoFormatter> {
                "application/json" => new adapters.TodoJsonFormatter()
            };
        }
        return Map<core.ITodoFormatter> {
            "text/html" => new adapters.TodoHtmlFormatter(resource.htmlPath),
            "text/plain" => new adapters.TodoTextFormatter(),
        };
    }

    new(mode: endor.Mode, password: str?) {
        let serviceName = "Todo Service";
        let factory = new middleware.ServiceFactory(serviceName, mode);
        let resource = new endor.ApiResource("Task");
        let responseFormatters = this._getResponseFormatters(mode, resource);
        let repository = new adapters.TaskTableRepository(factory.logger);
        let handler = new core.TodoHandler(
            repository,
            responseFormatters,
            factory.logger
        );
        let apiBuilder = factory.getApiBuilder(
            mode,
            resource,
            responseFormatters.keys(),
            handler.getHomePage(),
            password
        );

        apiBuilder.retrieveResources(handler.getAllTasks());
        apiBuilder.createResource(handler.createTask());
        apiBuilder.replaceResource(handler.replaceTask());
        apiBuilder.deleteResource(handler.deleteTask());
        this._api = factory.api;
    }

    pub getUrl(): str {
        return this._api.url;
    }
}
The TodoService class serves as a Winglang preflight entity that orchestrates the integration of the service core, its adapters, and middleware. It includes a public getUrl() method for testing purposes.
The new() constructor method takes two parameters:
mode: Determines the output format selection and middleware configuration.password: An optional string for HTTP Basic Authentication in scenarios requiring secure access.The service is initialized through the following steps:
ServiceFactory with serviceName and mode.Task resource descriptor that translates to the /tasks HTTP path.mode, it configures response formatters:
application/json for TEST mode.text/html and text/plain for PROD and DEV modes.core.TodoHandler with necessary dependencies, including a logger from ServiceFactory.ServiceFactory.getApiBuilder() to link TodoHandler methods to respective REST API endpoints.TodoHandler methods to the corresponding REST API calls.cloud.Api object to handle URL retrieval via getUrl().This TodoService can be instantiated with different target modes and optionally a random password, resulting in three primary configurations for various environments:
let _service = new service.TodoService(endor.Mode.PROD);let _service = new service.TodoService(endor.Mode.DEV);let _service = new service.TodoService(endor.Mode.TEST, _password);While detailed code snippets and textual descriptions provide precise insight into design decisions, they often fall short of conveying a holistic view. For a broader perspective, visual representations are invaluable, especially when dealing with concepts as abstract as higher-order programming utilized by Winglang's preflight/inflight mechanisms. This section aims to bridge this understanding gap through graphical illustrations.
To visualize core system components and their relationships a UML Class diagram is a suitable tool:
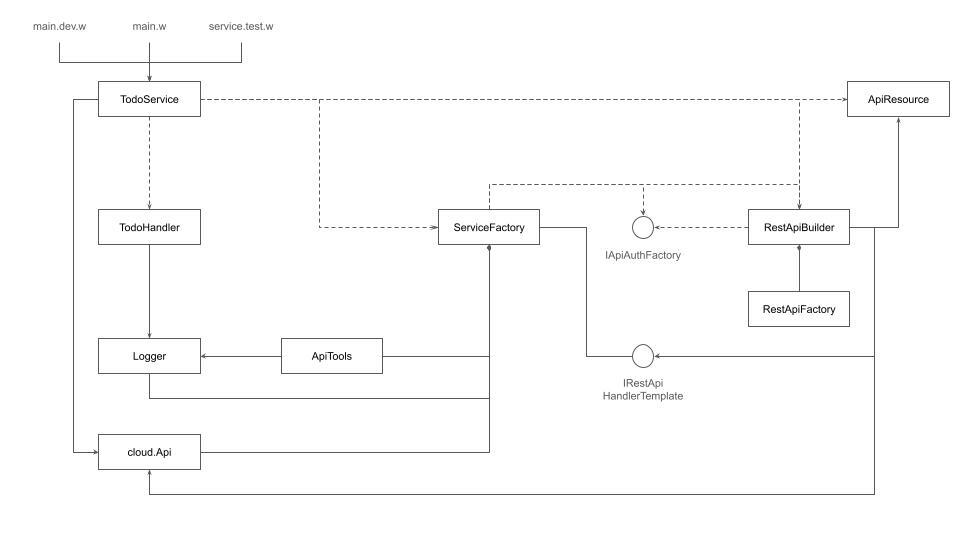
In this diagram, solid arrows indicate permanent references, dashed arrows depict temporal interactions, and diamond-ended lines show component aggregations. This static representation helps delineate how components are interconnected during the preflight phase.
However, to visualize what happens dynamically at the inflight stage, a more specialized notation is necessary. Traditional UML communication and sequence diagrams were found inadequate, prompting the creation of a custom notation specifically designed for this purpose.
Illustrated below is the createTask with HTTP Basic Authentication scenario:
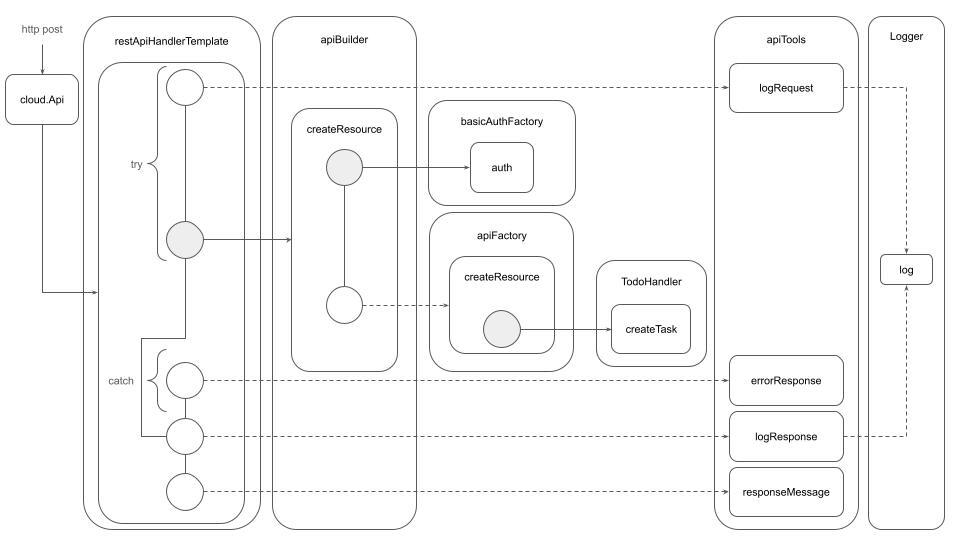 In this diagram:
cloud.Api to convert it into a cloud.ApiRequest and invokes the appropriate inflight function, typically specified within the RestApiHandlerTemplate (here, implemented by ServiceFactory).try block, where the logRequest function from ApiTools logs the request, and the plugged-in function (createResource from RestApiBuilder) processes the request. Upon error, errorResponse from ApiTools converts exceptions into cloud.ApiResponse. Regardless of the outcome, logResponse and responseMessage from ApiTools are invoked to finalize the processing.createResource function within RestApiBuilder initiates authentication via a plugged-in auth function (provided by BasicAuthFactory), which extracts user data and passes control to createResource of RestApiFactory.createResource in RestApiFactory parses HTTP headers and body data and calls the createTask function provided by TodoHandler, which handles the core business logic.This dynamic interaction is indeed complex, highlighting the intricate and interconnected nature of the system. The proposed middleware design aims to shield users from this complexity in daily operations. However, when issues arise, creating a precise graphical representation of the underlying system dynamics becomes essential. Future research will likely focus on developing tools to maintain cognitive control over such complex systems, ensuring that developers can effectively manage and troubleshoot without being overwhelmed.
The architecture adopted allows the service core to remain independent of any middleware framework, focusing on core functionality without being tangled in middleware specifics. An example of this is the core.TodoHandler class:
bring logging;
bring "./task.w" as task;
bring "./parser.w" as parser;
bring "./formatter.w" as formatter;

// Experimental implementation of
// "Preflight Object Oriented, Inflight Functional"
// Design Pattern
pub class TodoHandler {
    _tasks: task.ITaskDataRepository;
    _parser: parser.TodoParser;
    _formatter: formatter.TodoFormattingRouter;
    _logger: logging.Logger;

    new(
        tasks_: task.ITaskDataRepository,
        formatters: Map<formatter.ITodoFormatter>,
        logger: logging.Logger
    ) {
        this._tasks = tasks_;
        this._parser = new parser.TodoParser();
        this._formatter = new formatter.TodoFormattingRouter(formatters);
        this._logger = logger;
    }

    pub getHomePage(): inflight (Json, str): str {
        let handler = inflight (user: Json, outFormat: str): str => {
            let userData = this._parser.parseUserData(user);

            return this._formatter.formatHomePage(outFormat, userData);
        };
        return handler;
    }

    pub getAllTasks(): inflight (Json, Map<str>, str): str {
        let handler = inflight (
            user: Json,
            query: Map<str>,
            outFormat: str
        ): str => {
            let userData = this._parser.parseUserData(user);
            //TBD: should it get userData instead?
            let tasks = this._tasks.getTasks(userData.userID);

            return this._formatter.formatTasks(outFormat, tasks);
        };
        return handler;
    }

    pub createTask(): inflight (Json, Json, str): str {
        let handler = inflight (
            user: Json,
            taskAttributes: Json,
            outFormat: str
        ): str => {
            let taskData = this._parser.parsePartialTaskData(
                user,
                taskAttributes);
            this._tasks.addTask(taskData);
            //TBD: cloud events?
            this._logger.info(
                "createTask",
                Json{userID: taskData.userID, taskID:taskData.taskID});

            return this._formatter.formatTasks(outFormat, [taskData]);
        };
        return handler;
    }

    pub replaceTask(): inflight (Json, str, Json, str): str {
        let handler = inflight (
            user: Json,
            id: str,
            taskAttributes: Json,
            outFormat: str
        ): str => {
            let taskData = this._parser.parseFullTaskData(
                user,
                id,
                taskAttributes);
            this._tasks.replaceTask(taskData);
            //TBD: cloud events?
            this._logger.info(
                "replaceTask",
                Json{userID: taskData.userID, taskID:taskData.taskID});

            return this._formatter.formatTasks(outFormat, [taskData]);
        };
        return handler;
    }

    pub deleteTask(): inflight (Json, str): str {
        let handler = inflight (user: Json, id: str): str => {
            let userData = this._parser.parseUserData(user);
            let taskID = num.fromStr(id);
            //TBD: taskKey? userData?
            this._tasks.deleteTask(userData.userID, taskID);
            //TBD: cloud events?
            this._logger.info(
                "deleteTask",
                Json{userID: userData.userID, taskID:taskID});

            return ""; //TBD: formatter?
        };
        return handler;
    }
}
The core.TodoHandler is designed as a Winglang preflight class that encapsulates key functionalities for Todo Service operations. Each method in this class exemplifies a Factory Method, returning specialized inflight functions that handle specific aspects of Todo management.
The only implicit coupling between the core of the Todo Service and its middleware lies in the parameters passed to each function. This level of coupling, referred to as Knowledge Sharing, is a trade-off typically considered acceptable in such architectural designs, facilitating seamless integration while maintaining a clear separation of concerns.
Interestingly enough, introducing Generics support in Winglang could potentially increase rather than decrease system coupling. With Generics, the coordination between the core and middleware layers would extend beyond just the order and types of parameters. It would also necessitate sharing the names of functions and their parameters, thereby tightening the interdependence within the system.
The following UML class diagram summarizes the Todo Service logic design in visual form:
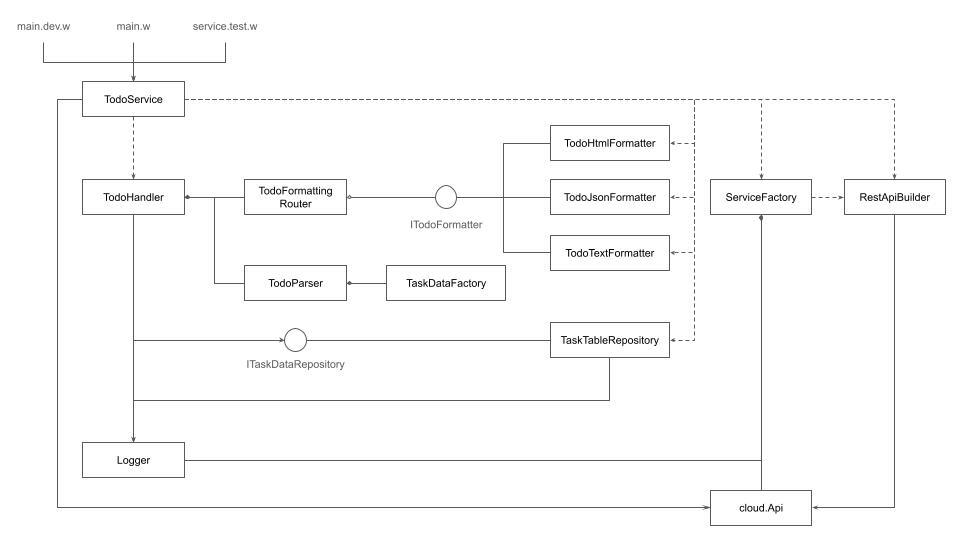
A detailed description of this design is presented in a previous publication.
The ServiceFactory class, detailed earlier, relies on the Endor middleware framework—an experimental library designed to push the boundaries of what is possible with Winglang, a new cloud-oriented programming language.
The name "Endor", derived from Quenya—a functional language created by J.R.R. Tolkien for the Elves in his Middle-earth fiction—translates to "Middle-earth." This nomenclature not only signifies 'middle' but also metaphorically represents our exploration into Winglang's unleashed yet potential, positioning it as a pioneering language at the crossroads of established practices and innovative paradigms.
In its current iteration, the Endor middleware framework encapsulates an initial set of functionalities for HTTP request handling, including various authentication methods. While a comprehensive review of the entire framework is outside the scope of this publication, we will briefly explore the Endor.ApiBuilder class implementation, which plays a crucial role in integrating application-specific handlers into a common request processing infrastructure:
bring cloud;
bring "./apiStubAuth.w" as apiStubAuth;
bring "./apiResource.w" as apiResource;
bring "./apiAuthFactory.w" as authFactory;
bring "./restApiFactory.w" as restApiFactory;
bring "./cookieAuthFilters.w" as cookieFilters;

pub interface IRestApiHandlerTemplate {
    makeRequestHandler(
        functionName: str,
        proc: inflight (cloud.ApiRequest): cloud.ApiResponse
    ): inflight (cloud.ApiRequest): cloud.ApiResponse;
}

pub class RestApiBuilder {
    _resource: apiResource.ApiResource;
    _template: IRestApiHandlerTemplate;
    _factory: restApiFactory.RestApiFactory;
    _auth: (inflight (cloud.ApiRequest): Json);
    _api: cloud.Api;

    new(
        api: cloud.Api,
        resource: apiResource.ApiResource,
        template: IRestApiHandlerTemplate,
        authFactory: authFactory.IApiAuthFactory,
        responseFormats: Array<str>
    ) {
        this._resource = resource;
        this._template = template;
        this._factory = new restApiFactory.RestApiFactory(responseFormats);
        this._auth = authFactory.getAuth();
        this._api = api;
    }

    _makeAuthRequestHandler(
        functionName: str,
        proc: inflight (Json, cloud.ApiRequest): cloud.ApiResponse
    ): inflight(cloud.ApiRequest): cloud.ApiResponse {
        let handler = inflight(request: cloud.ApiRequest): cloud.ApiResponse => {
            let userData = this._auth(request);
            return proc(userData, request);
        };
        return this._template.makeRequestHandler(functionName, handler);
    }

    pub samlLogin(
        cookieFactory: cookieFilters.CookieAuthFiltersFactory,
        getHomePage: inflight (Json, str): str
    ): void {
        this._api.post(
            "/sp/acs",
            this._template.makeRequestHandler(
                "login",
                this._factory.samlLogin(cookieFactory, getHomePage)
            )
        );
    }

    pub stubLogin(
        session: Json,
        getHomePage: inflight (Json, str): str
    ): void {
        this._api.get(
            "/",
            this._template.makeRequestHandler(
                "login",
                this._factory.stubLogin(session, getHomePage)
            )
        );
    }

    pub retrieveResources(
        handler: inflight (Json, Map<str>, str): str
    ): void {
        this._api.get(
            this._resource.path,
            this._makeAuthRequestHandler(
                "get{this._resource.plural}",
                this._factory.retrieveResources(
                    handler
                )
            )
        );
    }

    pub createResource(
        handler: inflight (Json, Json, str): str
    ): void {
        this._api.post(
            this._resource.path,
            this._makeAuthRequestHandler(
                "create{this._resource.singular}",
                this._factory.createResource(
                    handler
                )
            )
        );
    }

    pub replaceResource(
        handler: inflight (Json, str, Json, str): str
    ): void {
        this._api.put(
            this._resource.idPath,
            this._makeAuthRequestHandler(
                "replace{this._resource.singular}",
                this._factory.replaceResource(
                    handler
                )
            )
        );
    }

    pub deleteResource(
        handler: inflight (Json, str): str
    ): void {
        this._api.delete(
            this._resource.idPath,
            this._makeAuthRequestHandler(
                "delete{this._resource.singular}",
                this._factory.deleteResource(
                    handler
                )
            )
        );
    }

    //TODO: other operations: partial update (patch), has (head), delete all, update all
}
The RestApiBuilder class is designed to wrap application-specific handlers, such as createTask(), within a standardized cloud API request-response conversion process, seamlessly incorporating specified authentication methods. The conversion from cloud.ApiRequest to cloud.ApiResponse is further handled by the endor.RestApiFactory, whose details are not covered in this publication.
The endor.ApiTools class, another significant component of the framework, provides a suite of middleware operations:
bring cloud;
bring logging;
bring exception;

pub struct ApiToolsOptions {
    logger: logging.Logger;
    logLevel: logging.Level?;
    statusMessage: Map<str>?;
    statusLogging: Map<logging.Level>?;
}

//TODO: unit test
pub class ApiTools {
    _logger: logging.Logger;
    _logLevel: logging.Level;
    _errorStatus: Map<num>;
    _statusMessage: Map<str>;
    _statusLogging: Map<logging.Level>;

    new(
        options: ApiToolsOptions
    ) {
        this._logger = options.logger;
        this._logLevel = options.logLevel ?? logging.Level.DEBUG;
        this._errorStatus = Map<num>{
            "ValueError" => 400,
            "AuthenticationError" => 401,
            "AuthorizationError" => 403,
            "KeyError" => 404,
            "InternalError" => 500,
            "NotImplementedError" => 501
        };
        this._statusMessage = options.statusMessage ?? Map<str> {
            "400" => "Bad Request",
            "401" => "Unauthorized",
            "403" => "Forbidden",
            "404" => "Not Found",
            "500" => "Internal Server Error",
            "501" => "Not Implemented"
        };
        this._statusLogging = options.statusLogging ?? Map<logging.Level> {
            "200" => logging.Level.DEBUG,
            "400" => logging.Level.WARNING,
            "401" => logging.Level.WARNING,
            "403" => logging.Level.WARNING,
            "404" => logging.Level.WARNING,
            "500" => logging.Level.ERROR,
            "501" => logging.Level.ERROR,
        };
    }
    pub inflight logRequest(functionName: str, request: cloud.ApiRequest): void {
        this._logger.log(
            this._logLevel,
            functionName,
            Json{
                request: Json.parse(Json.stringify(request))
            }
        );
    }
    pub inflight logResponse(functionName: str, response: cloud.ApiResponse): void {
        if let logLevel = this._statusLogging.tryGet("{response.status!}") {
            this._logger.log(
                logLevel,
                functionName,
                Json{
                    response: Json.parse(Json.stringify(response))
                }
            );
        }
    }
    pub inflight errorResponse(err: str): cloud.ApiResponse {
        if let error = exception.tryParse(err) {
            if let status = this._errorStatus.tryGet(error.tag) {
                return cloud.ApiResponse {
                    status: status,
                    headers: {
                        "Content-Type" => "text/plain"
                    },
                    body: error.message
                };
            }
        }
        return cloud.ApiResponse {
            status: 500,
            headers: {
                "Content-Type" => "text/plain"
            },
            body: err
        };
    }
    pub inflight responseMessage(response: cloud.ApiResponse): cloud.ApiResponse {
        if let message = this._statusMessage.tryGet("{response.status!}") {
            return cloud.ApiResponse{
                status: response.status,
                headers: response.headers,
                body: message
            };
        }
        return response;
    }
}
This class offers essential functionalities for logging requests and responses, handling errors, and modifying response messages based on the status codes, thereby standardizing the error handling and logging processes across all middleware services.
The following UML class diagram summarizes the endor middleware framework design in visual form:
Finally, let us synthesize the components discussed throughout this series and identify some common patterns that have emerged. Below, we visualize how these elements interact:
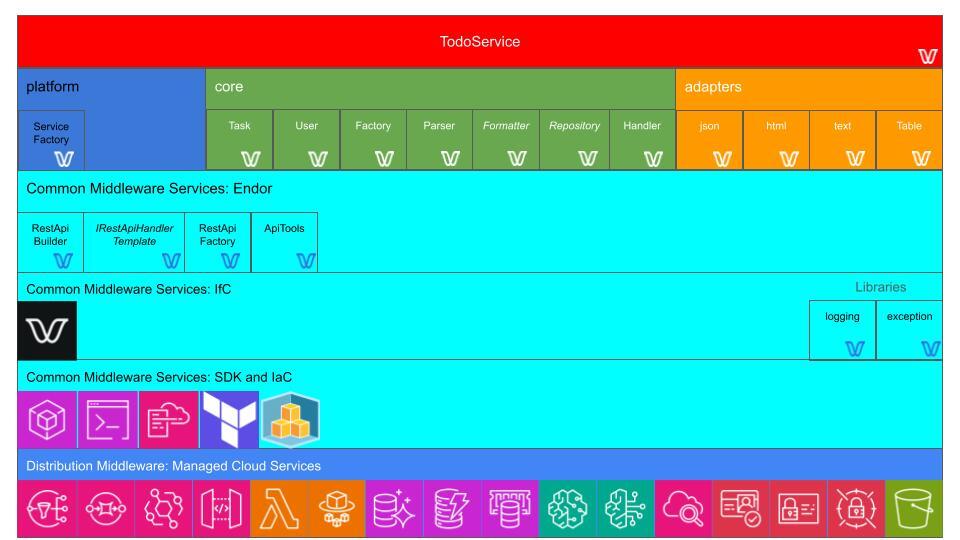
At the top of this structure is located the TodoService which pulls together three critical elements:
ServiceFactory class, crucial for implementing a standardized request-handling workflow.The endor Middleware Framework provides foundational building blocks for composing request handling workflows, utilizing core Winglang libraries like logging and exception for enhanced functionality.
The application of the Template Method Design Pattern to define a common request-handling workflow has demonstrated significant flexibility and utility, surpassing mainstream solutions such as PowerTools for AWS Lambda:
Nevertheless, this approach has limitations. A high number of deployment targets, services, resources, and function permutations may necessitate maintaining a large number of templates—a common challenge in any Engineering Platform based on blueprints.
Exploring whether these limitations can be surmounted using Winglang's unique capabilities will be the focus of future research. Stay tuned for further developments.
Throughout the preparation of this publication, I utilized several key tools to enhance the draft and ensure its quality.
The initial draft was crafted with the organizational capabilities of Notion's free subscription, facilitating the structuring and development of ideas.
For grammar and spelling review, the free version of Grammarly proved useful for identifying and correcting basic errors, ensuring the readability of the text.
The enhancement of stylistic expression and the narrative coherence checks were performed using the paid version of ChatGPT 4.0.
While these advanced tools and resources significantly contributed to the preparation process, the concepts, solutions, and final decisions presented in this article are entirely my own, for which I bear full responsibility.


The 9th issue of the Wing Inflight Magazine.
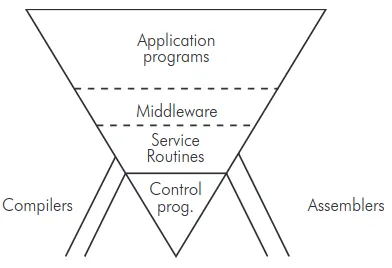
Introducing a new programming language that creates an opportunity and an obligation to reevaluate existing methodologies, solutions, and the entire ecosystem—from language syntax and toolchain to the standard library through the lens of first principles.
Simply lifting and shifting existing applications to the cloud has been broadly recognized as risky and sub-optimal. Such a transition tends to render applications less secure, inefficient, and costly without proper adaptation. This principle holds for programming languages and their ecosystems.
Currently, most cloud platform vendors accommodate mainstream programming languages like Python or TypeScript with minimal adjustments. While leveraging existing languages and their vast ecosystems has certain advantages—given it takes about a decade for a new programming language to gain significant traction—it's constrained by the limitations of third-party libraries and tools designed primarily for desktop or server environments, with perhaps a nod towards containerization.
Winglang is a new programming language pioneering a cloud-oriented paradigm that seeks to rethink the cloud software development stack from the ground up. My initial evaluations of Winglang's syntax, standard library, and toolchain were presented in two prior Medium publications:
Capitalizing on this exploration, I will focus now on the higher-level infrastructure frameworks, often called 'Middleware'. Given its breadth and complexity, Middleware development cannot be comprehensively covered in a single publication. Thus, this publication is probably the beginning of a series where each part will be published as new materials are gathered, insights derived, or solutions uncovered.
Part One of the series, the current publication, will provide an overview of Middleware origins and discuss the current state of affairs, and possible directions for Winglang Middleware. The next publications will look at more specific aspects.
With Winglang being a rapidly evolving language, distinguishing the core language features from the third-party Middleware built atop this series will remain an unfolding narrative. Stay tuned.
Throughout the preparation of this publication, I utilized several key tools to enhance the draft and ensure its quality.
The initial draft was crafted with the organizational capabilities of Notion's free subscription, facilitating the structuring and development of ideas.
For grammar and spelling review, the free version of Grammarly proved useful for identifying and correcting basic errors, ensuring the readability of the text.
The enhancement of stylistic expression and the narrative coherence checks were performed using the paid version of ChatGPT 4.0.
I owe a special mention to Nick Gal’s informative blog post for illuminating the origins of the term "Middleware," helping to set the correct historical context of the whole discussion.
While these advanced tools and resources significantly contributed to the preparation process, the concepts, solutions, and final decisions presented in this article are entirely my own, for which I bear full responsibility.
The term "Middleware" passed a long way from its inception and formal definitions to its usage in day-to-day software development practices, particularly within web development.
Covering every nuance and variation of Middleware would be long a journey worthy of a comprehensive volume entitled “The History of Middleware”—a volume awaiting its author.
In this exploration, we aim to chart the principal course, distilling the essence of Middleware and its crucial role in filling the gap between basic-level infrastructure and the practical needs of cloud-based applications development.
The concept of Middleware ||traces its roots back to an intriguing figure: the Russian-born British cartographer and cryptographer, Alexander d’Agapeyeff, at the "1968 NATO Software Engineering Conference."
Despite the scarcity of official information about d’Agapeyeff, his legacy extends beyond the enigmatic d’Agapeyeff Cipher, as he also played a pivotal role in the software industry as the founder and chairman of the "CAP Group." Insights into the early days of Middleware are illuminated by Brian Randell, a distinguished British computer scientist, in his recounting of "Some Middleware Beginnings."
At the NATO Conference d’Agapeyeff introduced his Inverted Pyramid—a conceptual framework positioning Middleware as the critical layer bridging the gap between low-level infrastructure (such as Control Programs and Service Routines) and Application Programs:
Fig 1: Alexander d'Agapeyeff's Pyramid
Here is how A. d’Agapeyeff explains it:
An example of the kind of software system I am talking about is putting all the applications in a hospital on a computer, whereby you get a whole set of people to use the machine. This kind of system is very sensitive to weaknesses in the software, particular as regards the inability to maintain the system and to extend it freely.
This sensitivity of software can be understood if we liken it to what I will call the inverted pyramid... The buttresses are assemblers and compilers. They don’t help to maintain the thing, but if they fail you have a skew. At the bottom are the control programs, then the various service routines. Further up we have what I call middleware.
This is because no matter how good the manufacturer’s software for items like file handling it is just not suitable; it’s either inefficient or inappropriate. We usually have to rewrite the file handling processes, the initial message analysis and above all the real-time schedulers, because in this type of situation the application programs interact and the manufacturers, software tends to throw them off at the drop of a hat, which is somewhat embarrassing. On the top you have a whole chain of application programs.
The point about this pyramid is that it is terribly sensitive to change in the underlying software such that the new version does not contain the old as a subset. It becomes very expensive to maintain these systems and to extend them while keeping them live.
A. d'Agapeyeff emphasized the delicate balance within this pyramid, noting how sensitive it is to changes in the underlying software that do not preserve backward compatibility. He also warned against danger of over-generalized software too often unsuitable to any practical need:
In aiming at too many objectives the higher-level languages have, perhaps, proved to be useless to the layman, too complex for the novice and too restricted for the expert.
Despite improvements in general-purpose file handling and other advancements since d’Agapeyeff's time, the essence of his observations remains relevant.
There is still a big gap between low-level infrastructure, today encapsulated in an Operating System, like Linux, and the needs of final applications. The Operating System layer reflects and simplifies access to hardware capabilities, which are common for almost all applications.
Higher-level infrastructure needs, however, vary between different groups of applications: some prioritize minimizing the operational cost, some others - speed of development, and others - highly tightened security.
Different implementations of the Middleware layer are intended to fill up this gap and to provide domain-neutral services that are better tailored to the non-functional requirements of various groups of applications.
This consideration also explains why it’s always preferable to keep the core language, aka Winglang, and its standard library relatively small and stable, leaving more variability to be addressed by these intermediate Middleware layers.
The middleware definition was refined in the “Patterns, Frameworks, and Middleware: Their Synergistic Relationships” paper, published in 2003 by Douglas C. Schmidt and Frank Buschmann. Here, they define middleware as:
software that can significantly increase reuse by providing readily usable, standard solutions to common programming tasks, such as persistent storage, (de)marshaling, message buffering and queueing, request demultiplexing, and concurrency control. Developers who use middleware can therefore focus primarily on application-oriented topics, such as business logic, rather than wrestling with tedious and error-prone details associated with programming infrastructure software using lower-level OS APIs and mechanisms.
To understand the interplay between Design Patterns, Frameworks and Middleware, let’s start with formal definitions derived from the “Patterns, Frameworks, and Middleware: Their Synergistic Relationships” paper Abstract:
Patterns codify reusable design expertise that provides time-proven solutions to commonly occurring software problems that arise in particular contexts and domains.
Frameworks provide both a reusable product-line architecture – guided by patterns – for a family of related applications and an integrated set of collaborating components that implement concrete realizations of the architecture.
Middleware is reusable software that leverages patterns and frameworks to bridge the gap between the functional requirements of applications and the underlying operating systems, network protocol stacks, and databases.
In other words, Middleware is implemented in the form of one or more Frameworks, which in turn apply several Design Patterns to achieve their goals including future extensibility. Exactly this combination, when implemented correctly, ensures Middleware's ability to flexibly address the infrastructure needs of large yet distinct groups of applications.
Let’s take a closer look at the definitions of each element presented above.
In the realm of software engineering, a Software Design Pattern is understood as a generalized, reusable blueprint for addressing frequent challenges encountered in software design. As defined by Wikipedia:
In software engineering, a software design pattern is a general, reusable solution to a commonly occurring problem within a given context in software design. It is not a finished design that can be transformed directly into source or machine code. Rather, it is a description or template for how to solve a problem that can be used in many different situations. Design patterns are formalized best practices that the programmer can use to solve common problems when designing an application or system.
Sometimes, the term Architectural Pattern is used to distinguish high-level software architecture decisions from lower-level, implementation-oriented Design Patterns, as defined in Wikipedia:
An architectural pattern is a general, reusable resolution to a commonly occurring problem in software architecture within a given context. The architectural patterns address various issues in software engineering, such as computer hardware performance limitations, high availability and minimization of a business risk. Some architectural patterns have been implemented within software frameworks.
It is essential to differentiate Architectural and Design Patterns from their implementations in specific software projects. While an Architectural or Design Pattern provides an initial idea for solution, its implementation may involve a combination of several patterns, tailored to the unique requirements and nuances of the project at hand.
Architectural Patterns, such as Pipe-and-Filters, and Design Patterns, such as the Decorator, are not only about solving problems in code. They also serve as a common language among architects and developers, facilitating more straightforward communication about software structure and design choices. They are also invaluable tools for analyzing existing solutions, as we will see later.
In the domain of computer programming, a Software Framework represents a sophisticated form of abstraction, designed to standardize the development process by offering a reusable set of libraries or tools. As defined by Wikipedia:
In computer programming, a software framework is an abstraction in which software, providing generic functionality, can be selectively changed by additional user-written code, thus providing application-specific software.
It provides a standard way to build and deploy applications and is a universal, reusable software environment that provides particular functionality as part of a larger software platform to facilitate the development of software applications, products and solutions.
In other words, a Software Framework is an evolved Software Library that employs the principle of inversion of control. This means the framework, rather than the user's application, takes charge of the control flow. The application-specific code is then integrated through callbacks or plugins, which the framework's core logic invokes as needed.
Utilizing a Software Framework as the foundational layer for integrating domain-specific code with the underlying infrastructure allows developers to significantly decrease the development time and effort for complex software applications. Frameworks facilitate adherence to established coding standards and patterns, resulting in more maintainable, scalable, and secure code.
Nonetheless, it's crucial to follow the Clean Architecture guidelines, which mandate that domain-specific code remains decoupled and independent from any framework to preserve its ability to evolve independently of any infrastructure. Therefore, an ideal Software Framework should support plugging into it a pure domain code without any modification.
The Middleware is defined by Wikipedia as follows:
Middleware is a type of computer software program that provides services to software applications beyond those available from the operating system. It can be described as "software glue".
Middleware in the context of distributed applications is software that provides services beyond those provided by the operating system to enable the various components of a distributed system to communicate and manage data. Middleware supports and simplifies complex distributed applications. It includes web servers, application servers, messaging and similar tools that support application development and delivery. Middleware is especially integral to modern information technology based on XML, SOAP, Web services, and service-oriented architecture.
Middleware, however, is not a monolithic entity but is rather composed of several distinct layers as we shall see in the next section.
Below is an illustrative diagram portraying Middleware as a stack of such layers, each with its specialized function, as suggested in the Schmidt and Buchman paper:
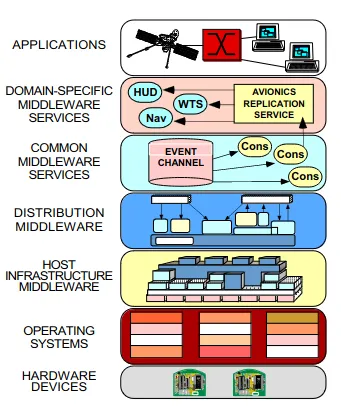
Fig 2: Middleware Layers
Fig 2: Middleware Layers in Context
To appreciate the significance of this layered structure, a good understanding of the very concept of Layered Architecture is essential—a concept too often misunderstood completely and confused with the Multitier Architecture, deviating significantly from the original principles laid out by E.W. Dijkstra.
At the “1968 NATO Software Engineering Conference,” E.W. Dijkstra presented a paper titled “Complexity Controlled by Hierarchical Ordering of Function and Variability” where he stated:
We conceive an ordered sequence of machines: A[0], A[1], ... A[n], where A[0] is the given hardware machine and where the software of layer i transforms machine A[i] into A[i+1]. The software of layer i is defined in terms of machine A[i], it is to be executed by machine A[i], the software of layer i uses machine A[i] to make machine A[i+1].
In other words, in a correctly organized Layered Architecture, the higher-level virtual machine is implemented in terms of the lower-level virtual machine. Within this series, we will come back to this powerful technique over and over again.
Right beneath the Applications layer resides the Domain-Specific Middleware Services layer, a notion deserving a separate discussion within the broader framework of Domain-Driven Design.
Within this context, however, we are more interested in the Distribution Middleware layer, which serves as the intermediary between Host Infrastructure Middleware within a single "box" and the Common Middleware Services layer which operates across a distributed system's architecture.
As stated in the paper:
Common middleware services augment distribution middleware by defining higher-level domain-independent reusable services that allow application developers to concentrate on programming business logic.
With this understanding, we can now place Winglang Middleware within the Middleware Services layer enabling the implementation of Domain-Specific Middleware Services in terms of its primitives.
To complete the picture, we need more quotes from the “Patterns, Frameworks, and Middleware: Their Synergistic Relationships” article mapped onto the modern cloud infrastructure elements.
Here is how it’s defined in the paper:
Host infrastructure middleware encapsulates and enhances native OS mechanisms to create reusable event demultiplexing, interprocess communication, concurrency, and synchronization objects, such as reactors; acceptors, connectors, and service handlers; monitor objects; active objects; and service configurators. By encapsulating the peculiarities of particular operating systems, these reusable objects help eliminate many tedious, error-prone, and non-portable aspects of developing and maintaining application software via low-level OS programming APIs, such as Sockets or POSIX pthreads.
In the AWS environment, general-purpose virtualization services such as AWS EC2 (computer), AWS VPC (network), and AWS EBS (storage) play this role.
On the other hand, when speaking about the AWS Lambda execution environment, we may identify AWS Firecracker, AWS Lambda standard and custom Runtimes, AWS Lambda Extensions, and AWS Lambda Layers as also belonging to this category.
Here is how it’s defined in the paper:
Distribution middleware defines higher-level distributed programming models whose reusable APIs and objects automate and extend the native OS mechanisms encapsulated by host infrastructure middleware.
Distribution middleware enables clients to program applications by invoking operations on target objects without hard-coding dependencies on their location, programming language, OS platform, communication protocols and interconnects, and hardware.
Within the AWS environment, fully managed API, Storage, and Messaging services such as AWS API Gateway, AWS SQS, AWS SNS, AWS S3, and DynamoDB would fit naturally into this category.
Here is how it’s defined in the paper:
Common middleware services augment distribution middleware by defining higher-level domain-independent reusable services that allow application developers to concentrate on programming business logic, without the need to write the “plumbing” code required to develop distributed applications via lower-level middleware directly.
For example, common middleware service providers bundle transactional behavior, security, and database connection pooling and threading into reusable components, so that application developers no longer need to write code that handles these tasks.
Whereas distribution middleware focuses largely on managing end-system resources in support of an object-oriented distributed programming model, common middleware services focus on allocating, scheduling, and coordinating various resources throughout a distributed system using a component programming and scripting model.
Developers can reuse these component services to manage global resources and perform common distribution tasks that would otherwise be implemented in an ad hoc manner within each application. The form and content of these services will continue to evolve as the requirements on the applications being constructed expand.
Formally speaking, Winglang, its Standard Library, and its Extended Libraries collectively constitute Common middleware services built on the top of the cloud platform Distribution Middleware and its corresponding lower-level Common middleware services represented by the cloud platform SDK for JavaScript and various Infrastructure as Code tools, such as AWS CDK or Terraform.
With Winglang Middleware we are looking for a higher level of abstraction built in terms of the core language and its library and facilitating the development of production-grade Domain-specific middleware services and applications on top of it.
Here is how it’s defined in the paper:
Domain-specific middleware services are tailored to the requirements of particular domains, such as telecom, e-commerce, health care, process automation, or aerospace. Unlike the other three middleware layers discussed above that provide broadly reusable “horizontal” mechanisms and services, domain-specific middleware services are targeted at “vertical” markets and product-line architectures. Since they embody knowledge of a domain, moreover, reusable domain-specific middleware services have the most potential to increase the quality and decrease the cycle-time and effort required to develop particular types of application software.
To sum up, the Winglang Middleware objective is to continue the trend of the Winglang compiler and its standard library to make developing Domain-specific middleware services less difficult.
Applying the terminology introduced above, the current state of affairs with AWS cloud Middleware could be visualized as follows:
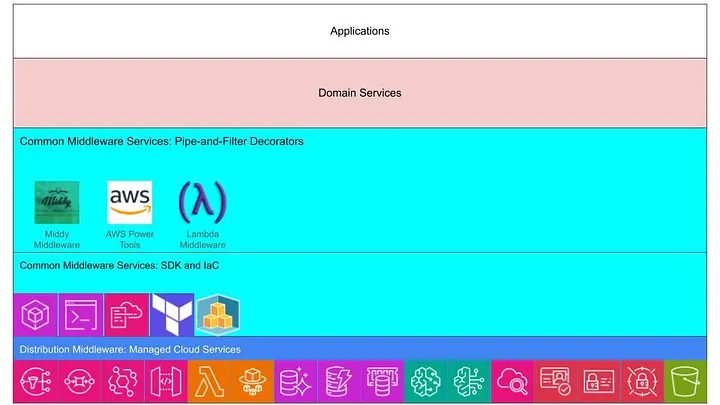
Fig 3: Cloud Middleware State of Affairs
We will look at three leading Middleware Frameworks for AWS:
If we dive into the Middy Documentation we will find that it positions itself as a middleware engine, which is correct if we recall that very often Frameworks, which Middy is, are called Engines. However, it later claims that “… like generic web frameworks (fastify, hapi, express, etc.), this problem has been solved using the middleware pattern.” This is, as we understand now, complete nonsense. If we dive into the Middy Documentation further, we will find the following picture:
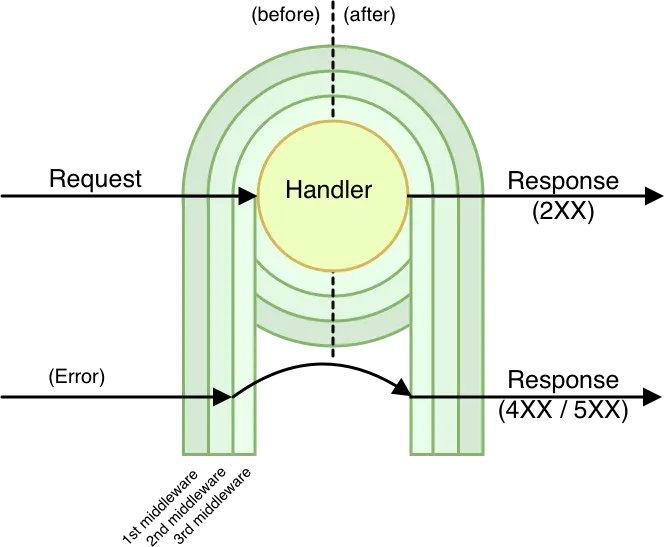
Fig 4: Middy
Now, we realize that what Middy calls “middleware” is a particular implementation of the Pipe-and-Filters Architecture Pattern via the Decorator Design Pattern. The latter should not be confused with TypeScript Decorators. In other words, Middy decorators are assembled into a pipeline each one performing certain operations before and/or after an HTTP request handling.
Perhaps, the main culprit of this confusion is the expressjs Framework Guide usage of titles like “Writing Middleware” and “Using Middleware” even though it internally uses the term middleware function, which is correct.
Middy comes with an impressive list of official middleware decorator plugins plus a long list of 3rd party middleware decorator plugins.
Here, the basic building blocks are called Features, which in many cases are Adapters of lower-level SDK functions. The list of features for different languages varies with the Python version to have the most comprehensive one. Features could be attached to Lambda Handlers using language decorators, used manually, or, in the case of TypeScript, using Middy. The term middleware pops up here and there and always means some decorator.
This one is also an implementation of the Pipe-and-Filters Architecture Pattern via the Decorator Design Pattern. Unlike Middy, individual decorators are combined in a pipeline using a special Compose decorator effectively applying the Composite Design Pattern.
Apart from using the incorrect terminology, all three frameworks have certain limitations in common, as follows:
The confusing sequence of operation of multiple Decorators. When more than one decorator is defined, the sequence of before operations is in the order of decorators, but the the sequence of after operations is in reverse order. With a long list of decorators that might be a source of serious confusion or even a conflict.
Reliance of environment variables. Control over the operation of particular adapters (e.g. Logger) solely relies on environment variables. To make a change, one will need to redeploy the Lambda Function.
A single list of decorators with some limited control in runtime. There is only one list of decorators per Lambda Function and, if some decorators need to be excluded and replaced depending on the deployment target or run-time environment, a run-time check needs to be performed (look, for example, at how Tracer behavior is controlled in Power Tools for AWS Lambda). This introduces unnecessary run-time overhead and enlarges the potential security attack surface.
Lack of support for higher-level crosscut specifications. All middleware decorators are specified for individual Lambda functions. Common specifications at the organization, organization unit, account, or service levels will require some handmade custom solutions.
Too narrow interpretation of Middleware as a linear implementation of Pipe-and-Filers and Decorator design patterns. Power Tools for AWS Lambda makes it slightly better by introducing its Features, also called Utilities, such as Logger, first and corresponding decorators second. Middy, on the other hand, treats everything as a decorator. In both cases, the decorators are stacked in one linear sequence, such that retrieving two parameters, one from the Secrets Manager and another from the AppConfig, cannot be performed in parallel while state-of-the-art pipeline builders, such as Marble.js and Async.js, support significantly more advanced control forms.
For Winglang Common Services Middleware Framework (we can now use the correct full name) this list of limitations will serve as a call for action to look for pragmatic ways to overcome these limitations.
Following the “Patterns, Frameworks, and Middleware: Their Synergistic Relationships” article middleware layers taxonomy, the Winglang Common Middleware Services Framework is positioned as follows:
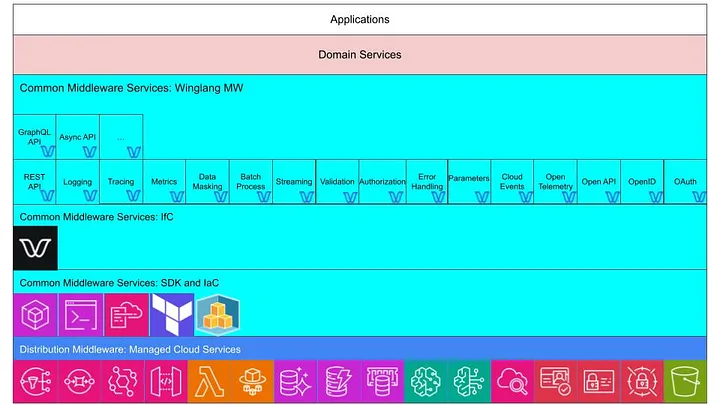
Fig 5: Winglang Middlware Layer
In the diagram above, the Winglang Middleware Layer, code name Winglang MW, is positioned as an upper sub-layer of Common Middleware Services, built on the top of the Winglang as a representative of the Infrastructure-from-Code solution, which in turn is built on the top of the cloud-specific SDK and IaC solutions providing convenient access to the cloud Distribution Middleware.
From the feature set perspective, the Winglang MW is expected
Different implementations of Winglang MW will vary in efficiency, ease of use (e.g. middleware pipeline configuration), flexibility, and supplementary tooling such as automatic code generation.
At the current stage, any premature conversion towards a single solution will be detrimental to the Winglang ecosystem evolution, and running multiple experiments in parallel would be more beneficial. Once certain middleware features prove themselves, they might be incorporated into the Winglang core, but it’s advisable not to rush too fast.
For the same reason, I intentionally called this section Directions rather than Requirements or Problem Statement. I have only a general sense of the desirable direction to proceed. Making things too specific could lead to some serendipitous alternatives being missed. I can, however, specify some constraints, as follows:
This publication was completely devoted to clarifying the concept of Middleware, its position within the cloud software system stack, and defining a general direction for developing one or more Winglang Middleware Frameworks.
I plan to devote the next Part Two of this series to exploring different options for implementing the Pipe-and-Filters Pattern in Middleware and after that to start building individual utilities and corresponding filters one by one.
It’s a rare opportunity that one does not encounter every day to revise the generic software infrastructure elements from the first principles and to explore the most suitable ways of realizing these principles on the leading modern cloud platforms. If you are interested in taking part in this journey, drop me a line.
import ReactPlayer from "react-player"; import console_new_look from "./assets/2024-03-13-magazine-008/console-new-look.mp4";
The 8th issue of the Wing Inflight Magazine.

This is an experience report on the initial steps of implementing a CRUD (Create, Read, Update, Delete) REST API in Winglang, with a focus on addressing typical production environment concerns such as secure authentication, observability, and error handling. It highlights how Winglang's distinctive features, particularly the separation of Preflight cloud resource configuration from Inflight API request handling, can facilitate more efficient integration of essential middleware components like logging and error reporting. This balance aims to reduce overall complexity and minimize the resulting code size. The applicability of various design patterns, including Pipe-and-Filters, Decorator, and Factory, is evaluated. Finally, future directions for developing a fully-fledged middleware library for Winglang are identified.
In my previous publication, I reported on my findings about the possible implementation of the Hexagonal Ports and Adapters pattern in the Winglang programming language using the simplest possible GreetingService sample application. The main conclusions from this evaluation were:
Initially, I planned to proceed with exploring possible ways of implementing a more general Staged Event-Driven Architecture (SEDA) architecture in Winglang. However, using the simplest possible GreetingService as an example left some very important architectural questions unanswered. Therefore I decided to explore in more depth what is involved in implementing a typical Create/Retrieve/Update/Delete (CRUD) service exposing standardized REST API and addressing typical production environment concerns such as secure authentication, observability, error handling, and reporting.
To prevent domain-specific complexity from distorting the focus on important architectural considerations, I chose the simplest possible TODO service with four operations:
Using this simple example allowed me to evaluate many important architectural options and to to come up with an initial prototype of a middleware library for the Winglang programming language compatible with and potentially surpassing popular libraries for mainstream programming languages, such as Middy for Node.js middleware engine for AWS Lambda and AWS Power Tools for Lambda.
Unlike my previous publication, I will not describe the step-by-step process of how I arrived at the current arrangement. Software architecture and design processes are rarely linear, especially beyond beginner-level tutorials. Instead, I will describe a starting point solution, which, while far from final, is representative enough to sense the direction in which the final framework might eventually evolve. I will outline the requirements, I wanted to address, the current architectural decisions, and highlight directions for future research.
Developing a simple, prototype-level TODO REST API service in Winglang is indeed very easy, and could be done within half an hour, using the Winglang Playground:
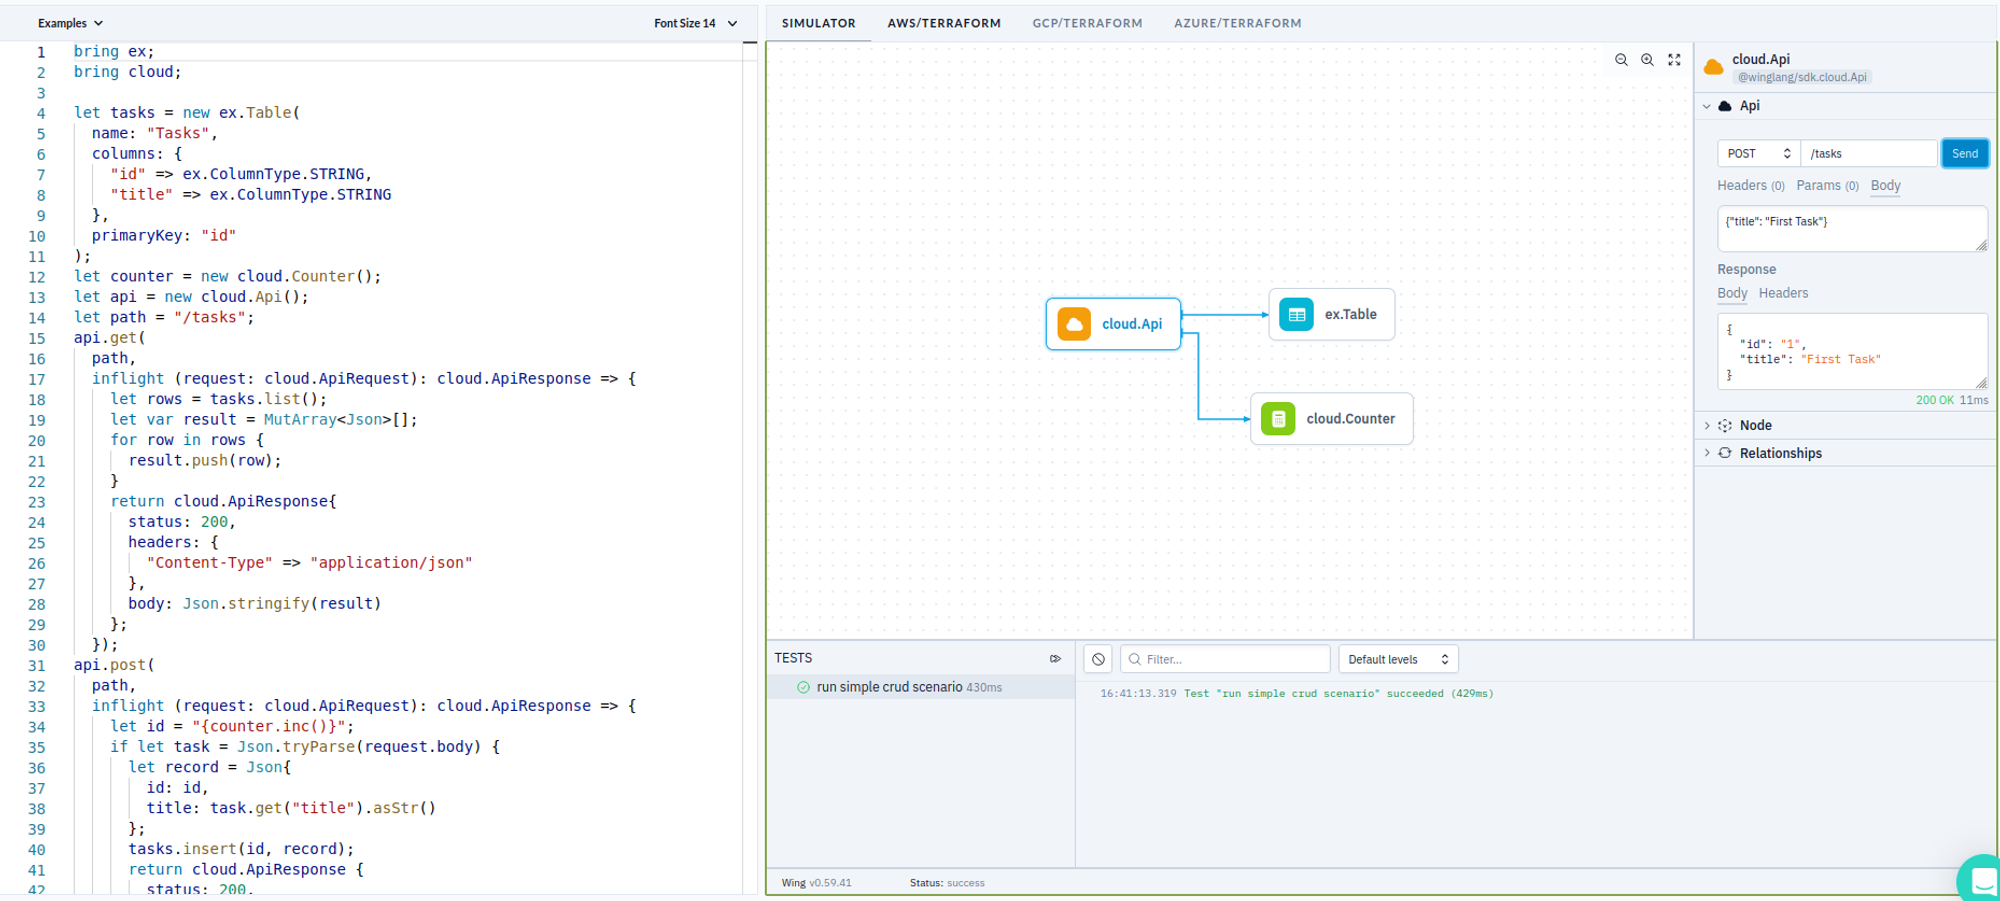
To keep things simple, I put everything in one source, even though, it of course could be split into Core, Ports, and Adapters. Let’s look at the major parts of this sample.
First, we need to define cloud resources, aka Ports, that we are going to use. This this is done as follows:
bring ex;
bring cloud;

let tasks = new ex.Table(
  name: "Tasks",
  columns: {
    "id" => ex.ColumnType.STRING,
    "title" => ex.ColumnType.STRING
  },
  primaryKey: "id"
);
let counter = new cloud.Counter();
let api = new cloud.Api();
let path = "/tasks";
Here we define a Winglang Table to keep TODO Tasks with only two columns: task ID and title. To keep things simple, we implement task ID as an auto-incrementing number using the Winglang Counter resource. And finally, we expose the TODO Service API using the Winglang Api resource.
Now, we are going to define a separate handler function for each of the four REST API requests. Getting a list of all tasks is implemented as:
api.get(
  path,
  inflight (request: cloud.ApiRequest): cloud.ApiResponse => {
    let rows = tasks.list();
    let var result = MutArray<Json>[];
    for row in rows {
      result.push(row);
    }
    return cloud.ApiResponse{
      status: 200,
      headers: {
        "Content-Type" => "application/json"
      },
      body: Json.stringify(result)
    };
  });
Creating a new task record is implemented as:
api.post(
  path,
  inflight (request: cloud.ApiRequest): cloud.ApiResponse => {
    let id = "{counter.inc()}";
    if let task = Json.tryParse(request.body) {
      let record = Json{
        id: id,
        title: task.get("title").asStr()
      };
      tasks.insert(id, record);
      return cloud.ApiResponse {
        status: 200,
        headers: {
          "Content-Type" => "application/json"
        },
        body: Json.stringify(record)
      };
    } else {
      return cloud.ApiResponse {
        status: 400,
        headers: {
          "Content-Type" => "text/plain"
        },
        body: "Bad Request"
      };
    }
  });
Updating an existing task is implemented as:
api.put(
  "{path}/:id",
  inflight (request: cloud.ApiRequest): cloud.ApiResponse => {
    let id = request.vars.get("id");
    if let task = Json.tryParse(request.body) {
      let record = Json{
        id: id,
        title: task.get("title").asStr()
      };
      tasks.update(id, record);
      return cloud.ApiResponse {
        status: 200,
        headers: {
          "Content-Type" => "application/json"
        },
        body: Json.stringify(record)
      };
    } else {
      return cloud.ApiResponse {
        status: 400,
        headers: {
          "Content-Type" => "text/plain"
        },
        body: "Bad Request"
      };
    }
  });
Finally, deleting an existing task is implemented as:
api.delete(
  "{path}/:id",
  inflight (request: cloud.ApiRequest): cloud.ApiResponse => {
    let id = request.vars.get("id");
    tasks.delete(id);
    return cloud.ApiResponse {
      status: 200,
      headers: {
        "Content-Type" => "text/plain"
      },
      body: ""
    };
  });
We could play with this API using the Winglang Simulator:
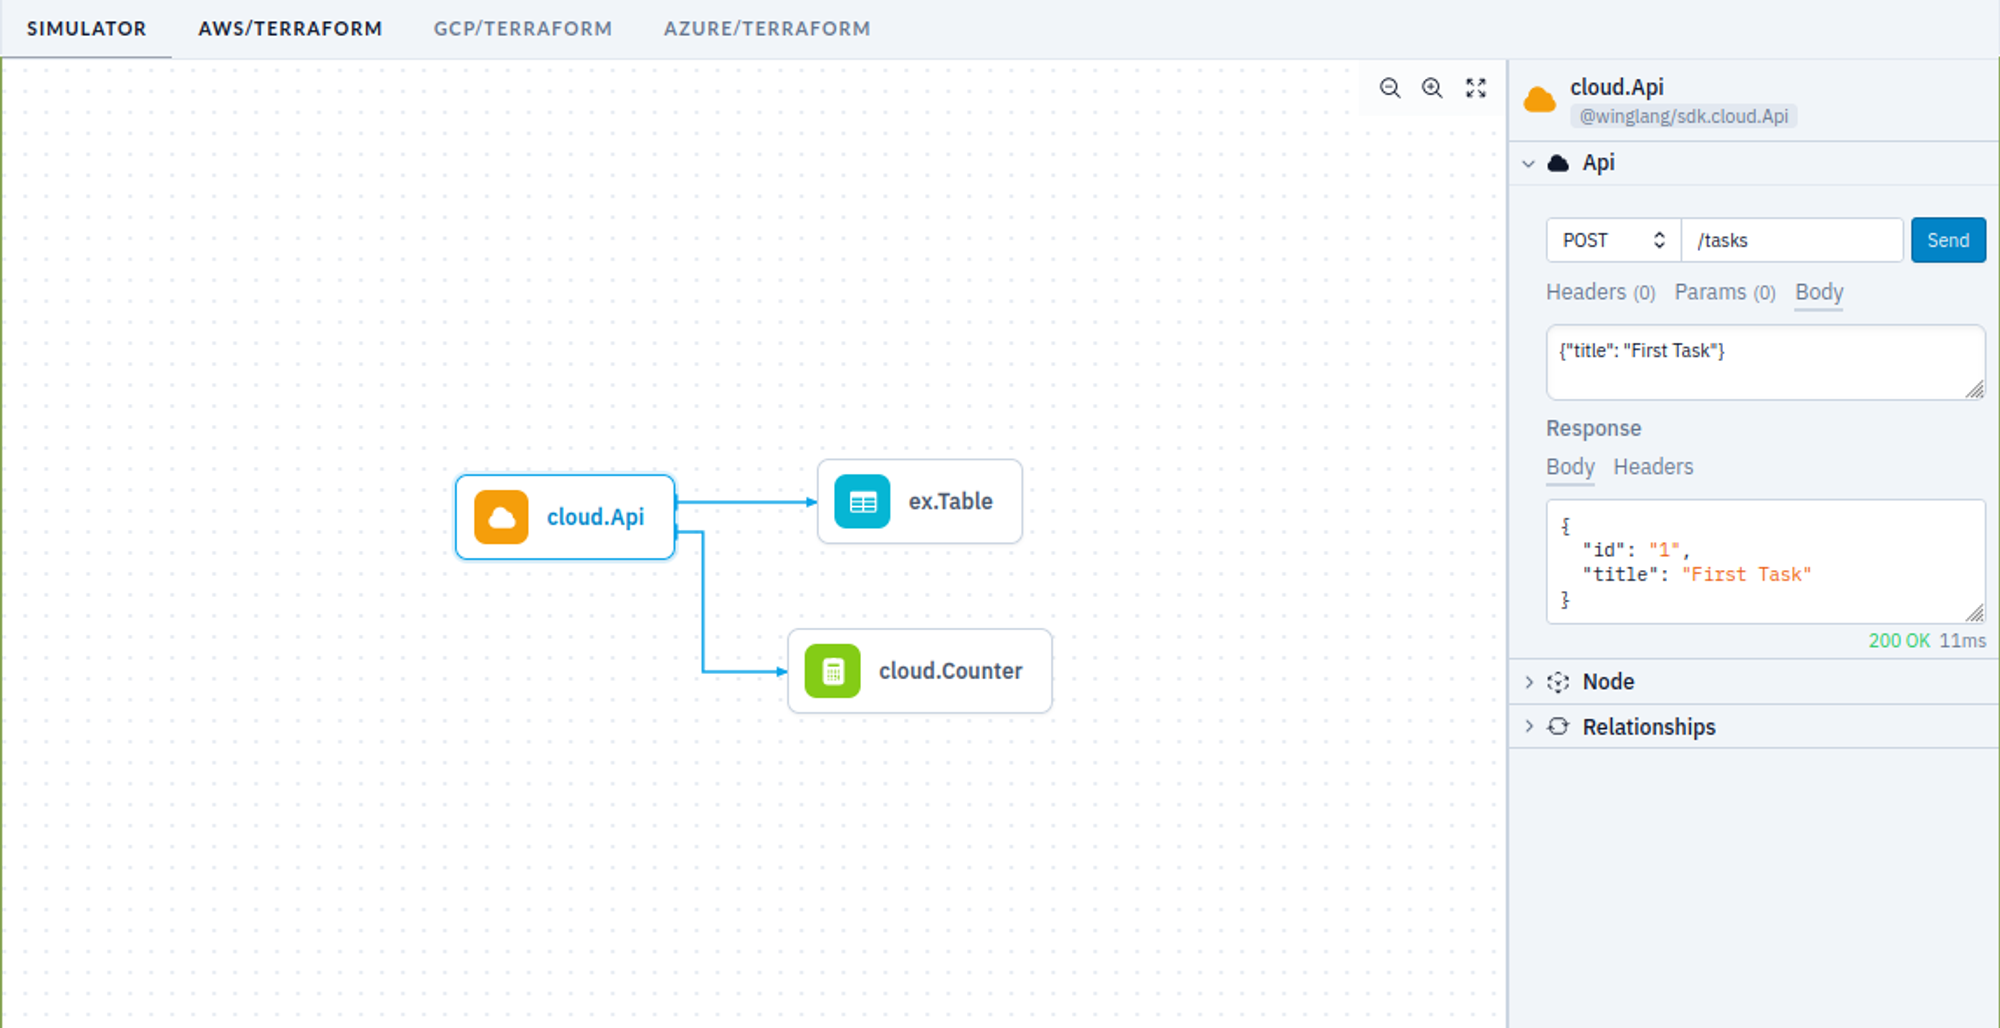
We could write one or more tests to validate the API automatically:
bring http;
bring expect;
let url = "{api.url}{path}";
test "run simple crud scenario" {
  let r1 = http.get(url);
  expect.equal(r1.status, 200);
  let r1_tasks = Json.parse(r1.body);
  expect.nil(r1_tasks.tryGetAt(0));
  let r2 = http.post(url, body: Json.stringify(Json{title: "First Task"}));
  expect.equal(r2.status, 200);
  let r2_task = Json.parse(r2.body);
  expect.equal(r2_task.get("title").asStr(), "First Task");
  let id = r2_task.get("id").asStr();
  let r3 = http.put("{url}/{id}", body: Json.stringify(Json{title: "First Task Updated"}));
  expect.equal(r3.status, 200);
  let r3_task = Json.parse(r3.body);
  expect.equal(r3_task.get("title").asStr(), "First Task Updated");
  let r4 = http.delete("{url}/{id}");
  expect.equal(r4.status, 200);
}
Last but not least, this service can be deployed on any supported cloud platform using the Winglang CLI. The code for the TODO Service is completely cloud-neutral, ensuring compatibility across different platforms without modification.
Should there be a need to expand the task details or link them to other system entities, the approach remains largely unaffected, provided the operations adhere to straightforward CRUD logic and can be executed within a 29-second timeout limit.
This example unequivocally demonstrates that the Winglang programming environment is a top-notch tool for the rapid development of such services. If this is all you need, you need not read further. What follows is a kind of White Rabbit hole of multiple non-functional concerns that need to be addressed before we can even start talking about serious production deployment.
You are warned. The forthcoming text is not for everybody, but rather for seasoned cloud software architects.

TODO sample service implementation presented above belongs to the so-called Headless REST API. This approach focuses on core functionality, leaving user experience design to separate layers. This is often implemented as Client-Side Rendering or Server Side Rendering with an intermediate Backend for Frontend tier, or by using multiple narrow-focused REST API services functioning as GraphQL Resolvers. Each approach has its merits for specific contexts.
I advocate for supporting HTTP Content Negotiation and providing a minimal UI for direct API interaction via a browser. While tools like Postman or Swagger can facilitate API interaction, experiencing the API as an end user offers invaluable insights. This basic UI, or what I refer to as an "engineering UI," often suffices.
In this context, anything beyond simple Server Side Rendering deployed alongside headless protocol serialization, such as JSON, might be unnecessarily complex. While Winglang provides support for Website cloud resource for web client assets (HTML pages, JavaScript, CSS), utilizing it for such purposes introduces additional complexity and cost.
A simpler solution would involve basic HTML templates, enhanced with HTMX's features and a CSS framework like Bootstrap. Currently, Winglang does not natively support HTML templates, but for basic use cases, this can be easily managed with TypeScript. For instance, rendering a single task line could be implemented as follows:
import { TaskData } from "core/task";

export function formatTask(path: string, task: TaskData): string {
  return `
    <li class="list-group-item d-flex justify-content-between align-items-center">
        <form hx-put="${path}/${task.taskID}" hx-headers='{"Accept": "text/plain"}' id="${task.taskID}-form">
            <span class="task-text">${task.title}</span>
            <input
                type="text"
                name="title"
                class="form-control edit-input"
                style="display: none;"
                value="${task.title}">
        </form>
        <div class="btn-group">
            <button class="btn btn-danger btn-sm delete-btn"
                hx-delete="${path}/${task.taskID}"
                hx-target="closest li"
                hx-swap="outerHTML"
                hx-headers='{"Accept": "text/plain"}'>✕</button>
            <button class="btn btn-primary btn-sm edit-btn">✎</button>
        </div>
    </li>
    `;
}
That would result in the following UI screen:
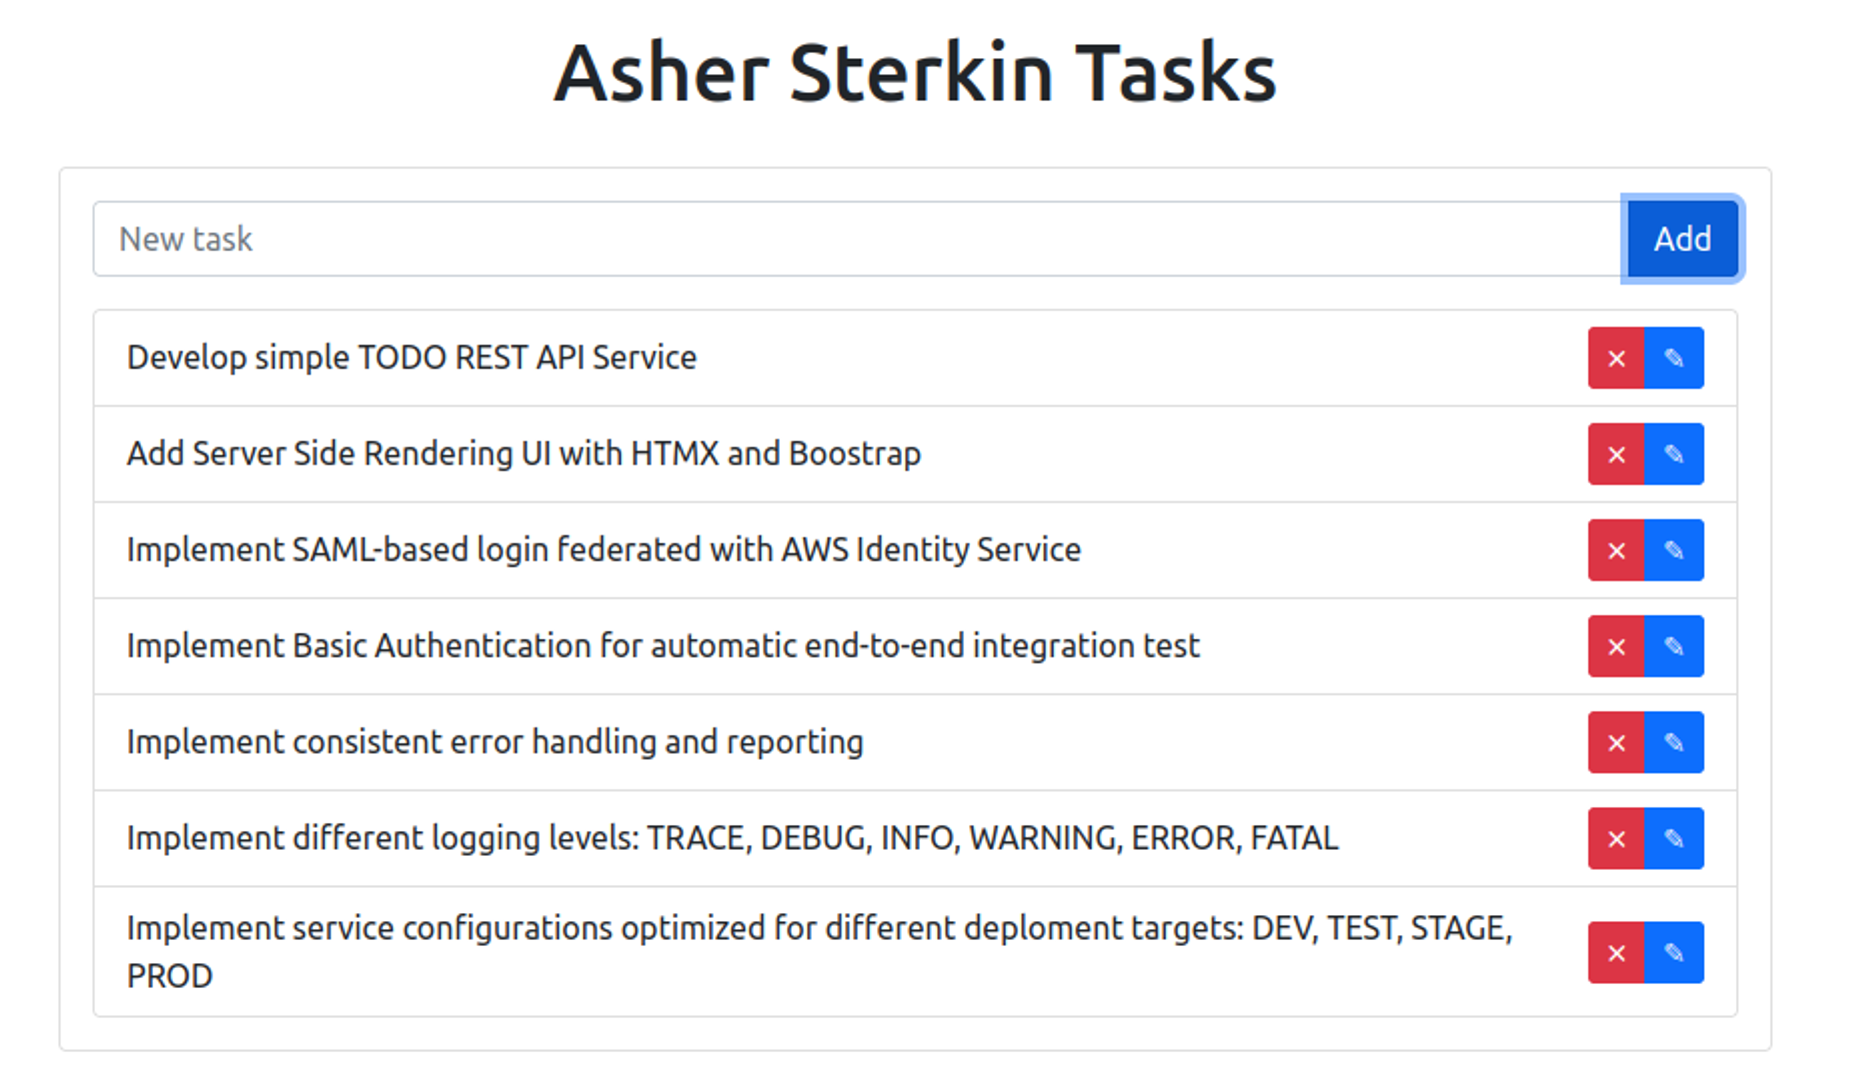
Not super-fancy, but good enough for demo purposes.
Even purely Headless REST APIs require strong usability considerations. API calls should follow REST conventions for HTTP methods, URL formats, and payloads. Proper documentation of HTTP methods and potential error handling are crucial. Client and server errors need to be logged, converted into appropriate HTTP status codes, and accompanied by clear explanation messages in the response body.
The need to handle multiple request parsers and response formatters based on content negotiation using Content-Type and Accept headers in HTTP requests led me to the following design approach:
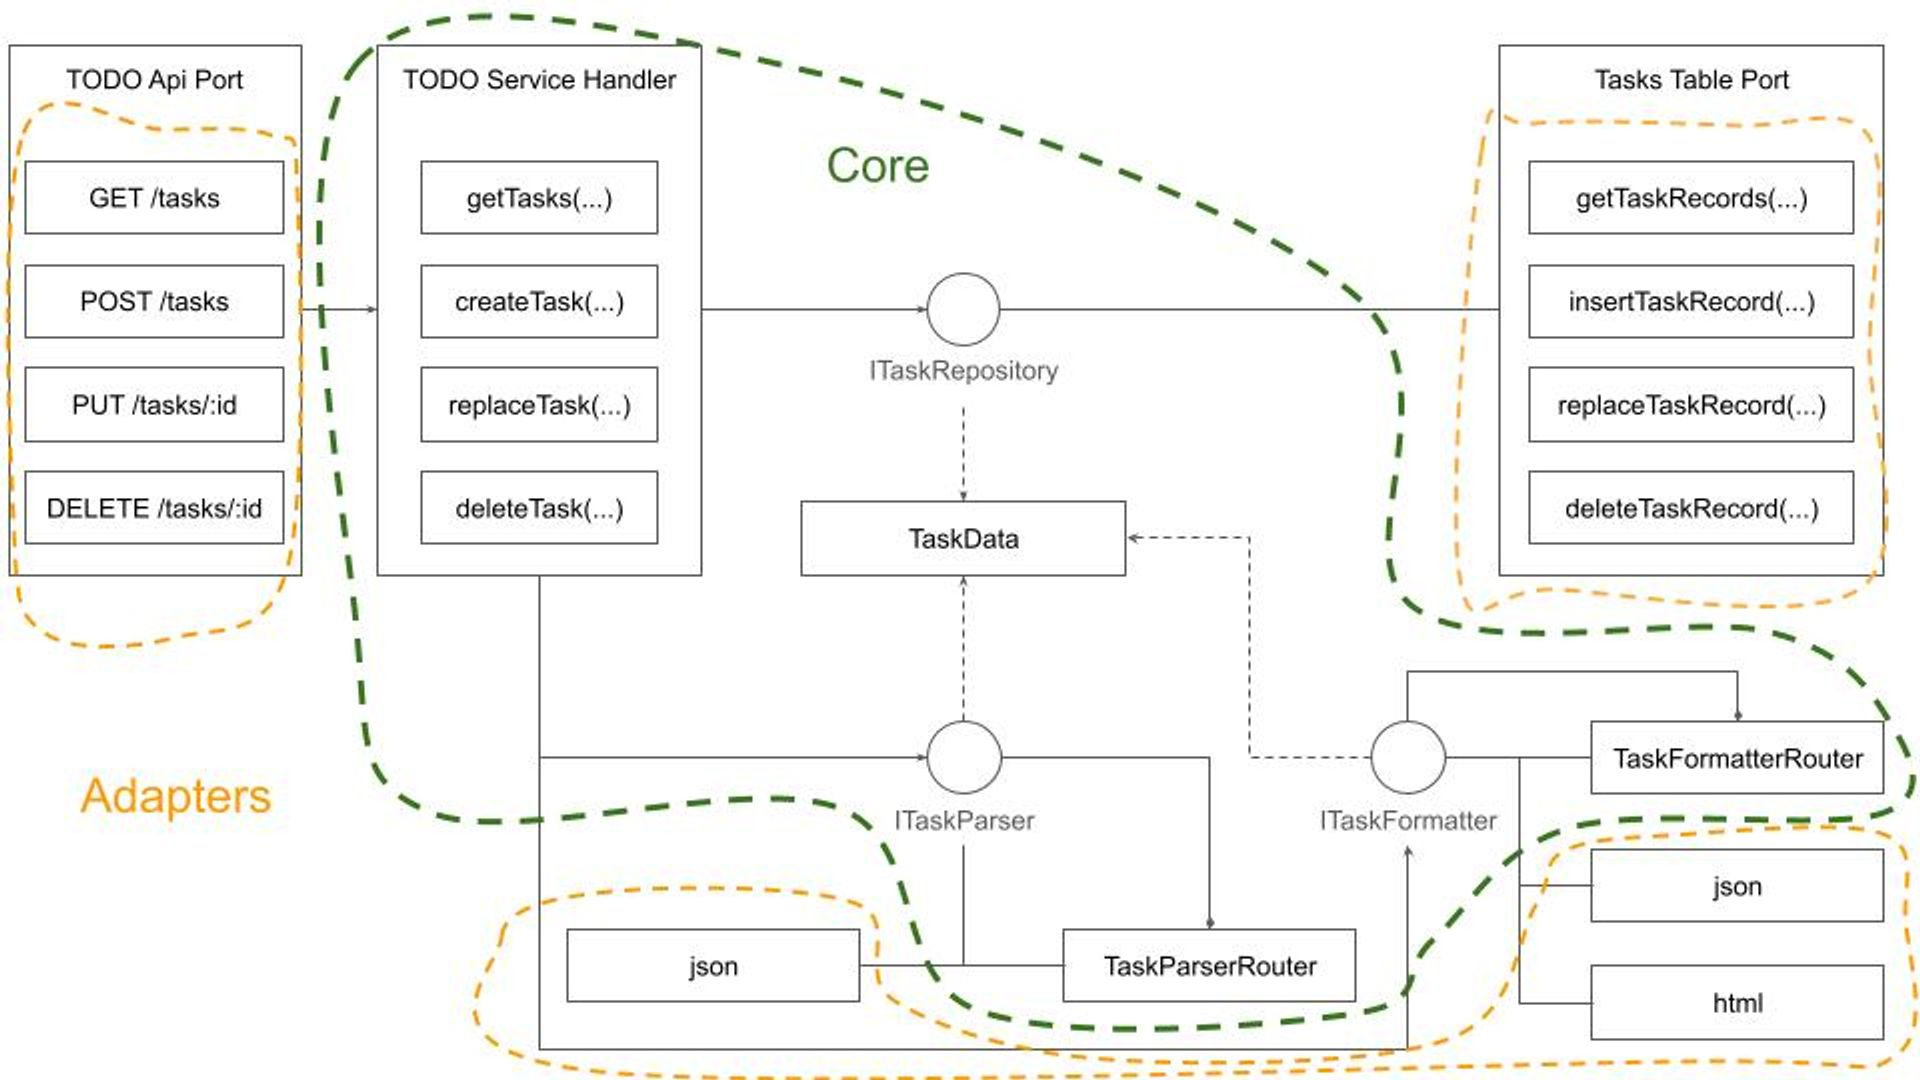
Adhering to the Dependency Inversion Principle ensures that the system Core is completely isolated from Ports and Adapters. While there might be an inclination to encapsulate the Core within a generic CRUD framework, defined by a ResourceData type, I advise caution. This recommendation stems from several considerations:
Another option would be to abandon the Core data types definition and rely entirely on untyped JSON interfaces, akin to a Lisp-like programming style. However, given Winglang's strong typing, I decided against this approach.
Overall, the TodoServiceHandler is quite simple and easy to understand:
bring "./data.w" as data;
bring "./parser.w" as parser;
bring "./formatter.w" as formatter;

pub class TodoHandler {
    _path: str;
    _parser: parser.TodoParser;
    _tasks: data.ITaskDataRepository;
    _formatter: formatter.ITodoFormatter;

    new(
        path: str,
        tasks_: data.ITaskDataRepository,
        parser: parser.TodoParser,
        formatter: formatter.ITodoFormatter,
    ) {
        this._path = path;
        this._tasks = tasks_;
        this._parser = parser;
        this._formatter = formatter;
    }

    pub inflight getHomePage(user: Json, outFormat: str): str {
        let userData = this._parser.parseUserData(user);

        return this._formatter.formatHomePage(outFormat, this._path, userData);
    }

    pub inflight getAllTasks(user: Json, query: Map<str>, outFormat: str): str {
        let userData = this._parser.parseUserData(user);
        let tasks = this._tasks.getTasks(userData.userID);

        return this._formatter.formatTasks(outFormat, this._path, tasks);
    }

    pub inflight createTask(
				user: Json,
				body: str,
				inFormat: str,
				outFormat: str
		): str {
        let taskData = this._parser.parsePartialTaskData(user, body);
        this._tasks.addTask(taskData);

        return this._formatter.formatTasks(outFormat, this._path, [taskData]);
    }

    pub inflight replaceTask(
				user: Json,
				id: str,
				body: str,
				inFormat: str,
				outFormat: str
		): str {
        let taskData = this._parser.parseFullTaskData(user, id, body);
        this._tasks.replaceTask(taskData);

        return taskData.title;
    }

    pub inflight deleteTask(user: Json, id: str): str {
        let userData = this._parser.parseUserData(user);
        this._tasks.deleteTask(userData.userID, num.fromStr(id));
        return "";
    }
}
As you might notice, the code structure deviates slightly from the design diagram presented earlier. These minor adaptations are normal in software design; new insights emerge throughout the process, necessitating adjustments. The most notable difference is the user: Json argument defined for every function. We'll discuss the purpose of this argument in the next section.
Exposing the TODO service to the internet without security measures is a recipe for disaster. Hackers, bored teens, and professional attackers will quickly target its public IP address. The rule is very simple:
any public interface must be protected unless exposed for a very short testing period. Security is non-negotiable.
Conversely, overloading a service with every conceivable security measure can lead to prohibitively high operational costs. As I've argued in previous writings, making architects accountable for the costs of their designs might significantly reshape their approach:
If cloud solution architects were responsible for the costs incurred by their systems, it could fundamentally change their design philosophy.
What we need, is a reasonable protection of the service API, not less but not more either. Since I wanted to experiment with full-stack Service Side Rendering UI my natural choice was to enforce user login at the beginning, to produce a JWT Token with reasonable expiration, say one hour, and then to use it for authentication of all forthcoming HTTP requests.
Due to the Service Side Rendering rendering specifics using HTTP Cookie to carry over the session token was a natural (to be honest suggested by ChatGPT) choice. For the Client-Side Rendering option, I might need to use the Bearer Token delivered via the HTTP Request headers Authorization field.
With session tokens now incorporating user information, I could aggregate TODO tasks by the user. Although there are numerous methods to integrate session data, including user details into the domain, I chose to focus on userID and fullName attributes for this study.
For user authentication, several options are available, especially within the AWS ecosystem:
As an independent software technology researcher, I gravitate towards the simplest solutions with the fewest components, which also address daily operational needs. Leveraging the AWS Identity Center, as detailed in a separate publication, was a logical step due to my existing multi-account/multi-user setup.
After integration, my AWS Identity Center main screen looks like this:
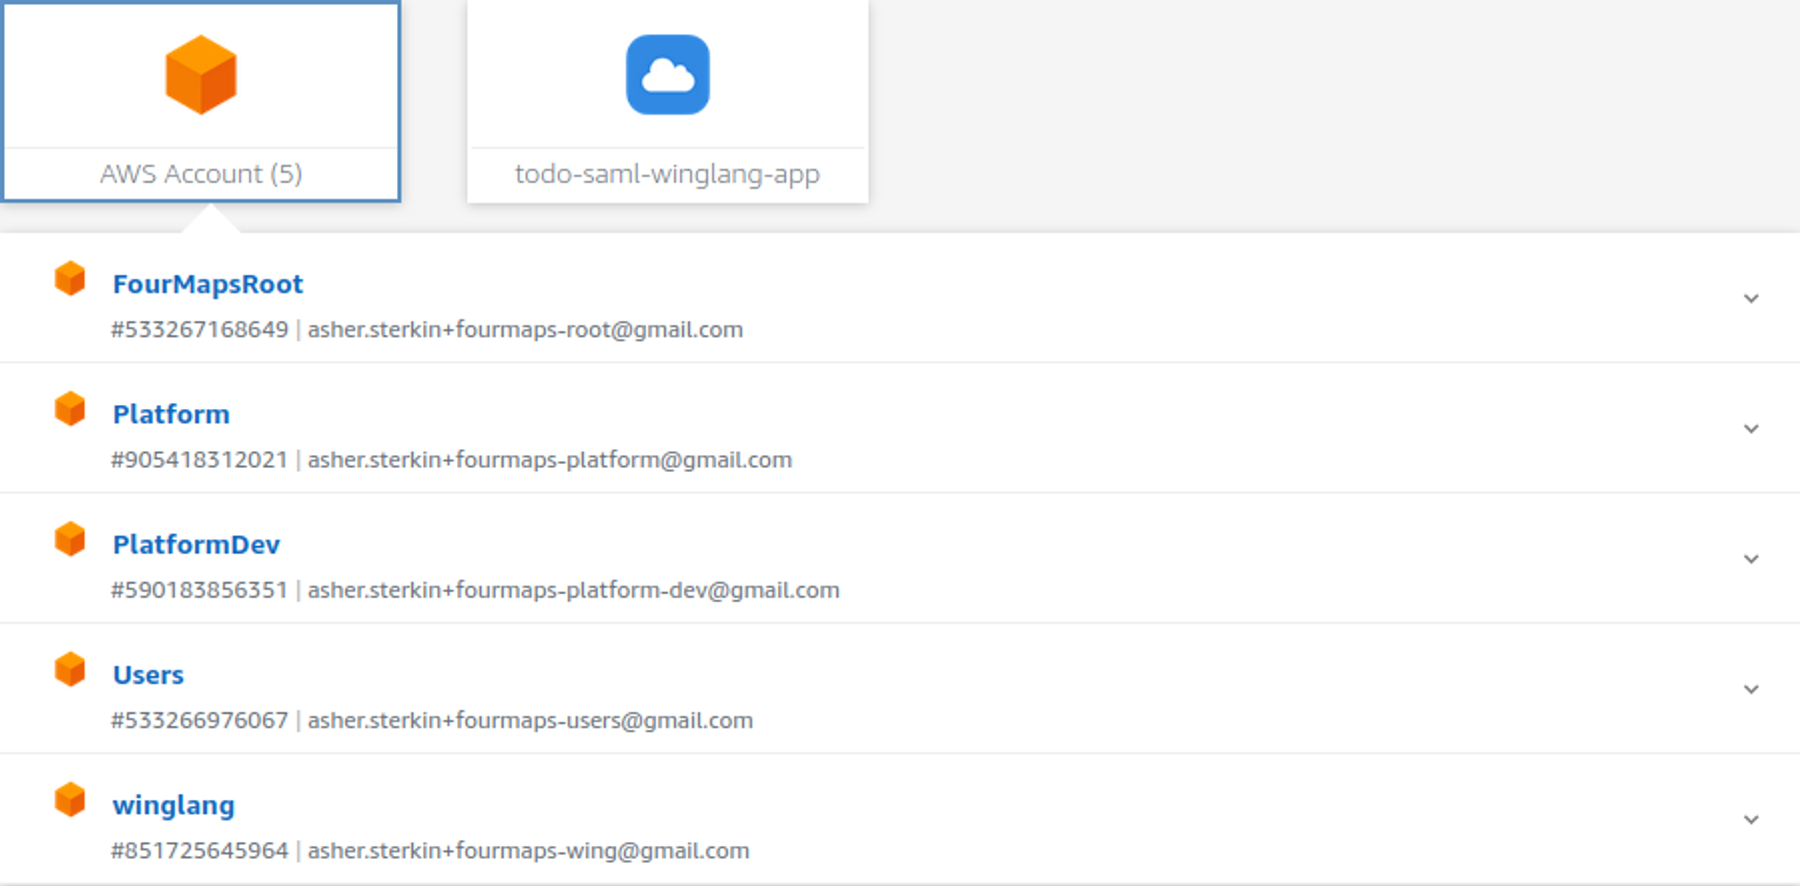
That means that in my system, users, myself, or guests, could use the same AWS credentials for development, administration, and sample or housekeeping applications.
To integrate with AWS Identity Center I needed to register my application and provide a new endpoint implementing the so-called “Assertion Consumer Service URL (ACS URL)”. This publication is not about the SAML standard. It would suffice to say that with ChatGPT and Google search assistance, it could be done. Some useful information can be found here. What came very handy was a TypeScript samlify library which encapsulates the whole heavy lifting of the SAML Login Response validation process.
What I’m mostly interested in is how this variability point affects the overall system design. Let’s try to visualize it using a semi-formal data flow notation:
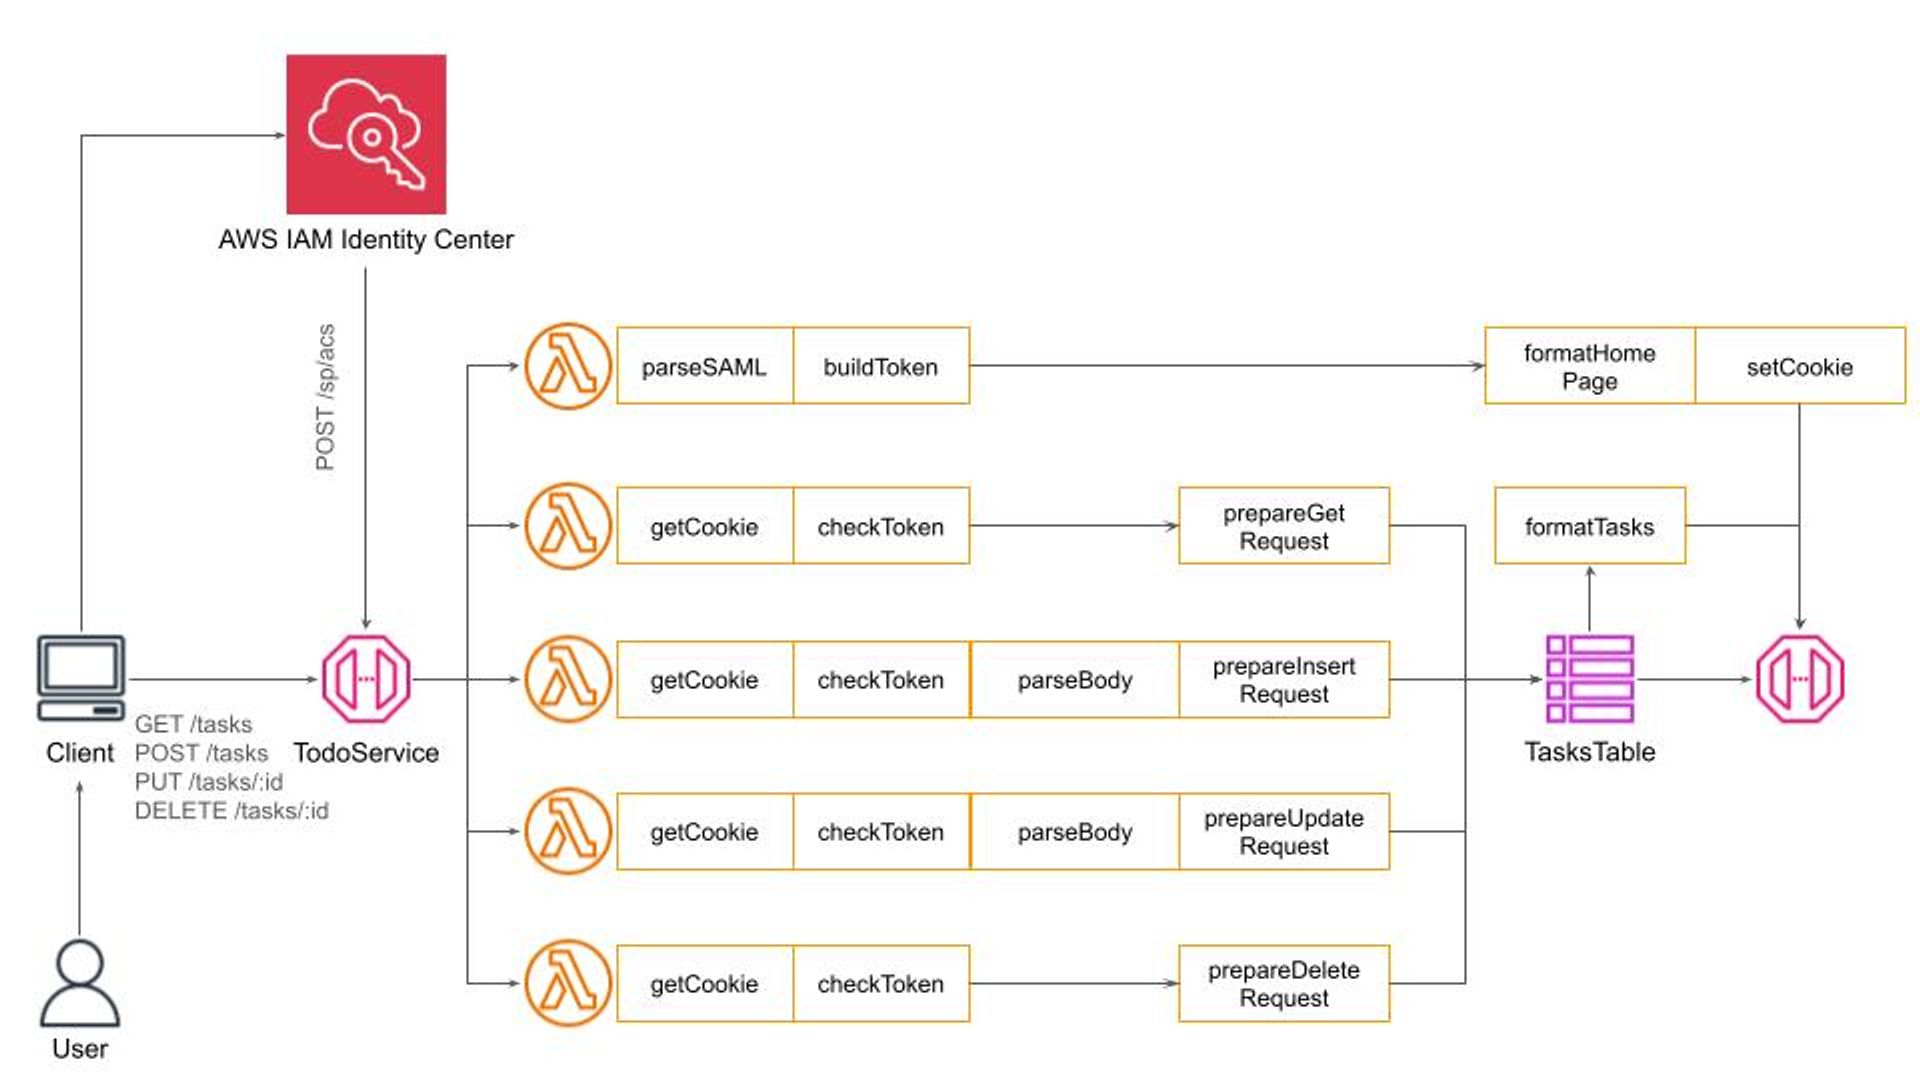
While it might seem unusual this representation reflects with high fidelity how data flows through the system. What we see here is a special instance of the famous Pipe-and-Filters architectural pattern.
Here, data flows through a pipeline and each filter performs one well-defined task in fact following the Single Responsibility Principle. Such an arrangement allows me to replace filters should I want to switch to a simple Basic HTTP Authentication, to use the HTTP Authorization header, or use a different secret management policy for JWT token building and validation.
If we zoom into Parse and Format filters, we will see a typical dispatch logic using Content-Type and Accept HTTP headers respectively:
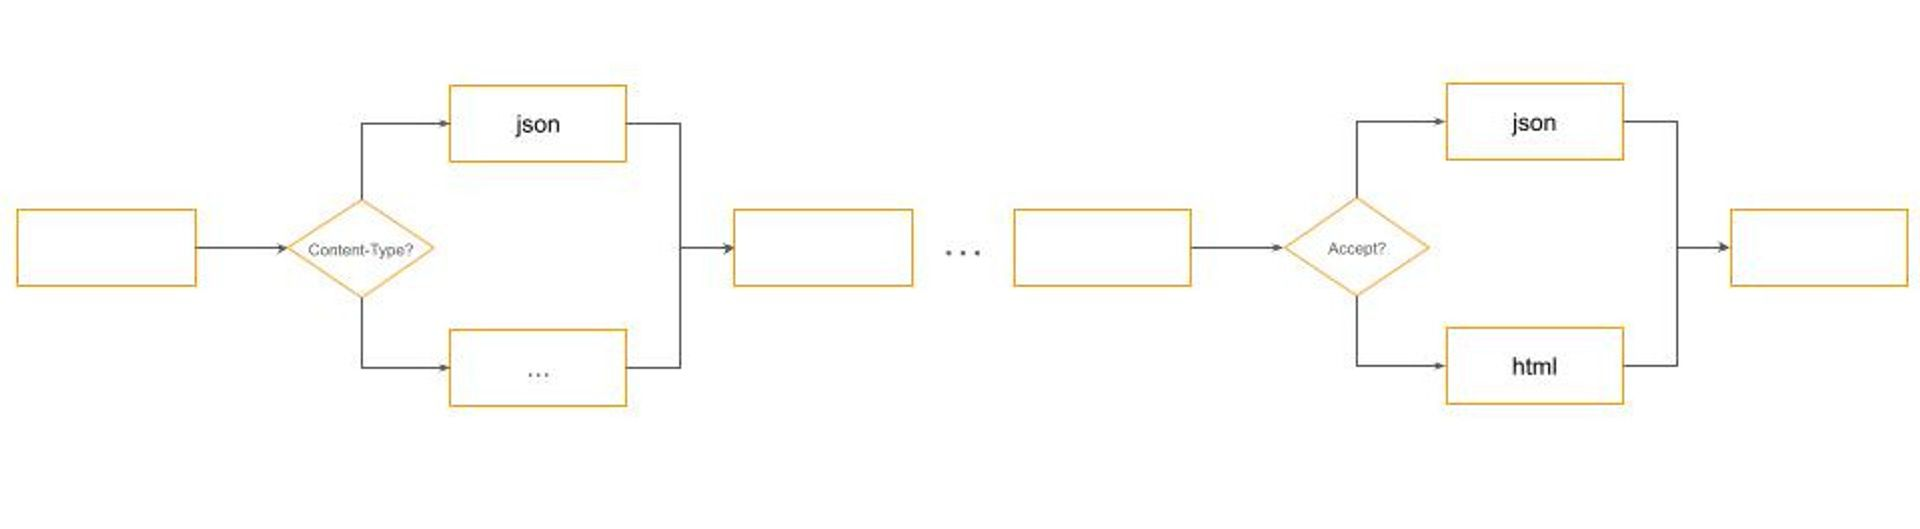
Many engineers confuse design and architectural patterns with specific implementations. This misses the essence of what patterns are meant to achieve.
Patterns are about identifying a suitable approach to balance conflicting forces with minimal intervention. In the context of building cloud-based software systems, where security is paramount but should not be overpriced in terms of cost or complexity, this understanding is crucial. The Pipe-and-Filters design pattern helps with addressing such design challenges effectively. It allows for modularization and flexible configuration of processing steps, which in this case, relate to authentication mechanisms.
For instance, while robust security measures like SAML authentication are necessary for production environments, they may introduce unnecessary complexity and overhead in scenarios such as automated end-to-end testing. Here, simpler methods like Basic HTTP Authentication may suffice, providing a quick and cost-effective solution without compromising the system's overall integrity. The goal is to maintain the system's core functionality and code base uniformity while varying the authentication strategy based on the environment or specific requirements.
Winglang's unique Preflight compilation feature facilitates this by allowing for configuration adjustments at the build stage, eliminating runtime overhead. This capability presents a significant advantage of Winglang-based solutions over other middleware libraries, such as Middy and AWS Power Tools for Lambda, by offering a more efficient and flexible approach to managing the authentication pipeline.
Implementing Basic HTTP Authentication, therefore, only requires modifying a single filter within the authentication pipeline, leaving the remainder of the system unchanged:

Due to some technical limitations, it’s currently not possible to implement Pipe-and-Filters in Winglang directly, but it could be quite easily simulated by a combination of Decorator and Factory design patterns. How exactly, we will see shortly. Now, let’s proceed to the next topic.
In this publication, I’m not going to cover all aspects of production operation. The topic is large and deserves a separate publication of its own. Below, is presented what I consider as a bare minimum:
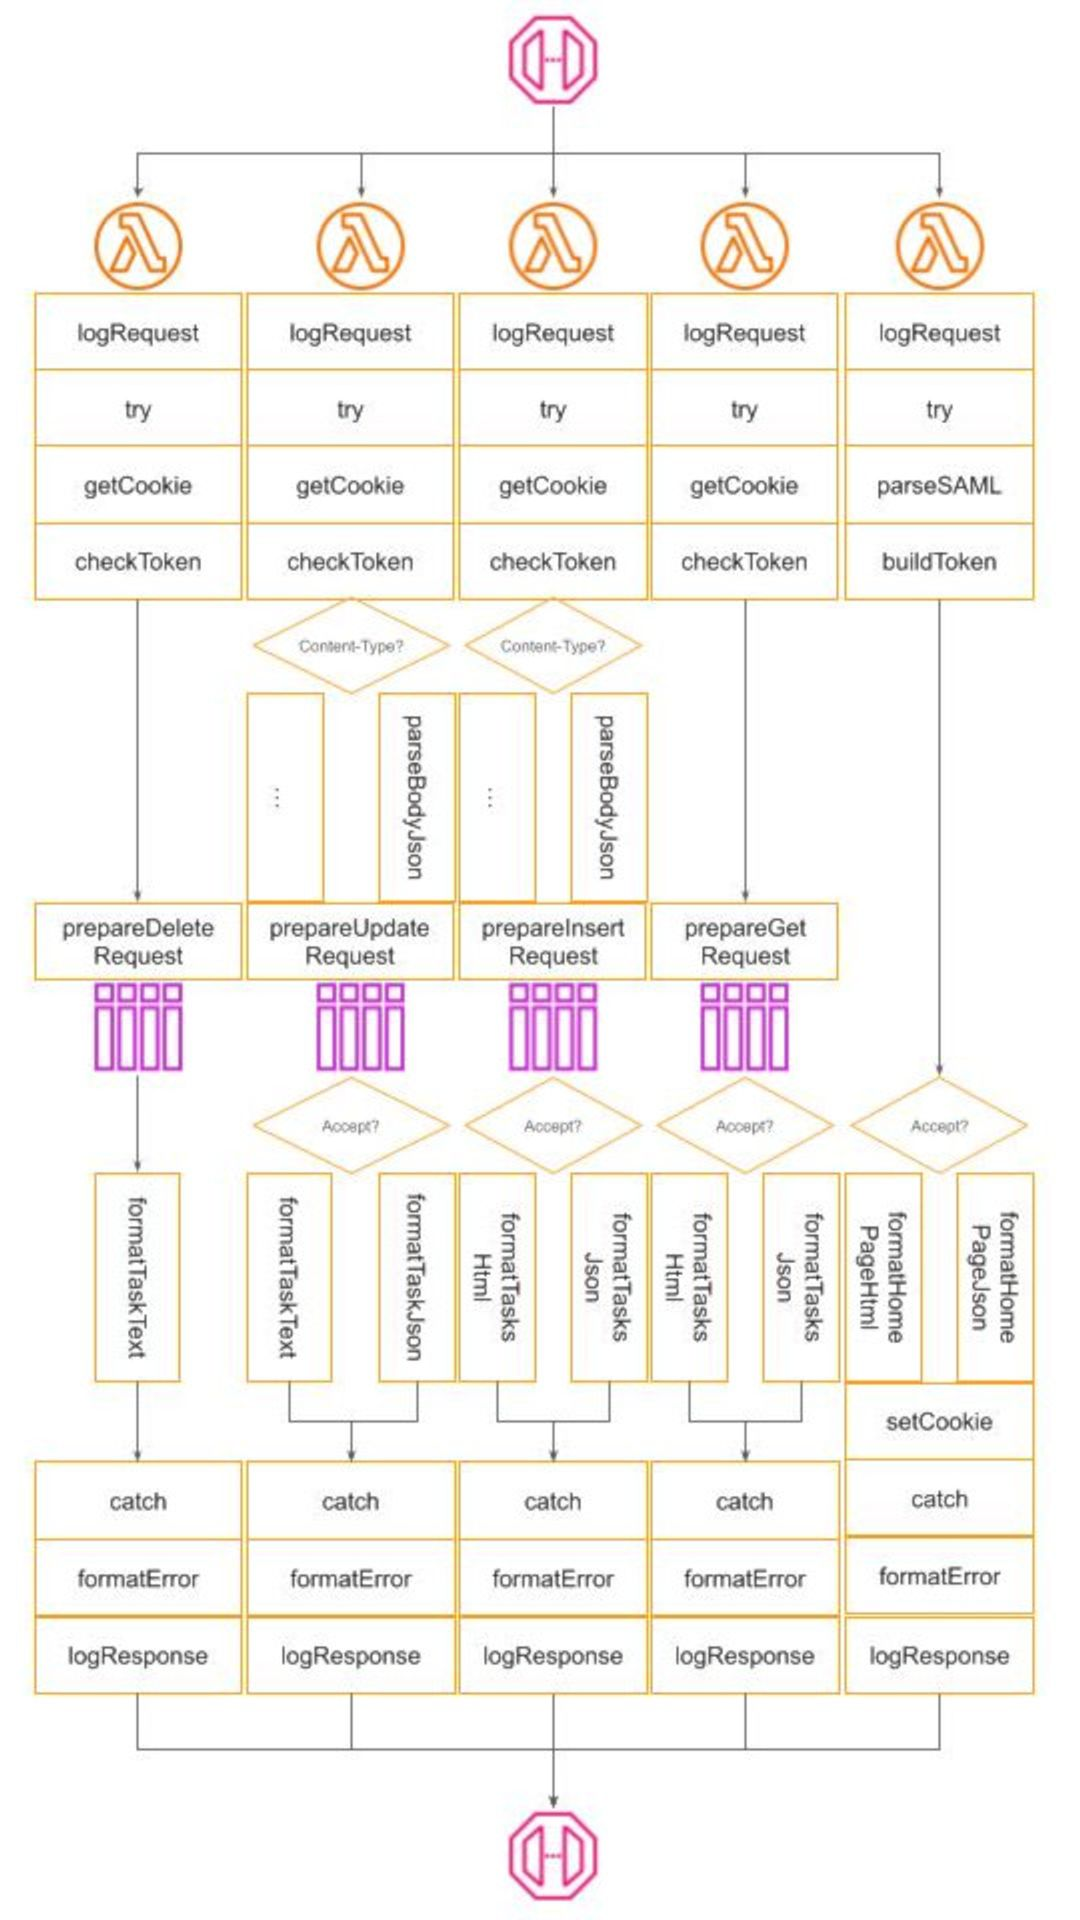
To operate a service we need to know what happens with it, especially when something goes wrong. This is achieved via a Structured Logging mechanism. At the moment, Winglang provides only a basic log(str) function. For my investigation, I need more and implemented a poor man-structured logging class
// A poor man implementation of configurable Logger
// Similar to that of Python and TypeScript
bring cloud;
bring "./dateTime.w" as dateTime;

pub enum logging {
  TRACE,
  DEBUG,
  INFO,
  WARNING,
  ERROR,
  FATAL
}

//This is just enough configuration
//A serious review including compliance
//with OpenTelemetry and privacy regulations
//Is required. The main insight:
//Serverless Cloud logging is substantially
//different
pub interface ILoggingStrategy {
  inflight timestamp(): str;
  inflight print(message: Json): void;
}

pub class DefaultLoggerStrategy impl ILoggingStrategy {
  pub inflight timestamp(): str {
    return dateTime.DateTime.toUtcString(std.Datetime.utcNow());
  }
  pub inflight print(message: Json): void {
    log("{message}");
  }
}

//TBD: probably should go into a separate module
bring expect;
bring ex;

pub class MockLoggerStrategy impl ILoggingStrategy {
  _name: str;
  _counter: cloud.Counter;
  _messages: ex.Table;

  new(name: str?) {
    this._name = name ?? "MockLogger";
    this._counter = new cloud.Counter();
    this._messages = new ex.Table(
      name: "{this._name}Messages",
      columns: Map<ex.ColumnType>{
        "id" => ex.ColumnType.STRING,
        "message" => ex.ColumnType.STRING
      },
      primaryKey: "id"
    );
  }
  pub inflight timestamp(): str {
    return "{this._counter.inc(1, this._name)}";
  }
  pub inflight expect(messages: Array<Json>): void {
    for message in messages {
      this._messages.insert(
	      message.get("timestamp").asStr(),
	      Json{ message: "{message}"}
	    );
    }
  }
  pub inflight print(message: Json): void {
    let expected = this._messages.get(
	    message.get("timestamp").asStr()
	  ).get("message").asStr();
    expect.equal("{message}", expected);
  }
}

pub class Logger {
  _labels: Array<str>;
  _levels: Array<logging>;
  _level: num;
  _service: str;
  _strategy: ILoggingStrategy;

  new (level: logging, service: str, strategy: ILoggingStrategy?) {
    this._labels = [
        "TRACE",
        "DEBUG",
        "INFO",
        "WARNING",
        "ERROR",
        "FATAL"
    ];
    this._levels = Array<logging>[
      logging.TRACE,
      logging.DEBUG,
      logging.INFO,
      logging.WARNING,
      logging.ERROR,
      logging.FATAL
    ];
    this._level = this._levels.indexOf(level);
    this._service = service;
    this._strategy = strategy ?? new DefaultLoggerStrategy();
  }
  pub inflight log(level_: logging, func: str, message: Json): void {
    let level = this._levels.indexOf(level_);
    let label = this._labels.at(level);
    if  this._level <= level {
      this._strategy.print(Json {
        timestamp: this._strategy.timestamp(),
        level: label,
        service: this._service,
        function: func,
        message: message
      });
    }
  }
  pub inflight trace(func: str, message: Json): void {
    this.log(logging.TRACE, func,message);
  }
  pub inflight debug(func: str, message: Json): void {
    this.log(logging.DEBUG, func, message);
  }
  pub inflight info(func: str, message: Json): void {
    this.log(logging.INFO, func, message);
  }
  pub inflight warning(func: str, message: Json): void {
    this.log(logging.WARNING, func, message);
  }
  pub inflight error(func: str, message: Json): void {
    this.log(logging.ERROR, func, message);
  }
  pub inflight fatal(func: str, message: Json): void {
    this.log(logging.FATAL, func, message);
  }
}
There is nothing spectacular here and, as I wrote in the comments, a cloud-based logging system requires a serious revision. Still, it’s enough for the current investigation. I’m fully convinced that logging is an integral part of any service specification and has to be tested with the same rigor as core functionality. For that purpose, I developed a simple mechanism to mock logs and check them against expectations.
For a REST API CRUD service, we need to log at least three types of things:
In addition, depending on needs the original error message might need to be converted into a standard one, for example in order not to educate attackers.
How much if any details to log depends on multiple factors: deployment target, type of request, specific user, type of error, statistical sampling, etc. In development and test mode, we will normally opt for logging almost everything and returning the original error message directly to the client screen to ease debugging. In production mode, we might opt for removing some sensitive data because of regulation requirements, to return a general error message, such as “Bad Request”, without any details, and apply only statistical sample logging for particular types of requests to save the cost.
Flexible logging configuration was achieved by injecting four additional filters in every request handling pipeline:
This structure, although not an ultimate one, provides enough flexibility to implement a wide range of logging and error-handling strategies depending on the service and its deployment target specifics.
As with logs, Winglang at the moment provides only a basic throw <str> operator, so I decided to implement my version of a poor man structured exceptions:
// A poor man structured exceptions
pub inflight class Exception {
    pub tag: str;
    pub message: str?;

    new(tag: str, message: str?) {
        this.tag = tag;
        this.message = message;
    }
    pub raise() {
        let err = Json.stringify(this);
        throw err;
    }
    pub static fromJson(err: str): Exception {
        let je = Json.parse(err);

        return new Exception(
	        je.get("tag").asStr(),
	        je.tryGet("message")?.tryAsStr()
	      );
    }
    pub toJson(): Json { //for logging
        return Json{tag: this.tag, message: this.message};
    }
}

// Standard exceptions, similar to those of Python
pub inflight class KeyError extends Exception {
    new(message: str?) {
        super("KeyError", message);
    }
}
pub inflight class ValueError extends Exception {
    new(message: str?) {
        super("ValueError", message);
    }
}
pub inflight class InternalError extends Exception {
    new(message: str?) {
        super("InternalError", message);
    }
}
pub inflight class NotImplementedError extends Exception {
    new(message: str?) {
        super("NotImplementedError", message);
    }
}
//Two more HTTP-specific, yet useful
pub inflight class AuthenticationError extends Exception {
		//aka HTTP 401 Unauthorized
    new(message: str?) {
        super("AuthenticationError", message);
    }
}
pub inflight class AuthorizationError extends Exception {
		//aka HTTP 403 Forbidden
    new(message: str?) {
        super("AuthorizationError", message);
    }
}
These experiences highlight how the developer community can bridge gaps in new languages with temporary workarounds. Winglang is still evolving, but its innovative features can be harnessed for progress despite the language's age.
Now, it’s time to take a brief look at the last production topic on my list, namely
Scaling is a crucial aspect of cloud development, but it's often misunderstood. Some neglect it entirely, leading to problems when the system grows. Others over-engineer, aiming to be a "FANG" system from day one. The proclamation "We run everything on Kubernetes" is a common refrain in technical circles, regardless of whether it's appropriate for the project at hand.
Neither—neglect nor over-engineering— extreme is ideal. Like security, scaling shouldn't be ignored, but it also shouldn't be over-emphasized.
Up to a certain point, cloud platforms provide cost-effective scaling mechanisms. Often, the choice between different options boils down to personal preference or inertia rather than significant technical advantages.
The prudent path involves starting small and cost-effectively, scaling out based on real-world usage and performance data, rather than assumptions. This approach necessitates a system designed for easy configuration changes to accommodate scaling, something not inherently supported by Winglang but certainly within the realm of feasibility through further development and research. As an illustration, let's consider scaling within the AWS ecosystem:
In essence, Winglang's approach, emphasizing the Preflight and Inflight stages, holds promise for facilitating these scaling strategies, although it may still be in the early stages of fully realizing this potential. This exploration of scalability within cloud software development emphasizes starting small, basing decisions on actual data, and remaining flexible in adapting to changing requirements.
In the mid-1990s, I learned about Commonality Variability Analysis from Jim Coplien. Since then, this approach, alongside Edsger W. Dijkstra's Layered Architecture, has been a cornerstone of my software engineering practices. Commonality Variability Analysis asks: "In our system, which parts will always be the same and which might need to change?" The Open-Closed Principle dictates that variable parts should be replaceable without modifying the core system.
Deciding when to finalize the stable aspects of a system involves navigating the trade-off between flexibility and efficiency, with several stages from code generation to runtime offering opportunities for fixation. Dynamic language proponents might delay these decisions to runtime for maximum flexibility, whereas advocates for static, compiled languages typically secure crucial system components as early as possible.
Winglang, with its unique Preflight compilation phase, stands out by allowing cloud resources to be fixed early in the development process. In this publication, I explored how Winglang enables addressing non-functional aspects of cloud services through a flexible pipeline of filters, though this granularity introduces its own complexity. The challenge now becomes managing this complexity without compromising the system's efficiency or flexibility.
While the final solution is a work in progress, I can outline a high-level design that balances these forces:
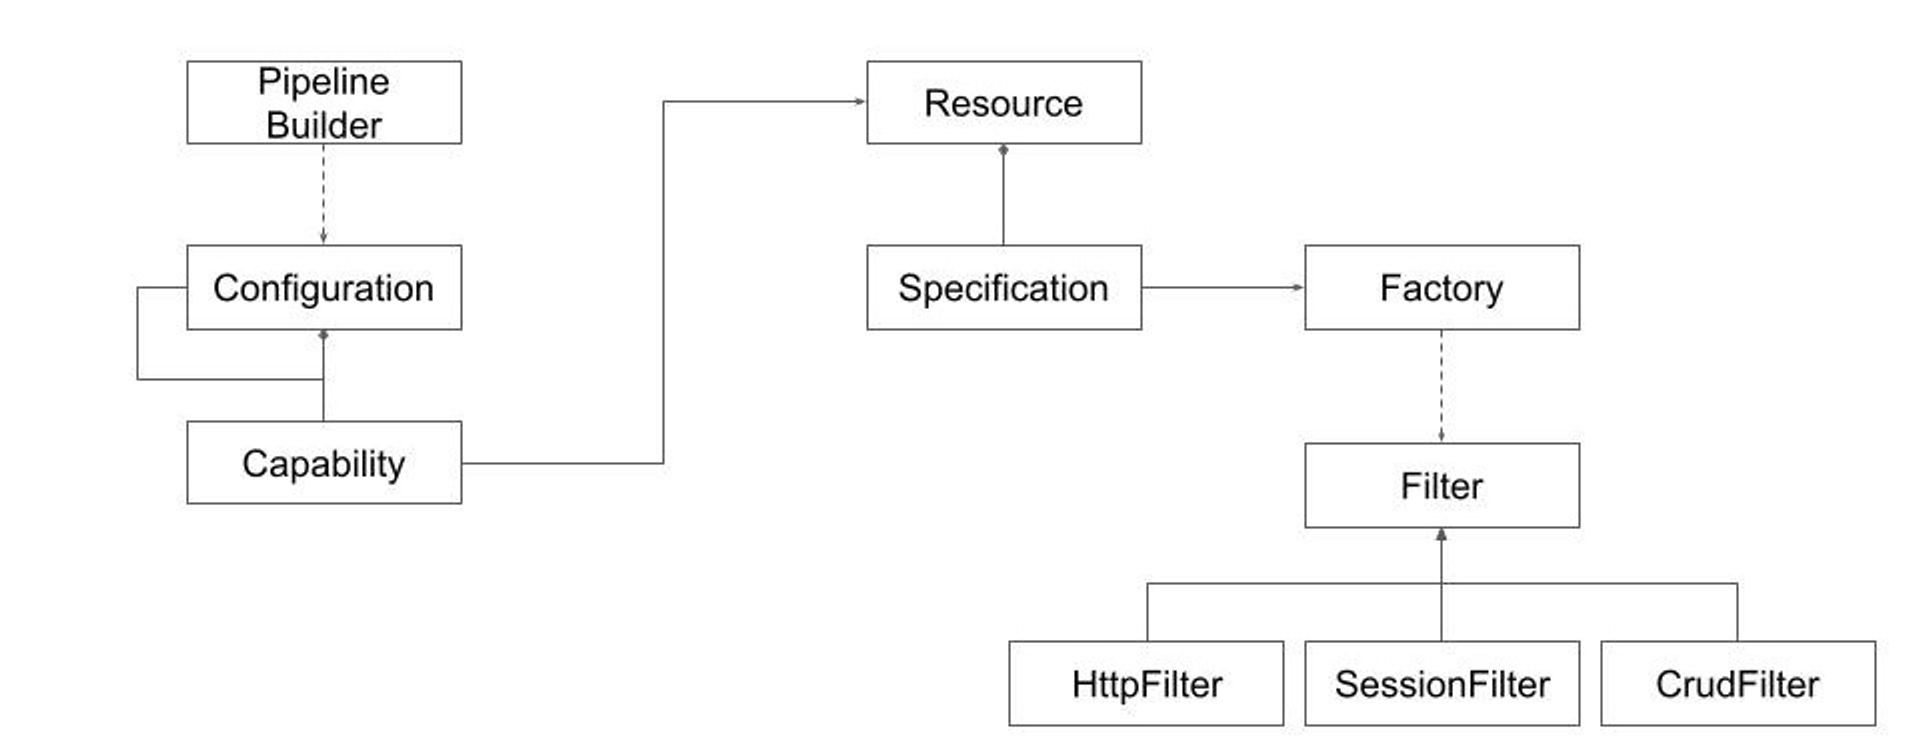
This design combines several software Design Patterns to achieve the desired balance. The process involves:
This approach shifts complexity towards implementing the Pipeline Builder machinery and Configuration specification. Experience teaches such machinery could be implemented (described for example in this publication). That normally requires some generic programming and dynamic import capabilities. Coming up with a good configuration data model is more challenging.
Recent advances in generative AI-based copilots raise new questions about achieving the most cost-efficient outcome. To understand the problem, let's revisit the traditional compilation and configuration stack:
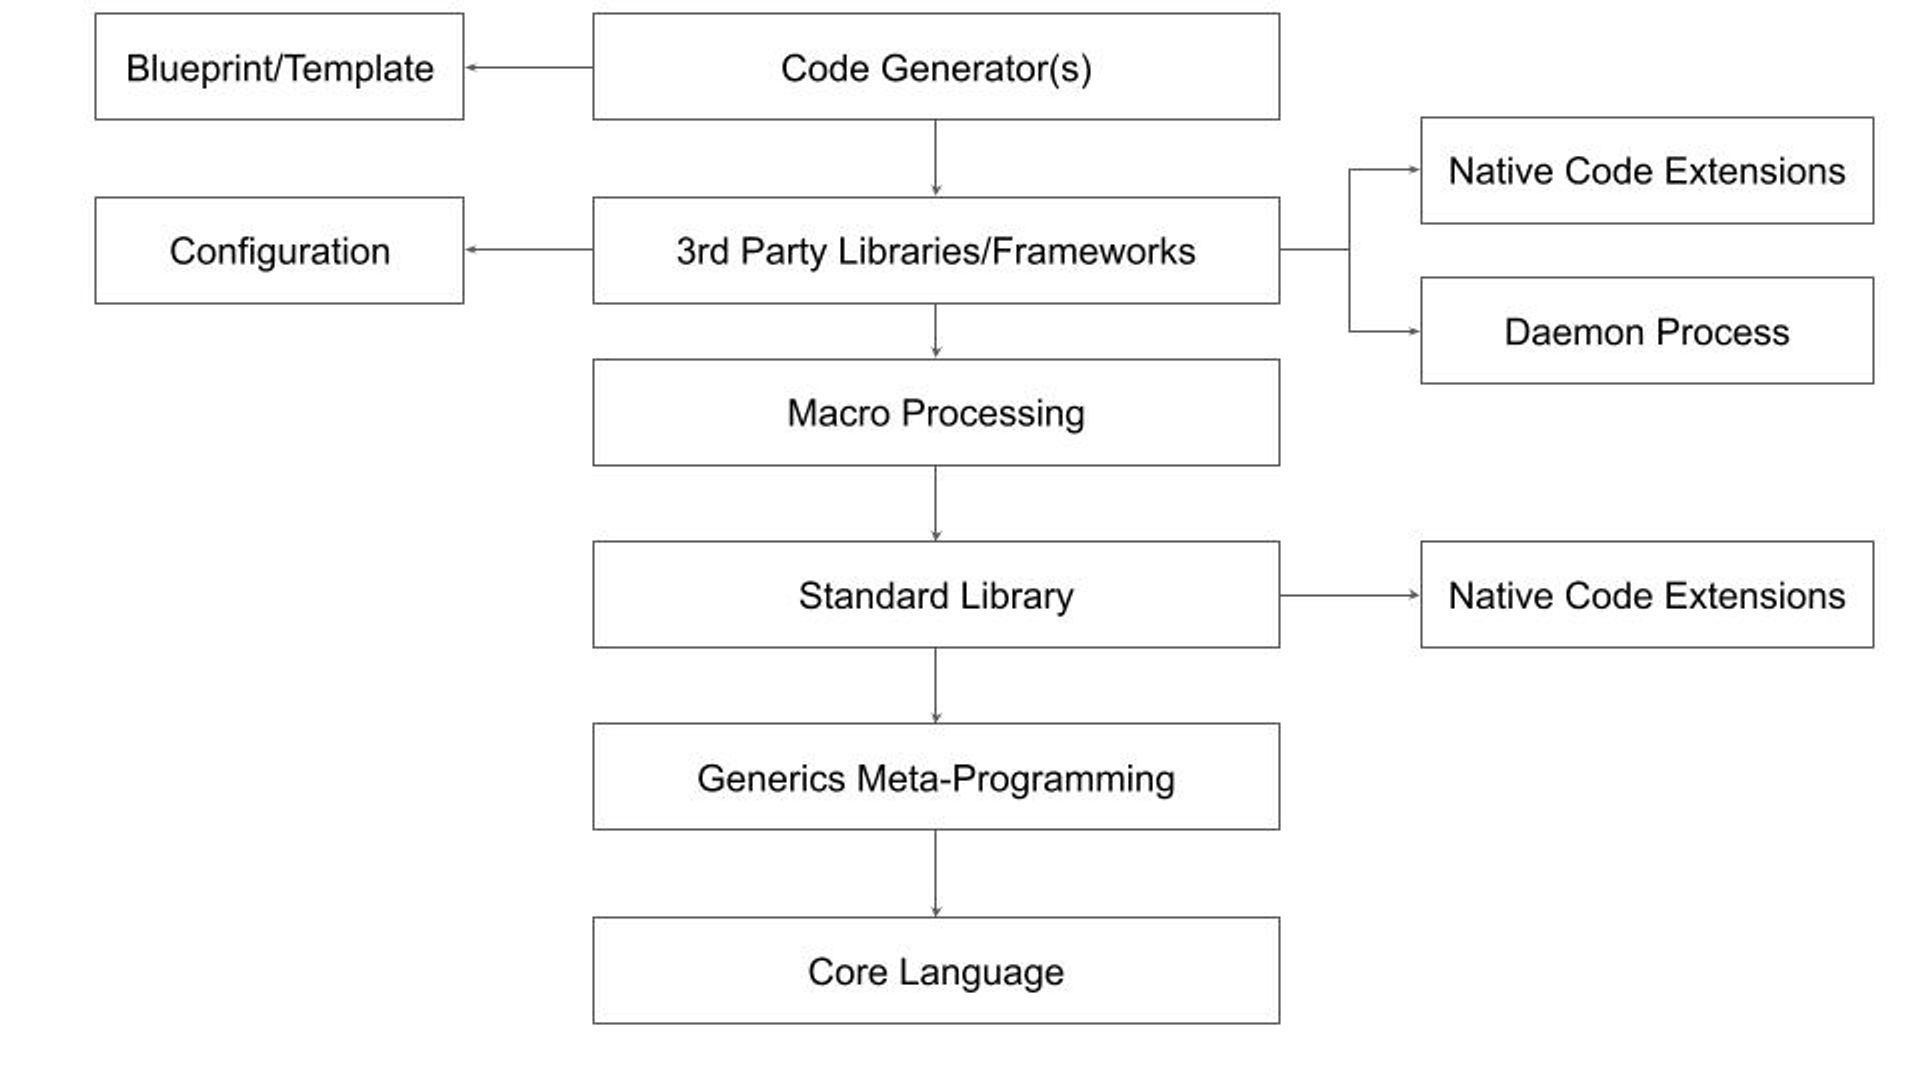
This general case may not apply to every ecosystem. Here's a breakdown of the typical layers:
This complex structure has limitations. Generics can obscure the core language, macros are unsafe, configuration files are poorly disguised scripts, and code generators rely on inflexible static templates. These limitations are why I believe the current trend of Internal Development Platforms has limited growth potential.
As we look forward to the role of generative AI in streamlining these processes, the question becomes: Can generative AI-based copilots not only simplify but also enhance our ability to balance commonality and variability in software engineering?
This is going to be the main topic of my future research to be reported in the next publications. Stay tuned.

As the saying goes, there are several ways to skin a cat...in the tech world, there are 5 ways to skin a Lambda Function 🤩
As developers try to bridge the gap between development and DevOps, I thought it would be helpful to compare Programming Languages and DevTools.
Let's start with the idea of a simple function that would upload a text file to a Bucket in our cloud app.
The next step is to demonstrate several ways this could be accomplished.
Note: In cloud development, managing permissions and bucket identities, packaging runtime code, and handling multiple files for infrastructure and runtime add layers of complexity to the development process.

Let's dive into some code!
After installing Wing, let's create a file:
main.w
If you aren't familiar with the Wing Programming Language, please check out the open-source repo HERE
bring cloud;

let bucket = new cloud.Bucket();

new cloud.Function(inflight () => {
  bucket.put("hello.txt", "world!");
});
Let's do a breakdown of what's happening in the code above.
bring cloudis Wing's import syntax
Create a Cloud Bucket:
let bucket = new cloud.Bucket();initializes a new cloud bucket instance.
On the backend, the Wing platform provisions a new bucket in your cloud provider's environment. This bucket is used for storing and retrieving data.
Create a Cloud Function: The
new cloud.Function(inflight () => { ... });statement defines a new cloud function.
This function, when triggered, performs the actions defined within its body.
bucket.put("hello.txt", "world!");uploads a file named hello.txt with the content world! to the cloud bucket created earlier.
wing compile --platform tf-aws main.w
terraform apply
That's it, Wing takes care of the complexity of (permissions, getting the bucket identity in the runtime code, packaging the runtime code into a bucket, having to write multiple files - for infrastructure and runtime), etc.
Not to mention it generates IAC (TF or CF), plus Javascript that you can deploy with existing tools.
But while you develop, you can use the local simulator to get instant feedback and shorten the iteration cycles
Wing even has a playground that you can try out in the browser!
Step 1: Initialize a New Pulumi Project
mkdir pulumi-s3-lambda-ts
cd pulumi-s3-lambda-ts
pulumi new aws-typescript
Step 2. Write the code to upload a text file to S3.
This will be your project structure.
pulumi-s3-lambda-ts/
├─ src/
│  ├─ index.ts              # Pulumi infrastructure code
│  └─ lambda/
│     └─ index.ts           # Lambda function code to upload a file to S3
├─ tsconfig.json            # TypeScript configuration
└─ package.json             # Node.js project file with dependencies
Let's add this code to index.ts
import * as pulumi from "@pulumi/pulumi";
import * as aws from "@pulumi/aws";

// Create an AWS S3 bucket
const bucket = new aws.s3.Bucket("myBucket", {
  acl: "private",
});

// IAM role for the Lambda function
const lambdaRole = new aws.iam.Role("lambdaRole", {
  assumeRolePolicy: JSON.stringify({
    Version: "2023-10-17",
    Statement: [
      {
        Action: "sts:AssumeRole",
        Principal: {
          Service: "lambda.amazonaws.com",
        },
        Effect: "Allow",
        Sid: "",
      },
    ],
  }),
});

// Attach the AWSLambdaBasicExecutionRole policy
new aws.iam.RolePolicyAttachment("lambdaExecutionRole", {
  role: lambdaRole,
  policyArn: aws.iam.ManagedPolicy.AWSLambdaBasicExecutionRole,
});

// Policy to allow Lambda function to access the S3 bucket
const lambdaS3Policy = new aws.iam.Policy("lambdaS3Policy", {
  policy: bucket.arn.apply((arn) =>
    JSON.stringify({
      Version: "2023-10-17",
      Statement: [
        {
          Action: ["s3:PutObject", "s3:GetObject"],
          Resource: `${arn}/*`,
          Effect: "Allow",
        },
      ],
    })
  ),
});

// Attach policy to Lambda role
new aws.iam.RolePolicyAttachment("lambdaS3PolicyAttachment", {
  role: lambdaRole,
  policyArn: lambdaS3Policy.arn,
});

// Lambda function
const lambda = new aws.lambda.Function("myLambda", {
  code: new pulumi.asset.AssetArchive({
    ".": new pulumi.asset.FileArchive("./src/lambda"),
  }),
  runtime: aws.lambda.Runtime.NodeJS12dX,
  role: lambdaRole.arn,
  handler: "index.handler",
  environment: {
    variables: {
      BUCKET_NAME: bucket.bucket,
    },
  },
});

export const bucketName = bucket.id;
export const lambdaArn = lambda.arn;
Next, create a lambda/index.ts directory for the Lambda function code:
import { S3 } from "aws-sdk";

const s3 = new S3();

export const handler = async (): Promise<void> => {
  const bucketName = process.env.BUCKET_NAME || "";
  const fileName = "example.txt";
  const content = "Hello, Pulumi!";

  const params = {
    Bucket: bucketName,
    Key: fileName,
    Body: content,
  };

  try {
    await s3.putObject(params).promise();
    console.log(
      `File uploaded successfully at https://${bucketName}.s3.amazonaws.com/${fileName}`
    );
  } catch (err) {
    console.log(err);
  }
};
Step 3: TypeScript Configuration (tsconfig.json)
{
  "compilerOptions": {
    "target": "ES2018",
    "module": "CommonJS",
    "strict": true,
    "esModuleInterop": true,
    "skipLibCheck": true,
    "forceConsistentCasingInFileNames": true
  },
  "include": ["src/**/*.ts"],
  "exclude": ["node_modules", "**/*.spec.ts"]
}
After creating a Pulumi project, a yaml file will automatically be generated. pulumi.yaml
name: s3-lambda-pulumi
runtime: nodejs
description: A simple example that uploads a file to an S3 bucket using a Lambda function
template:
  config:
    aws:region:
      description: The AWS region to deploy into
      default: us-west-2
Ensure your lambda directory with the index.js file is correctly set up. Then, run the following command to deploy your infrastructure: pulumi up
Step 1: Initialize a New CDK Project
mkdir cdk-s3-lambda
cd cdk-s3-lambda
cdk init app --language=typescript
Step 2: Add Dependencies
npm install @aws-cdk/aws-lambda @aws-cdk/aws-s3
Step 3: Define the AWS Resources in CDK
File: index.js
import * as cdk from "@aws-cdk/core";
import * as lambda from "@aws-cdk/aws-lambda";
import * as s3 from "@aws-cdk/aws-s3";

export class CdkS3LambdaStack extends cdk.Stack {
  constructor(scope: cdk.Construct, id: string, props?: cdk.StackProps) {
    super(scope, id, props);

    // Create the S3 bucket
    const bucket = new s3.Bucket(this, "MyBucket", {
      removalPolicy: cdk.RemovalPolicy.DESTROY, // NOT recommended for production code
    });

    // Define the Lambda function
    const lambdaFunction = new lambda.Function(this, "MyLambda", {
      runtime: lambda.Runtime.NODEJS_14_X, // Define the runtime
      handler: "index.handler", // Specifies the entry point
      code: lambda.Code.fromAsset("lambda"), // Directory containing your Lambda code
      environment: {
        BUCKET_NAME: bucket.bucketName,
      },
    });

    // Grant the Lambda function permissions to write to the S3 bucket
    bucket.grantWrite(lambdaFunction);
  }
}
Step 4: Lambda Function Code
Create the same file struct as above and in the pulumi directory: index.ts
import { S3 } from 'aws-sdk';
const s3 = new S3();

exports.handler = async (event: any) => {
  const bucketName = process.env.BUCKET_NAME;
  const fileName = 'uploaded_file.txt';
  const content = 'Hello, CDK! This file was uploaded by a Lambda function!';

  try {
    const result = await s3.putObject({
      Bucket: bucketName!,
      Key: fileName,
      Body: content,
    }).promise();

    console.log(`File uploaded successfully: ${result}`);
    return {
      statusCode: 200,
      body: `File uploaded successfully: ${fileName}`,
    };
  } catch (error) {
    console.log(error);
    return {
      statusCode: 500,
      body: `Failed to upload file: ${error}`,
    };
  }
};
First, compile your TypeScript code: npm run build, then
Deploy your CDK to AWS: cdk deploy
Step 1: Initialize a New CDKTF Project
mkdir cdktf-s3-lambda-ts
cd cdktf-s3-lambda-ts
Then, initialize a new CDKTF project using TypeScript:
cdktf init --template="typescript" --local
Step 2: Install AWS Provider and Add Dependencies
npm install @cdktf/provider-aws
Step 3: Define the Infrastructure
Edit main.ts to define the S3 bucket and Lambda function:
import { Construct } from "constructs";
import { App, TerraformStack } from "cdktf";
import { AwsProvider, s3, lambdafunction, iam } from "@cdktf/provider-aws";

class MyStack extends TerraformStack {
  constructor(scope: Construct, id: string) {
    super(scope, id);

    new AwsProvider(this, "aws", { region: "us-west-2" });

    // S3 bucket
    const bucket = new s3.S3Bucket(this, "lambdaBucket", {
      bucketPrefix: "cdktf-lambda-",
    });

    // IAM role for Lambda
    const role = new iam.IamRole(this, "lambdaRole", {
      name: "lambda_execution_role",
      assumeRolePolicy: JSON.stringify({
        Version: "2023-10-17",
        Statement: [
          {
            Action: "sts:AssumeRole",
            Principal: { Service: "lambda.amazonaws.com" },
            Effect: "Allow",
          },
        ],
      }),
    });

    new iam.IamRolePolicyAttachment(this, "lambdaPolicy", {
      role: role.name,
      policyArn:
        "arn:aws:iam::aws:policy/service-role/AWSLambdaBasicExecutionRole",
    });

    const lambdaFunction = new lambdafunction.LambdaFunction(this, "MyLambda", {
      functionName: "myLambdaFunction",
      handler: "index.handler",
      role: role.arn,
      runtime: "nodejs14.x",
      s3Bucket: bucket.bucket, // Assuming the Lambda code is uploaded to this bucket
      s3Key: "lambda.zip", // Assuming the Lambda code zip file is named lambda.zip
      environment: {
        variables: {
          BUCKET_NAME: bucket.bucket,
        },
      },
    });

    // Grant the Lambda function permissions to write to the S3 bucket
    new s3.S3BucketPolicy(this, "BucketPolicy", {
      bucket: bucket.bucket,
      policy: bucket.bucket.apply((name) =>
        JSON.stringify({
          Version: "2023-10-17",
          Statement: [
            {
              Action: "s3:*",
              Resource: `arn:aws:s3:::${name}/*`,
              Effect: "Allow",
              Principal: {
                AWS: role.arn,
              },
            },
          ],
        })
      ),
    });
  }
}

const app = new App();
new MyStack(app, "cdktf-s3-lambda-ts");
app.synth();
Step 4: Lambda Function Code
The Lambda function code should be written in TypeScript and compiled into JavaScript, as AWS Lambda natively executes JavaScript. Here's an example index.ts for the Lambda function that you need to compile and zip:
import { S3 } from "aws-sdk";

const s3 = new S3();

exports.handler = async () => {
  const bucketName = process.env.BUCKET_NAME || "";
  const content = "Hello, CDKTF!";
  const params = {
    Bucket: bucketName,
    Key: `upload-${Date.now()}.txt`,
    Body: content,
  };

  try {
    await s3.putObject(params).promise();
    return { statusCode: 200, body: "File uploaded successfully" };
  } catch (err) {
    console.error(err);
    return { statusCode: 500, body: "Failed to upload file" };
  }
};
You need to compile this TypeScript code to JavaScript, zip it, and upload it to the S3 bucket manually or using a script.
Ensure the s3Key in the LambdaFunction resource points to the correct zip file in the bucket.
Compile your project using npm run build
Generate Terraform Configuration Files
Run the cdktf synth command. This command executes your CDKTF app, which generates Terraform configuration files (*.tf.json files) in the cdktf.out directory:
Deploy Your Infrastructure
cdktf deploy
Step 1: Terraform Setup
Define your AWS Provider and S3 Bucket Create a file named main.tf with the following:
provider "aws" {
  region = "us-west-2" # Choose your AWS region
}

resource "aws_s3_bucket" "lambda_bucket" {
  bucket_prefix = "lambda-upload-bucket-"
  acl           = "private"
}

resource "aws_iam_role" "lambda_execution_role" {
  name = "lambda_execution_role"

  assume_role_policy = jsonencode({
    Version = "2023-10-17"
    Statement = [
      {
        Action = "sts:AssumeRole"
        Effect = "Allow"
        Principal = {
          Service = "lambda.amazonaws.com"
        }
      },
    ]
  })
}

resource "aws_iam_policy" "lambda_s3_policy" {
  name        = "lambda_s3_policy"
  description = "IAM policy for Lambda to access S3"

  policy = jsonencode({
    Version = "2023-10-17"
    Statement = [
      {
        Action   = ["s3:PutObject", "s3:GetObject"],
        Effect   = "Allow",
        Resource = "${aws_s3_bucket.lambda_bucket.arn}/*"
      },
    ]
  })
}

resource "aws_iam_role_policy_attachment" "lambda_s3_access" {
  role       = aws_iam_role.lambda_execution_role.name
  policy_arn = aws_iam_policy.lambda_s3_policy.arn
}

resource "aws_lambda_function" "uploader_lambda" {
  function_name = "S3Uploader"

  s3_bucket = "YOUR_DEPLOYMENT_BUCKET_NAME" # Set your deployment bucket name here
  s3_key    = "lambda.zip" # Upload your ZIP file to S3 and set its key here

  handler = "index.handler"
  role    = aws_iam_role.lambda_execution_role.arn
  runtime = "nodejs14.x"

  environment {
    variables = {
      BUCKET_NAME = aws_s3_bucket.lambda_bucket.bucket
    }
  }
}
Step 2: Lambda Function Code (TypeScript)
Create a TypeScript file index.ts for the Lambda function:
import { S3 } from 'aws-sdk';

const s3 = new S3();

exports.handler = async (event: any) => {
  const bucketName = process.env.BUCKET_NAME;
  const fileName = `uploaded-${Date.now()}.txt`;
  const content = 'Hello, Terraform and AWS Lambda!';

  try {
    await s3.putObject({
      Bucket: bucketName!,
      Key: fileName,
      Body: content,
    }).promise();

    console.log('Upload successful');
    return {
      statusCode: 200,
      body: JSON.stringify({ message: 'Upload successful' }),
    };
  } catch (error) {
    console.error('Upload failed:', error);
    return {
      statusCode: 500,
      body: JSON.stringify({ message: 'Upload failed' }),
    };
  }
};
Finally after uploading your Lambda function code to the specified S3 bucket, run terraform apply.
I hope you enjoyed this comparison of five simple ways to write a function in our cloud app that uploads a text file to a Bucket.
As you can see, most of the code becomes very complex, except for Wing.
If you are intrigued about Wing and like how we are simplifying the process of cloud development, please join our community and reach out to us on Twitter.
As I argued elsewhere, automatically generating cloud infrastructure specifications directly from application code represents “The Next Logical Step in Cloud Automation.” This approach, sometimes referred to as “Infrastructure From Code” (IfC), aims to:
Ensure automatic coordination of four types of interactions with cloud services: life cycle management, pre- and post-configuration, consumption, and operation, while making pragmatic choices of the most appropriate levels of API abstraction for each cloud service and leaving enough control to the end-user for choosing the most suitable vendor, based on personal preferences, regulations or brownfield deployment constraints
While analyzing the IfC Technology Landscape a year ago, I identified five attributes essential for analyzing major offerings in this space:
At that time, Winglang appeared on my radar as a brand-new cloud programming-oriented language running atop the NodeJS runtime. It comes with an optional plugin for VSCode, its own console, and fully supports cloud self-hosting via popular cloud orchestration engines such as Terraform and AWS CDK.
Today, I want to explore how well Winglang is suited for supporting the Clean Architecture style, based on the Hexagonal Ports and Adapters pattern. Additionally, I’m interested in how easily Winglang can be integrated with TypeScript, a representative of mainstream programming languages that can be compiled into JavaScript and run atop the NodeJS runtime engine.
This publication is a technology research report. While it could potentially be converted into a tutorial, it currently does not serve as one. The code snippets in Winglang are intended to be self-explanatory. The language syntax falls within the common Algol-60 family and is, in most cases, straightforward to understand. In instances of uncertainty, please consult the Winglang Language Reference, Library, and Examples. For introductory materials, refer to the References.
Many thanks to Elad Ben-Israel, Shai Ber, and Nathan Tarbert for the valuable feedback on the early draft of this paper.
Creating the simplest possible “Hello, World!” application is a crucial, yet often overlooked, validation step in new software technology. Although such an application lacks practical utility, it reveals the general accessibility of the technology to newcomers. As a marketing wit once told me, “We have only one chance to make a first impression.” So, let’s begin with a straightforward one-liner in Winglang.
About Winglang: Winglang is an innovative cloud-oriented programming language designed to simplify cloud application development. It integrates seamlessly with cloud services, offering a unique approach to building and deploying applications directly in the cloud environment. This makes Winglang an intriguing option for developers looking to leverage cloud capabilities more effectively.
Installing Winglang is straightforward, assuming you already have npm and terraform installed and configured on your computer. As a technology researcher, I primarily work with remote desktops. Therefore, I won’t delve into the details of preparing your workstation here. My personal setup, once stabilized, will be shared in a separate publication.
My first step is to create a one-line application that prints the sentence “Hello, Winglang!” In Winglang, this is indeed could be done in a single line:
log(“Hello, Winglang!”);
However, to execute this one line of code, we need to compile it by typing wing compile:
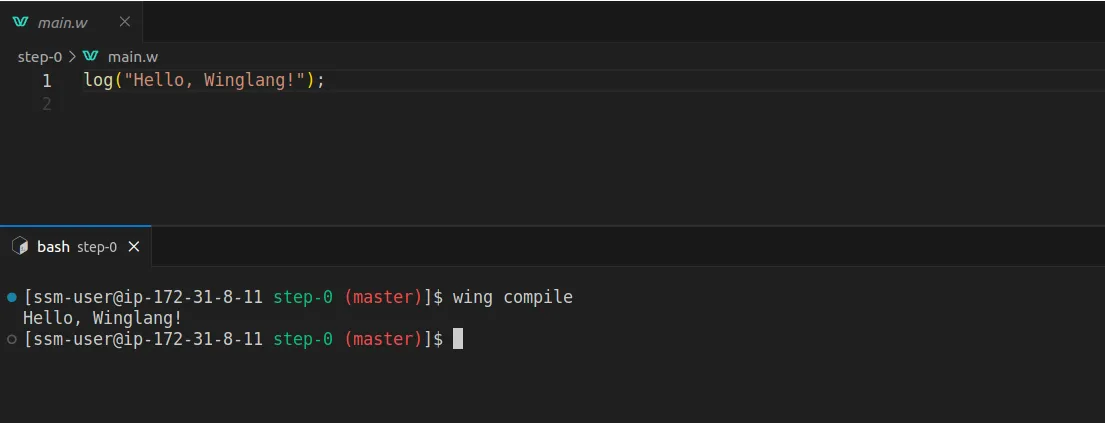
Winglang adopts an intriguing approach by distinctly separating the phases of programmatic definition of cloud resources during compilation and their use during runtime. This is articulated in Winglang as Preflight and Inflight execution phases.
Simply put, the Preflight phase occurs when application code is compiled into a target orchestration engine template, such as a local simulator or Terraform, while the Inflight phase is when the application code executes within a Cloud Function or Container.
The ability to use the same syntax for programming the compilation phase and even print logs is quite a unique feature. For comparison, consider the ability to use the same syntax for programming “C” macros or C++ templates to print debugging logs of the compilation phase, just as you would program the runtime phase.
Now, I aim to create the simplest possible application that prints the sentence “Hello, Winglang!” during runtime, that is during the Inflight phase. In Winglang, accomplishing this requires just a couple of lines, similar to what you’d expect in any mainstream programming language:
bring cloud;

log("Hello, Winglang, Preflight!");

let helloWorld = new cloud.Function(inflight (event: str) => {
    log("Hello, Winglang!");
});
By typing wing it in the VSCode Terminal, you can bring up the Winglang simulator (I prefer the preview in the editor). Click on cloud.Function, then on Invoke, and you will see the following:
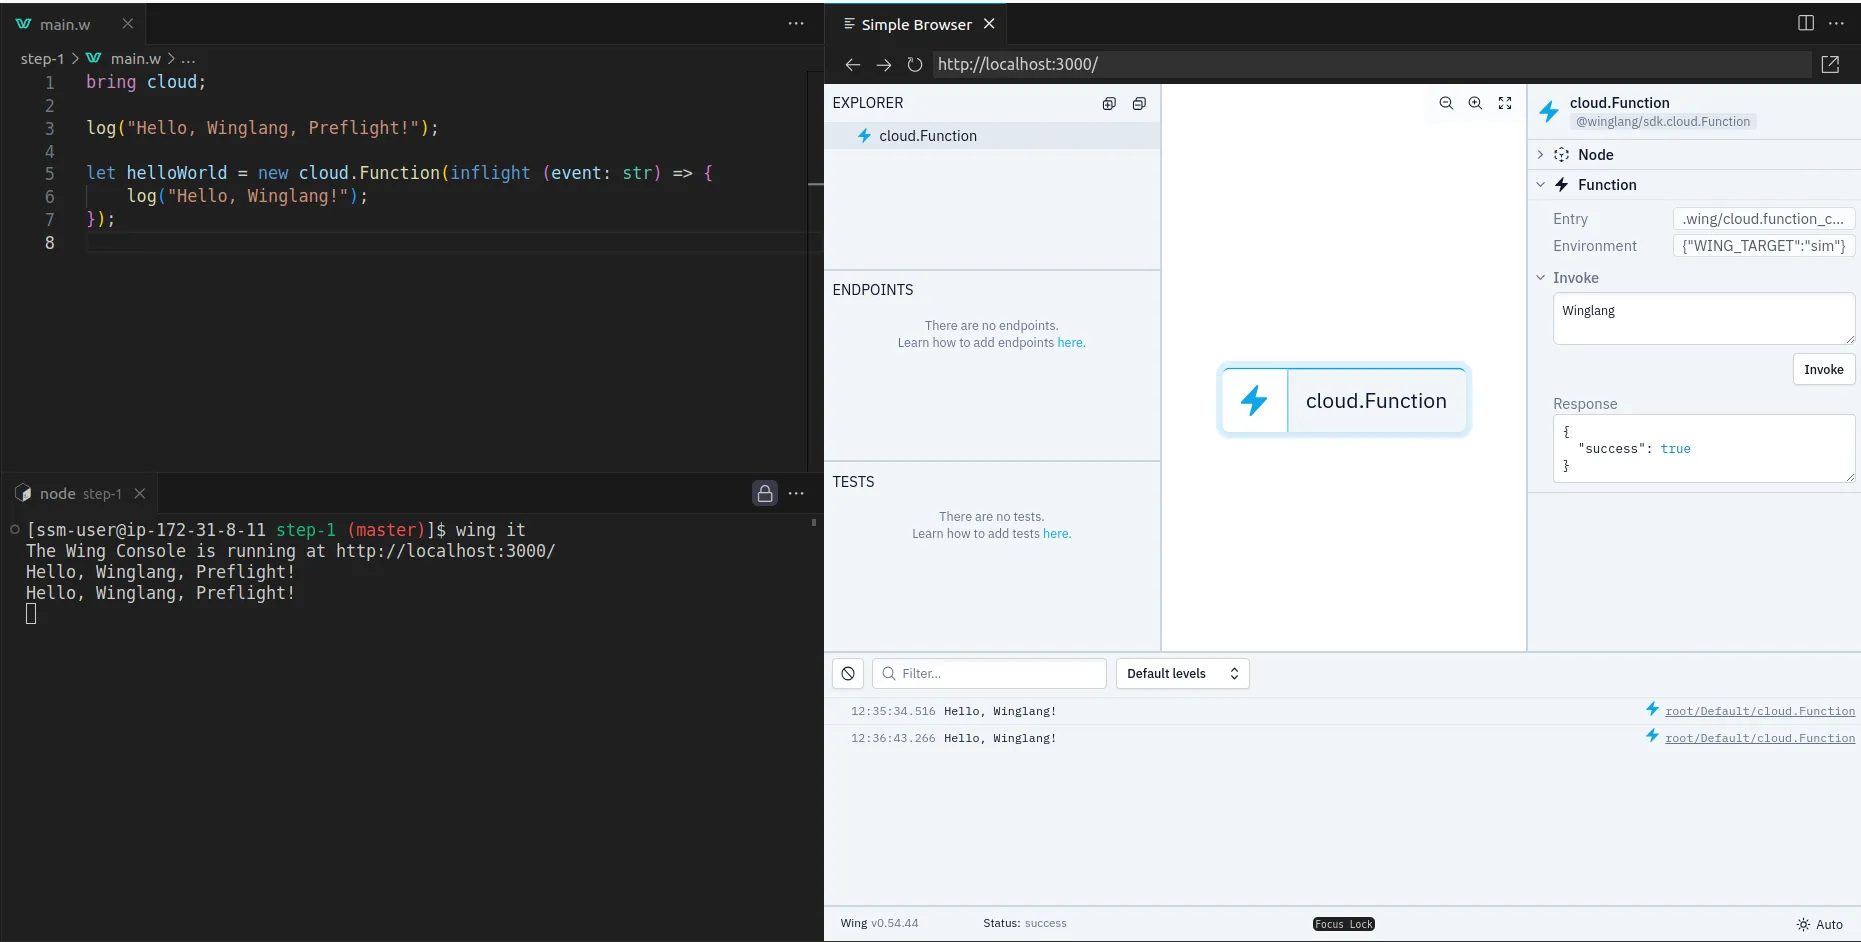
This is pretty cool and Winglang definitely passes the initial smoke test.
name ArgumentTo move beyond simply printing static text, we’re going to slightly modify our initial function to return the greeting “Hello,<name>!”, where <name> is the function’s argument. The updated code, along with the simulator’s output, will look something like this:
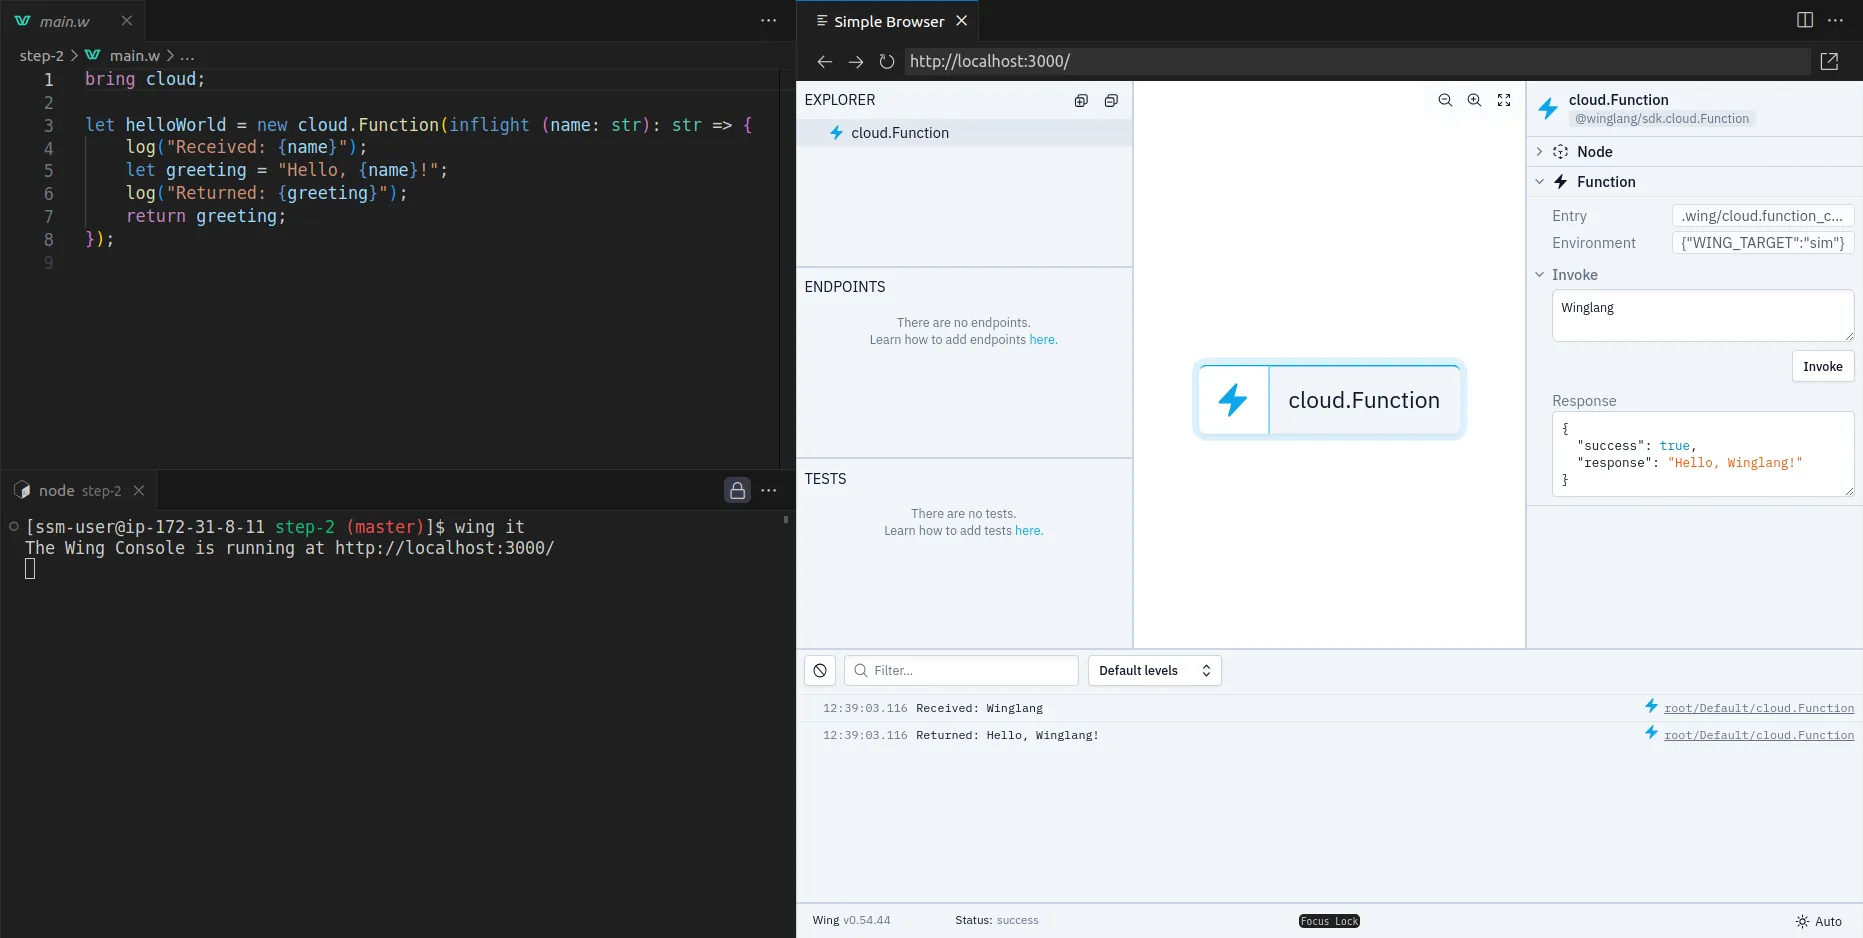
Keep in mind, there’s no need to close the simulator. Simply edit the file, hit CTRL+S to save, and the simulator will automatically load the new version.
In today’s world, a system without test automation support hardly has a right to exist. Let’s add some tests to our simple function (now renamed to makeGreeting):
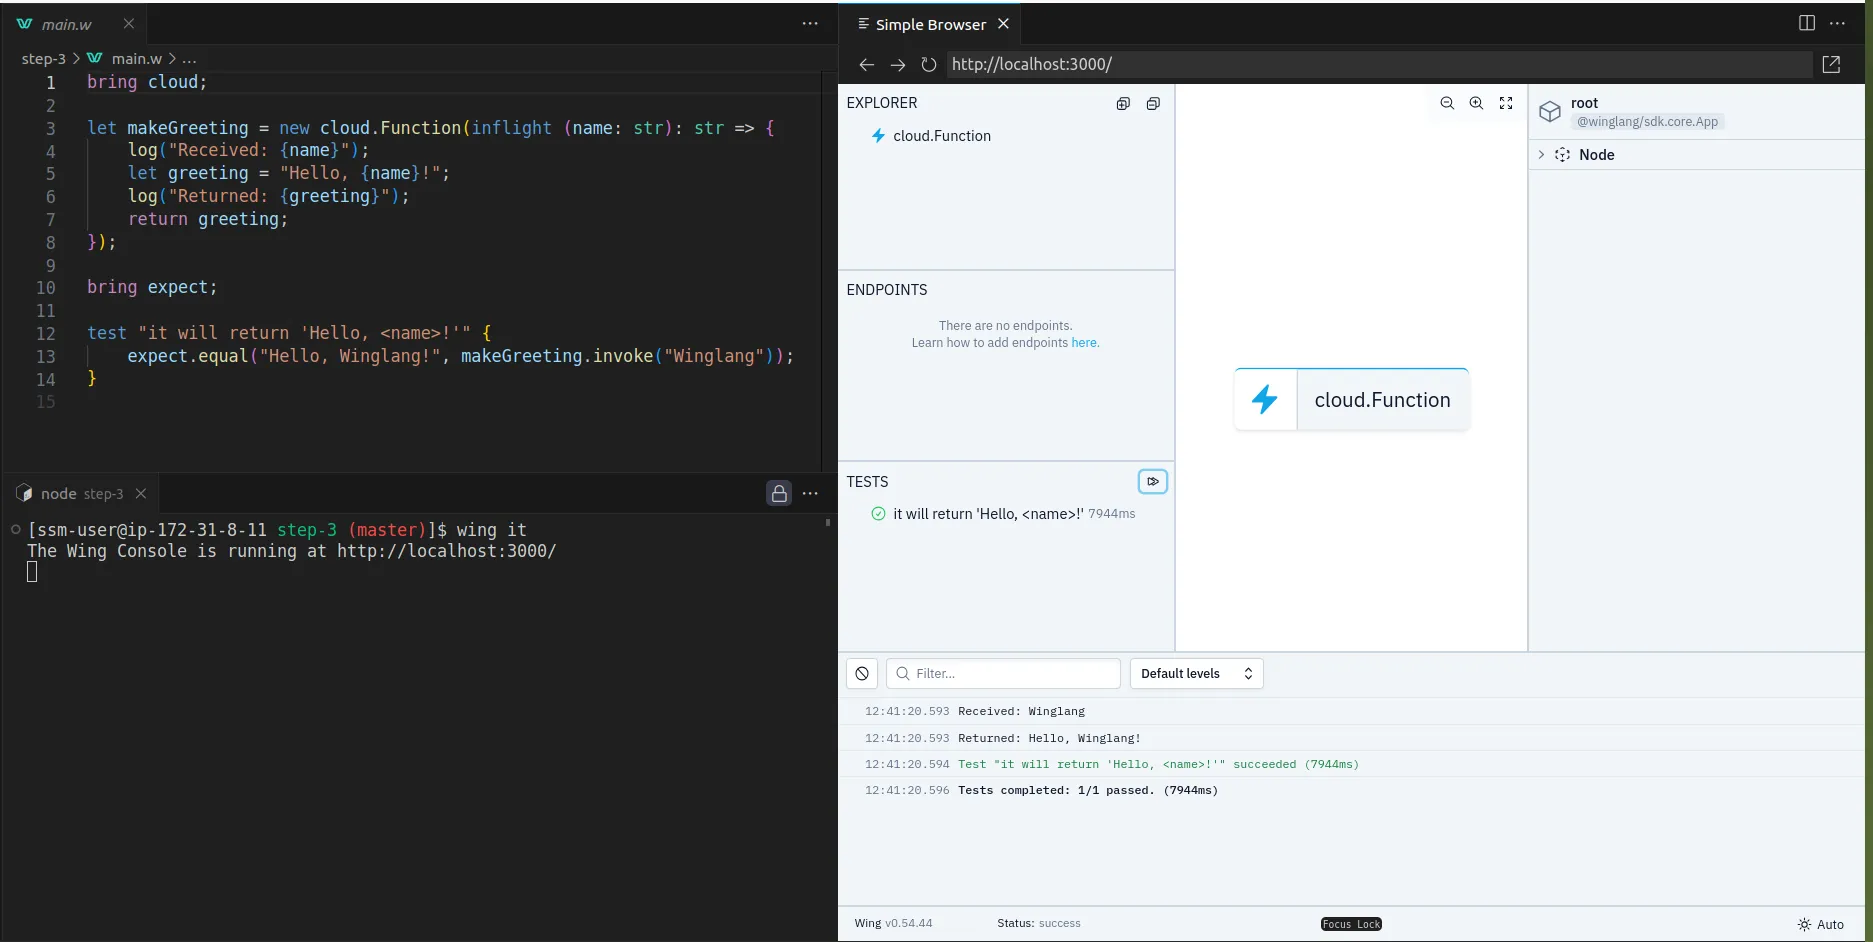
Again, there’s no need to close the simulator. The entire process is interactive and flows quite smoothly.
You can also run the tests via the command line in the VSCode Terminal:
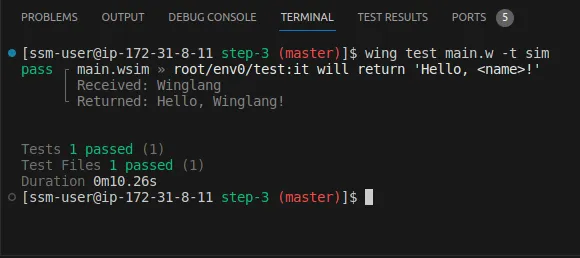
The same test can also be run automatically in the cloud by typing, for example, wing test -t tf-aws. Additionally, the same code can be deployed on a target cloud.
Cloud neutrality support in Winglang is important and fascinating topic, which will be covered in more details in the next Step Four: Extracting Core section.
If all you need is to develop simple Transaction Scripts that:
Then you may choose to stop here. Explore Winglang Examples to see what can be achieved today, and visit Winglang Issues for insights on current limitations and future plans. However, if you’re interested in exploring how Winglang supports complex software architectures with potentially intricate computational logic and long-term support requirements, you are welcome to proceed to Part Two of this publication.
Hexagonal Architecture, introduced by Alistair Cockburn in 2005, represented a significant shift in the way software applications were structured. Also known as the Ports and Adapters pattern, this architectural style was designed to create a clear separation between an application’s core logic and its external components. It enables applications to be equally driven by users, programs, automated tests, or batch scripts, and allows for development and testing in isolation from runtime devices and databases. By organizing interactions through ‘ports’ and ‘adapters’, the architecture ensures that the application remains agnostic to the nature of external technologies and interfaces. This approach not only prevented the infiltration of business logic into user interface code but also enhanced the flexibility and maintainability of software, making it adaptable to various environments and technologies.
While I believe that Alistair Cockburn, like many other practitioners, may have misinterpreted the original intent of layered software architecture as introduced by E.W. Dijkstra in his seminal work, “The Structure of ‘THE’ Multiprogramming System” (a topic I plan to address in a separate publication), the foundational idea he presents remains useful. As I argued in my earlier publication, the Ports metaphor aligns well with cloud resources that trigger specific events, while software modules interacting directly with the cloud SDK effectively function as Adapters.
Numerous attempts (see References) have been made to apply Hexagonal Architecture concepts to cloud and, more specifically, serverless development. A notable example is the blog post “Developing Evolutionary Architecture with AWS Lambda,” which showcases a repository structure closely aligned with what I envision. However, even this example employs a more complex application than what I believe is necessary for initial exploration. I firmly hold that we should fully understand and explore the simplest possible applications, at the “Hello, World!” level, before delving into more complex scenarios. With this in mind, let’s examine how far we can go in building a straightforward Greeting Service.
First and foremost, our goal is to extract the Core and ensure its complete independence from any external dependencies:
bring cloud;

pub class Greeting impl cloud.IFunctionHandler {
    pub inflight handle(name: str): str {
        return "Hello, {name}!";
    }
}
At the moment, the Winglang Module System does not support public functions. I does, however, support public static class functions, which semantically are equivalent. Unfortunately, I cannot directly pass a public static inflight function to cloud.Function (it only works for closures), and I need to implement the cloud.IFunctionHandler interface. These limitations are fairly understandable and quite typical for a new programming system.
By extracting the core into a separate module, we can focus on what brings the application to life in the first place. This also enables extensive testing of the core logic independently, as shown below:
bring "./core" as core;
bring expect;

let greeting = new core.Greeting();

test "it will return 'Hello, <name>!'" {
    expect.equal("Hello, World!", greeting.handle("World"));
    expect.equal("Hello, Winglang!", greeting.handle("Winglang"));
}
Keeping the simulator up with only the core test allows us to quickly explore application logic and discuss it with stakeholders without worrying about cloud resources. This approach often epitomizes what a true MVP (Minimum Viable Product) is about:

The main file is now streamlined, focusing on system-level packaging and testing:
bring cloud;
bring "./core" as core;


let makeGreeting = new cloud.Function(inflight (name: str): str => {
    log("Received: {name}");
    let greeting = core.Greeting.makeGreeting(name);
    log("Returned: {greeting}");
    return greeting;
});


bring expect;

test "it will return 'Hello, `<name>`!'" {
 expect.equal("Hello, Winglang!", makeGreeting.invoke("Winglang"));
}
To consolidate everything, it’s time to introduce a Makefile to automate the entire process:
.PHONY: all test_core test_local test_remote

cloud ?= aws

all: test_remote

test_core:
 wing test test.core.main.w -t sim

test_local: test_core
 wing test main.w -t sim

test_remote: test_local
 wing test main.w -t tf-$(cloud)
Here, I’ve defined a Makefile variable cloud with the default value aws, which specifies the target cloud platform for remote tests. By using Terraform as an orchestration engine, I ensure that the same code and Makefile will run without any changes on any cloud platform supported by Winglang, such as aws, gcp, or azure.
The output of remote testing is worth examining:
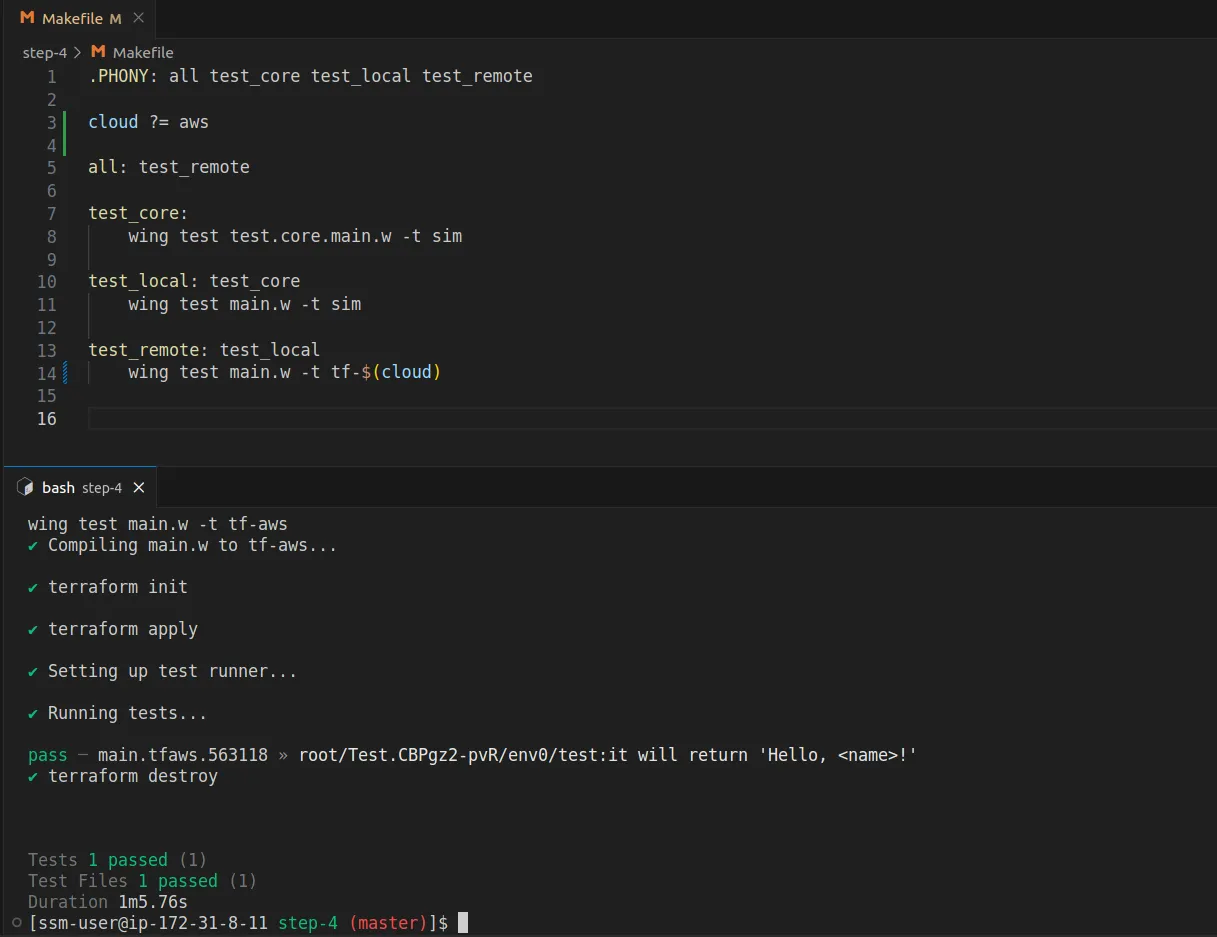
As we can see, Winglang automatically converts the Preflight code into Terraform templates and invokes Terraform commands to deploy the resulting stack to the cloud. It then runs the same test, effectively executing the Inflight code on the actual cloud, aws in this case, and finally deletes all resources. In such cases, I don't even need to access the cloud console to monitor the process. I can treat the cloud as a supercomputer, working with it through Winglang's cross-compilation mechanism.
The project structure now mirrors our architectural intent:
greeting-service/
│
├── core/
│ └── Greeting.w
│
├── main.w
├── Makefile
└── test.core.main.w
makeGreeting(name) Request HandlerThe core functionality should be purely computational, stateless, and free from side effects. This is crucial to ensure that the core does not depend on any external framework and can be fully tested automatically. Introducing states or external side effects would generally hinder this possibility. However, we still aim to isolate application logic from the real environment represented by Ports and Adapters. To achieve this, we introduce a separate Request Handler module, as follows:
bring cloud;
bring "../core" as core;

pub class Greeting impl cloud.IFunctionHandler {
 pub inflight handle(name: str): str {
 log("Received: {name}");
 let greeting = core.Greeting.makeGreeting(name);
 log("Returned: {greeting}");
 return greeting;
 }
}
In this case, the GreetingHandler is responsible for logging, which is a side effect. In more complex applications, it would communicate with external databases, message buses, third-party services, etc., via Ports and Adapters.
The core logic is now encapsulated as a plain function and is no longer derived from the cloud.IFunctionHandler interface:
pub class Greeting {
 pub static inflight makeGreeting(name: str): str {
 return "Hello, {name}!";
 }
}
The unit test for the core logic is accordingly simplified:
bring "./core" as core;
bring expect;

test "it will return 'Hello, <name>!'" {
    expect.equal("Hello, World!", core.Greeting.makeGreeting("World"));
    expect.equal("Hello, Wing!", core.Greeting.makeGreeting("Wing"));
}
The responsibility of connecting the handler and core logic now falls to the main.w module:
bring cloud;
bring "./handlers" as handlers;


let greetingHandler = new handlers.Greeting();
let makeGreetingFunction = new cloud.Function(greetingHandler);

bring expect;

test "it will return 'Hello, <name>!'" {
    expect.equal("Hello, Wing!", makeGreetingFunction.invoke("Wing"));
}
Once again, the project structure reflects our architectural intent:
greeting-service/
│
├── core/
│   └── Greeting.w
├── handlers/
│   └── Greeting.w
├── main.w
├── Makefile
└── test.core.main.w
It should be noted that for a simple service like Greeting, such an evolved structure could be considered over-engineering and not justified by actual business needs. However, as a software architect, it’s essential for me to outline a general skeleton for a fully-fledged service without getting bogged down in application-specific complexities that might not yet be known. By isolating different system components from one another, we make future system evolution less painful, and in many cases just practically feasible. In such cases, investing in a preliminary system structure by following best practices is fully justified and necessary. As Grady Booch famously said, “One cannot refactor a doghouse into a skyscraper.”
In general, keeping core functionality purely stateless and free from side effects, and isolating stateful application behavior with potential side effects into separate handlers, is conceptually equivalent to the monadic programming style widely adopted in Functional Programming environments.
We can now remove the direct cloud.Function creation from the main module and encapsulate it into a separate GreetingFunction port as follows:
bring "./handlers" as handlers;
bring "./ports" as ports;


let greetingHandler = new handlers.Greeting();
let makeGreetingService = new ports.GreetingFunction(greetingHandler);

bring expect;

test "it will return 'Hello, <name>!'" {
    expect.equal("Hello, Wing!", makeGreetingService.invoke("Wing"));
}
The GreetingFunction is defined in a separate module like this:
bring cloud;

pub class GreetingFunction {
    \_f: cloud.Function;
    new(handler: cloud.IFunctionHandler) {
        this.\_f = new cloud.Function(handler);
    }
    pub inflight invoke(name: str): str {
        return this.\_f.invoke(name);
    }
}
This separation of concerns allows the main.w module to focus on connecting different parts of the system together. Specific port configuration is performed in a separate module dedicated to that purpose. While such isolation of GreetingHandler might seem unnecessary at this stage, it becomes more relevant when considering the nuanced configuration supported by Winglang cloud.Function, including execution platform (e.g., AWS Lambda vs Container), environment variables, timeout, maximum resources, etc. Extracting the GreetingFunction port definition into a separate module naturally facilitates the concealment of these details.
The project structure is updated accordingly:
greeting-service/
│
├── core/
│   └── Greeting.w
├── handlers/
│   └── Greeting.w
├── ports/
│   └── greetingFunction.w
├── main.w
├── Makefile
└── test.core.main.w
The adopted naming convention for port modules also allows for the inclusion of multiple port definitions within the same project, enabling the selection of the required one based on external configuration.
There are several reasons why a project might consider implementing its core functionality in a mainstream programming language that can still run atop the underlying runtime environment. For example, using TypeScript, which compiles into JavaScript, and can be integrated with Winglang. Here are some of the most common reasons:
The Greeting service core functionality, redeveloped in TypeScript, would look like this:
export function makeGreeting(name: string): string {
    return \`Hello, ${name}!\`;
}
Its unit test, developed using the jest framework, would be:
import { makeGreeting } from "@core/makeGreeting";

describe("makeGreeting", () => {
  it("should return a greeting with the provided name", () => {
    const name = "World";
    const expected = "Hello, World!";
    const result = makeGreeting(name);
    expect(result).toBe(expected);
  });
});
To make it accessible to Winglang language modules, a simple wrapper is needed:
pub inflight class Greeting {
    pub extern "../target/core/makeGreeting.js" static inflight  makeGreeting(name: str): str;
}
The main technical challenge is to place the compiled JavaScript version where the Winglang wrapper can find it. For this project, I decided to use the target folder, where the Winglang compiler puts its artifacts. To achieve this, I created a dedicated tsconfig.build.json:
{
    "extends": "./tsconfig.json",
    "compilerOptions": {
      "outDir": "./target",
      // ... production-specific compiler options ...
    },
    "exclude": \[
      "core/\*.test.ts"
    \]
}
The Makefile was also modified to automate the process:
.PHONY: all install test\_core test\_local test\_remote

cloud ?= aws

all: test\_remote

install:
 npm install

test\_core: install
 npm run test

build\_core: test\_core
 npm run build

test\_local: build\_core
 wing test main.w -t sim

test\_remote: test\_local
 wing test main.w -t tf-$(cloud)
The folder structure reflects the changes made:
greeting-service/
│
├── core/
│   └── Greeting.w
│   └── makeGreeting.ts
│   └── makeGreeting.test.ts
├── handlers/
│   └── Greeting.w
├── ports/
│   └── greetingFunction.w
├── jest.config.js
├── main.w
├── Makefile
├── package-lock.json
├── package.json
├── tsconfig.build.json
└── tsconfig.json
Now, let’s consider making our Greeting service accessible via a REST API. This could be necessary, for instance, to enable demonstrations from a web browser or to facilitate calls from external services that, due to security or technological constraints, cannot communicate directly with the GreetingFunction port. To accomplish this, we need to introduce a new Port definition and modify the main.w module, while keeping everything else unchanged:
bring cloud;
bring http;


pub class GreetingApi{
    pub apiUrl: str;

    new(handler: cloud.IFunctionHandler) {
        let api = new cloud.Api();

        api.get("/greetings", inflight (request: cloud.ApiRequest): cloud.ApiResponse => {
            return cloud.ApiResponse{
                status: 200,
                body: handler.handle(request.query.get("name"))
            };
        });

        this.apiUrl = api.url;
    }

    pub inflight invoke(name: str): str {
        let result = http.get("{this.apiUrl}/greetings?name={name}");
        assert(200 == result.status);
        return result.body;
    }

}
To maintain a consistent testing interface, I implemented an invoke method that functions similarly to the GreetingFunction port. This design choice is not mandatory but rather a matter of convenience to minimize the amount of change.
The main.w module now allocates the GreetingApi port:
bring "./handlers" as handlers;
bring "./ports" as ports;


let greetingHandler = new handlers.Greeting();
let makeGreetingService = new ports.GreetingApi(greetingHandler);

bring expect;

test "it will return 'Hello, <name>!'" {
    expect.equal("Hello, Wing!", makeGreetingService.invoke("Wing"));
}
Since there is now something to use externally, the Makefile was modified to include deploy and destroy targets,as follows:
.PHONY: all install test\_core build\_core update test\_adapters test\_local test\_remote compile tf-init deploy destroy

cloud ?= aws
target := target/main.tf$(cloud)

all: test\_remote

install:
 npm install

test\_core: install
 npm run test

build\_core: test\_core
 npm run build

update:
 sudo npm update -g wing

test\_adapters: update
 wing test test.adapters.main.w -t sim

test\_local: build\_core test\_adapters
 wing test test.main.w -t sim

test\_remote: test\_local
 wing test test.main.w -t tf-$(cloud)

compile:
 wing compile main.w -t tf-$(cloud)

tf-init: compile
 ( \\
  cd $(target) ;\\
  terraform init \\
 )

deploy: tf-init
 ( \\
  cd $(target) ;\\
  terraform apply -auto-approve \\
 )

destroy:
 ( \\
  cd $(target) ;\\
  terraform destroy -auto-approve \\
 )
The browser screen looks almost as expected, but notice a strange JSON.parse error message (will be addressed in the forthcoming section):
The project structure is updated to reflect these changes:
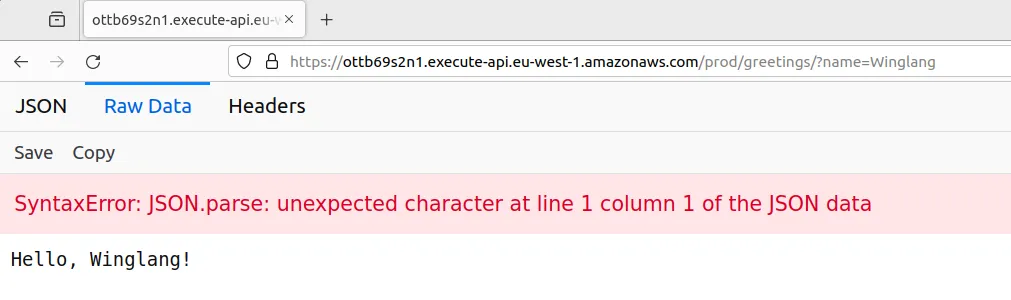
greeting-service/
│
├── core/
│   └── Greeting.w
│   └── makeGreeting.ts
│   └── makeGreeting.test.ts
├── handlers/
│   └── Greeting.w
├── ports/
│   └── greetingApi.w
│   └── greetingFunction.w
├── jest.config.js
├── main.w
├── Makefile
├── package-lock.json
├── package.json
├── tsconfig.build.json
└── tsconfig.json
The GreetingApi port implementation introduced in the previous section slightly violates the Single Responsibility Principle, which states: “A class should have only one reason to change.” Currently, there are multiple potential reasons for change:
We can generally agree that while HTTP Request Processing and HTTP Response Formatting are closely related, HTTP Routing stands apart. To decouple these functionalities, we introduce an ApiAdapter responsible for converting cloud.ApiRequest to cloud.ApiResponse, thereby extracting this functionality from the GreetingApi port.
To achieve this, we introduce a new IRestApiAdapter interface:
bring cloud;


pub interface IRestApiAdapter {
    inflight handle(request: cloud.ApiRequest): cloud.ApiResponse;
}
The GreetingApiAdapter class is defined as follows:
bring cloud;
bring "./IRestApiAdapter.w" as restApiAdapter;

pub class GreetingApiAdapter impl restApiAdapter.IRestApiAdapter {
    \_h: cloud.IFunctionHandler;
    new(handler: cloud.IFunctionHandler) {
        this.\_h = handler;
    }
    inflight pub handle(request: cloud.ApiRequest): cloud.ApiResponse {
        return cloud.ApiResponse{
            status: 200,
            body: this.\_h.handle(request.query.get("name"))
        };
    }
}
The modified GreetingApi port class is now:
bring cloud;
bring http;
bring "../adapters/IRestApiAdapter.w" as restApiAdapter;

pub class GreetingApi{
    \_apiUrl: str;
    \_adapter: restApiAdapter.IRestApiAdapter;
    new(adapter: restApiAdapter.IRestApiAdapter) {
        let api = new cloud.Api();
        this.\_adapter = adapter;

        api.get("/greetings", inflight (request: cloud.ApiRequest): cloud.ApiResponse => {
            return this.\_adapter.handle(request);
        });
        this.\_apiUrl = api.url;
    }
    pub inflight invoke(name: str): str {
        let result = http.get("{this.\_apiUrl}/greetings?name={name}");
        assert(200 == result.status);
        return result.body;
    }
}
The main.w module is updated accordingly:
bring "./handlers" as handlers;
bring "./ports" as ports;
bring "./adapters" as adapters;

let greetingHandler = new handlers.Greeting();
let greetingStringAdapter = new adapters.GreetingApiAdapter(greetingHandler);
let makeGreetingService = new ports.GreetingApi(greetingStringAdapter);
bring expect;
test "it will return 'Hello, <name>!'" {
    expect.equal("Hello, Wing!", makeGreetingService.invoke("Wing"));
}
The project structure reflects these changes:
greeting-service/
│
├── adapters/
│   └── greetingApiAdapter.w
│   └── IRestApiAdapter.w
├── core/
│   └── Greeting.w
│   └── makeGreeting.ts
│   └── makeGreeting.test.ts
├── handlers/
│   └── Greeting.w
├── ports/
│   └── greetingApi.w
│   └── greetingFunction.w
├── jest.config.js
├── main.w
├── Makefile
├── package-lock.json
├── package.json
├── tsconfig.build.json
└── tsconfig.json
Extracting the GreetingApiAdapter from the GreetingApi port might seem like a purist action, performed to demonstrate the potential value of Adapters, even if artificially and not strictly necessary. However, this perspective changes when we consider serious testing. The GreetingApiAdapter implementation from the previous section assumes that the name argument always comes within the query part of the HTTP request. But what happens if it doesn't? The system will crash, while according to standard it should respond with the HTTP 400 (Bad Request) status code in such cases. The modified structure allows us to introduce a separate unit test fully dedicated to testing the GreetingApiAdapter:
bring cloud;
bring expect;
bring "./adapters" as adapters;
bring "./handlers" as handlers;

let greetingHandler = new handlers.Greeting();
let greetingStringAdapter = new adapters.GreetingStringRestApiAdapter(greetingHandler);

test "it will return 200 and correct answer when name supplied" {
    let request = cloud.ApiRequest{
        method: cloud.HttpMethod.GET,
        path: "/greetings",
        query: {"name" => "Wing"},
        vars: {}
    };
    let response = greetingStringAdapter.handle(request);
    expect.equal(200, response.status);
    expect.equal("Hello, Wing!", response.body);
}

test "it will return 400 and error message when name is not supplied" {
    let request = cloud.ApiRequest{
        method: cloud.HttpMethod.GET,
        path: "/greetings",
        query: {"somethingElse" => "doesNotMatter"},
        vars: {}
    };
    let response = greetingStringAdapter.handle(request);
    expect.equal(400, response.status);
    expect.equal("Query name=<name> is missing", response.body);
}
Running this test with the existing implementation will result in failure, necessitating the following changes:
bring cloud;
bring "./IRestApiAdapter.w" as restApiAdapter;


pub class GreetingStringRestApiAdapter impl restApiAdapter.IRestApiAdapter {
    \_h: cloud.IFunctionHandler;

    new(handler: cloud.IFunctionHandler) {
        this.\_h = handler;
    }

    inflight pub handle(request: cloud.ApiRequest): cloud.ApiResponse {
        if let name = request.query.tryGet("name") {
            return cloud.ApiResponse{
                status: 200,
                body: this.\_h.handle(name)
            };
        } else {
            return cloud.ApiResponse{
                status: 400,
                body: "Query name=<name> is missing"
            };
        }
    }
}
The main lesson from this story is that system complexity can exist in multiple places, not always within the core logic. Separation of concerns aids in managing this complexity through dedicated and isolated test suites.
GreetingServiceAfter all the modifications made, the resulting version of the main.w module has become quite complex, incorporating the logic of wiring system handlers, ports, and adapters. Additionally, maintaining end-to-end system tests within the same module is only feasible up to a point. Different testing and production environments may be necessary to address various security and cost considerations. To tackle these issues, it's advisable to extract the GreetingService configuration into a separate module:
bring "./handlers" as handlers;
bring "./ports" as ports;
bring "./adapters" as adapters;


pub class Greeting {
    pub api: ports.GreetingApi;

    new() {
        let greetingHandler = new handlers.Greeting();
        let greetingStringAdapter = new adapters.GreetingStringRestApiAdapter(greetingHandler);
        this.api = new ports.GreetingApi(greetingStringAdapter);
    }
}
Ideally, the creation of the Greeting service object should be implemented using a static method, following the Factory Method design pattern. However, I encountered difficulties in this approach, as Preflight static functions require a context, which I was unable to determine how to obtain. Nonetheless, even in this form, extracting the Greeting service class opens up multiple possibilities for different configurations in testing and production environments. The main.w module can now be relieved of the testing code:
bring "./service.w" as service;


let greetingService = new service.Greeting();
The system end-to-end test is now placed in its dedicated test.main.w module:
bring "./service.w" as service;

let greetingService = new service.Greeting();
bring expect;
test "it will return 'Hello, <name>!'" {
    expect.equal("Hello, Wing!", greetingService.api.invoke("Wing"));
}
In this case, code duplication is minimal, and as previously mentioned, a real system will have different configurations for test and production environments. The detailed specifications for these will be passed to the Greeting service class constructor.
Now, I aim to put the resulting architecture to the final test by partially implementing HTTP Content Negotiation. Specifically, the Greeting service should support returning a greeting statement as plain text, HTML, or JSON, depending on the client's request. The appropriate way to express these requirements is to modify the GreetingApiAdapter unit test as follows:
bring cloud;
bring expect;
bring "./adapters" as adapters;
bring "./handlers" as handlers;

let greetingHandler = new handlers.Greeting();
let greetingStringAdapter = new adapters.GreetingApiAdapter(greetingHandler);

test "it will return 200 and plain text answer when name is supplied without headers" {
    let request = cloud.ApiRequest{
        method: cloud.HttpMethod.GET,
        path: "/greetings",
        query: {"name" => "Wing"},
        vars: {}
    };
    let response = greetingStringAdapter.handle(request);
    expect.equal(200, response.status);
    expect.equal("Hello, Wing!", response.body);
    expect.equal("text/plain", response.headers?.get("Content-Type"));
}

test "it will return 200 and json answer when name is supplied with headers Accept: application/json" {
    let request = cloud.ApiRequest{
        method: cloud.HttpMethod.GET,
        path: "/greetings",
        query: {"name" => "Wing"},
        headers: {"Accept" => "application/json"},
        vars: {}
    };
    let response = greetingStringAdapter.handle(request);
    expect.equal(200, response.status);
    expect.equal("application/json", response.headers?.get("Content-Type"));
    let data = Json.tryParse(response.body);
    let expected = Json.stringify(Json {
        greeting: "Hello, Wing!"
    });
    expect.equal(expected, response.body);
}

test "it will return 200 and html answer when name is supplied with headers Accept: text/html" {
    let request = cloud.ApiRequest{
        method: cloud.HttpMethod.GET,
        path: "/greetings",
        query: {"name" => "Wing"},
        headers: {"Accept" => "text/html"},
        vars: {}
    };
    let response = greetingStringAdapter.handle(request);
    expect.equal(200, response.status);
    expect.equal("text/html", response.headers?.get("Content-Type"));
    let body = response.body ?? "";
    assert(body.contains("Hello, Wing!"));
}

test "it will return 400 and error message when name is not supplied" {
    let request = cloud.ApiRequest{
        method: cloud.HttpMethod.GET,
        path: "/greetings",
        query: {"somethingElse" => "doesNotMatter"},
        vars: {}
    };
    let response = greetingStringAdapter.handle(request);
    expect.equal(400, response.status);
    expect.equal("Query name=<name> is missing", response.body);
    expect.equal("text/plain", response.headers?.get("Content-Type"));
}
Suddenly, having a separate class for HTTP request/response handling doesn’t seem like a purely theoretical exercise, but rather a very pragmatic architectural decision. To make these tests pass, substantial modifications are needed in the GreetingApiAdapter class:
bring cloud;
bring "./IRestApiAdapter.w" as restApiAdapter;
bring "../core" as core;


pub class GreetingApiAdapter impl restApiAdapter.IRestApiAdapter {
    \_h: cloud.IFunctionHandler;

    new(handler: cloud.IFunctionHandler) {
        this.\_h = handler;
    }

    inflight static \_textPlain(greeting: str): str {
        return greeting;
    }

    inflight static \_applicationJson(greeting: str): str {
        let responseBody = Json {
            greeting: greeting
        };
        return Json.stringify(responseBody);
    }

    inflight \_findContentType(formatters: Map<inflight (str): str>, headers: Map<str>): str {
        let contentTypes = (headers.tryGet("Accept") ?? "").split(",");
        for ct in contentTypes {
            if formatters.has(ct) {
                return ct;
            }
        }
        return "text/plain";
    }

    inflight \_buildOkResponse(headers: Map<str>, name: str): cloud.ApiResponse {
        let greeting = this.\_h.handle(name) ?? "";  // TODO: guard against empty greeting or what??
        let formatters = {
            "text/plain" => GreetingApiAdapter.\_textPlain,
            "text/html"  => core.Greeting.formatHtml,
            "application/json" => GreetingApiAdapter.\_applicationJson
        };
        let contentType = this.\_findContentType(formatters, headers);
        return cloud.ApiResponse{
            status: 200,
            body: formatters.get(contentType)(greeting),
            headers: {"Content-Type" => contentType}
        };
    }

    inflight pub handle(request: cloud.ApiRequest): cloud.ApiResponse {
        if let name = request.query.tryGet("name") {
            return this.\_buildOkResponse(request.headers ?? {}, name);
        } else {
            return cloud.ApiResponse{
                status: 400,
                body: "Query name=<name> is missing",
                headers: {"Content-Type" => "text/plain"}
            };
        }
    }
}
Notice how quickly the complexity escalates. We’re not done yet, as we need a proper HTML formatter. The easiest way to implement it seemed to be in TypeScript, so I decided to place it in the core package:
export function formatHtml(greeting: string): string {
    return \`
    <!DOCTYPE html>
    <html lang="en">
    <head>
        <meta charset="UTF-8">
        <meta name="viewport" content="width=device-width, initial-scale=1.0">
        <title>Wing Greeting Service</title>

        <!-- Tailwind CSS Play CDN https://tailwindcss.com/docs/installation/play-cdn -->
        <script src="https://cdn.tailwindcss.com"></script>
    </head>
    <body class="flex items-center justify-center h-screen">
        <div class="text-center", id="greeting">
            <h1 class="text-2xl font-bold">${greeting}</h1>
        </div>
    </body>
    </html>
    \`
}
There is, of course, a separate unit test for it:
import { formatHtml } from "@core/formatHtml";

describe("formatHtml", () => {
  it("should return a properly formatted HTML greeting page", () => {
    const greeting = "Hello, World!";
    const result = formatHtml(greeting);
    expect(result).toContain(greeting);
  });
});
Placing the HTML response formatter in the core package could be debated as a violation of Hexagonal Architecture principles. Indeed, formatting an HTML response doesn’t seem to belong to the core application logic. Technically, relocating it wouldn’t be too hard, and in a larger real-world system, that’s probably what should be done. However, I chose to place it there to consolidate all TypeScript-related components in one place and to test and build them through the same set of Makefile targets.
Now, the browser gets response in format it could understand and render properly:
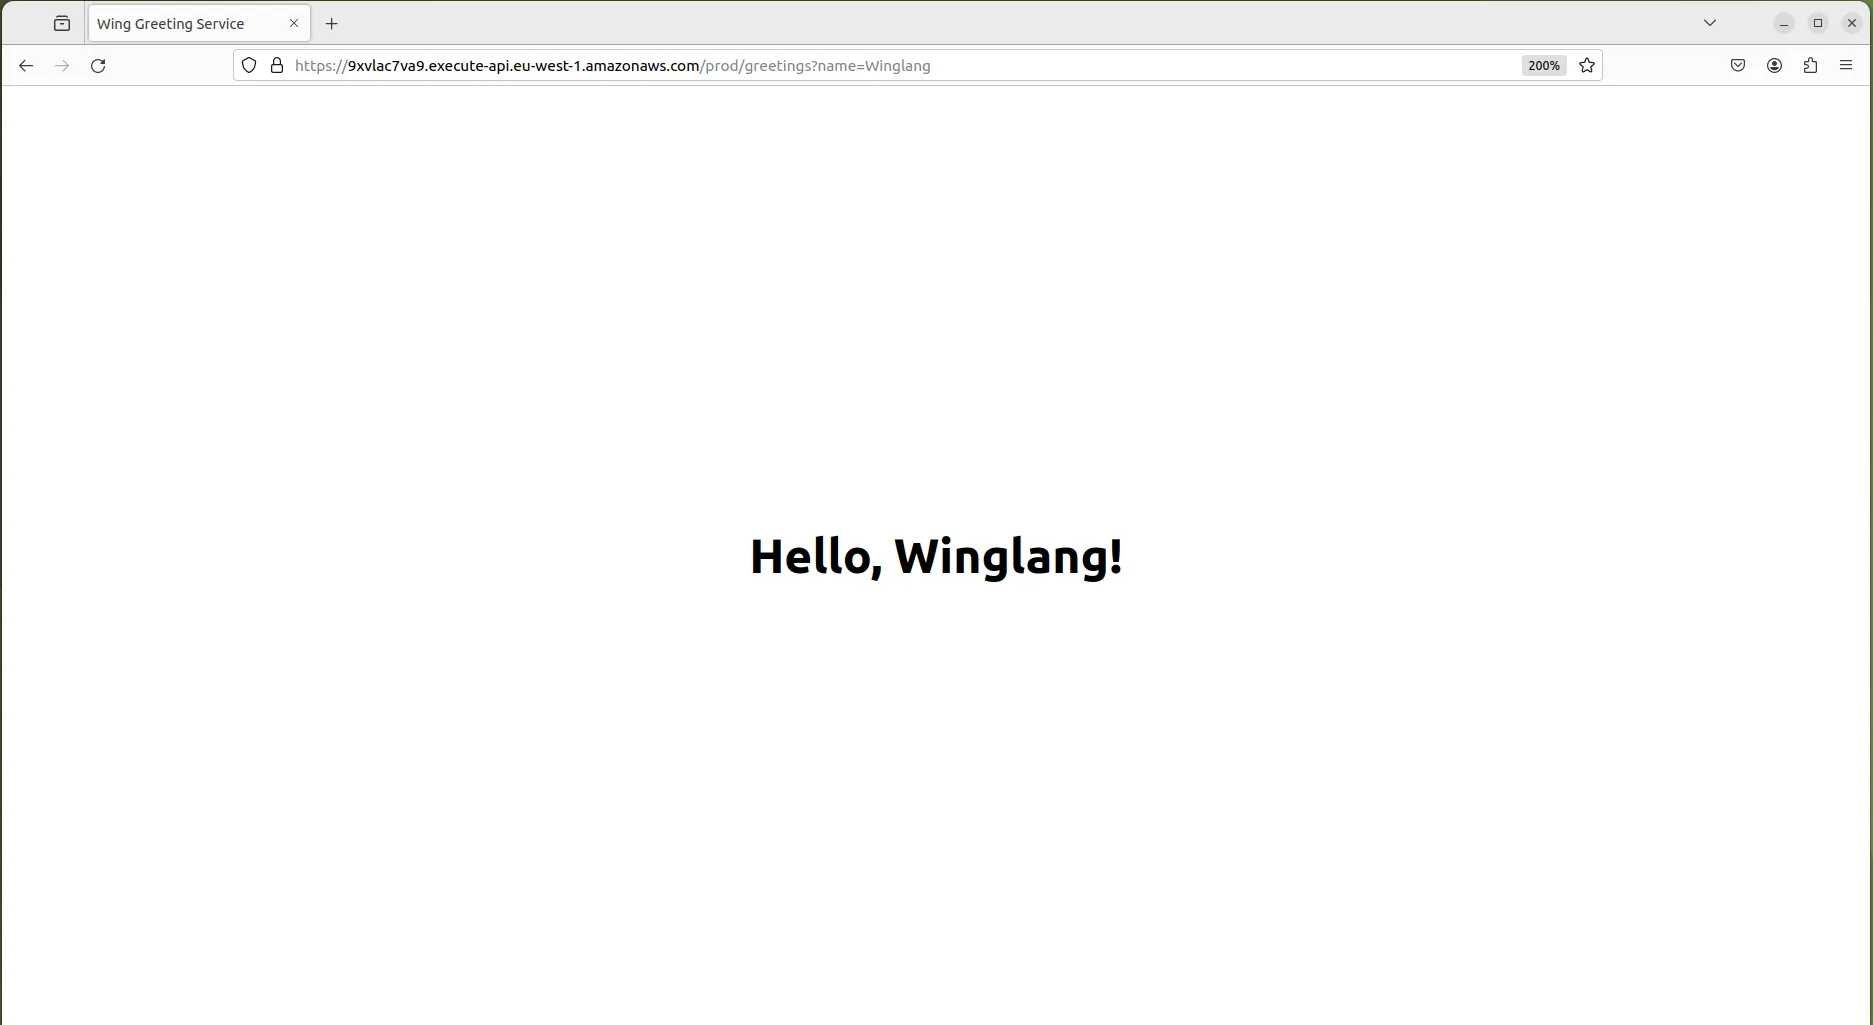
As stated at the outset, the objectives of this technology research report were to explore:
The exploration was conducted using the simplest “Hello, World!” application, which evolved into the GreetingService through twelve incremental steps, each introducing a minor modification to the previous code base. This resulted in the following project structure:
greeting-service/
│
├── adapters/
│   └── greetingApiAdapter.w
│   └── IRestApiAdapter.w
├── core/
│   └── Greeting.w
│   └── makeGreeting.ts
│   └── makeGreeting.test.ts
├── handlers/
│   └── Greeting.w
├── ports/
│   └── greetingApi.w
│   └── greetingFunction.w
├── jest.config.js
├── main.w
├── Makefile
├── package-lock.json
├── package.json
├── service.w
├── test.adapters.main.w
├── test.main.w
├── tsconfig.build.json
└── tsconfig.json
In my view, this structure reflects the overall service architecture quite well. As a minor improvement, I would consider relocating the TypeScript related files to a sub-level within the core folder.
Overall, the Winglang Module System passed the initial test, providing substantial support for the separation of concerns as prescribed by the Hexagonal Ports and Adapters pattern. It also offers reasonable support for interoperability with NodeJS runtime engine-based languages, such as TypeScript. My wish list for potential improvements includes:
main.w, essential for the effective implementation of the Factory Method design pattern, crucial for supporting non-trivial service configurations.main.w (this worked for TypeScript external functions), to eliminate the need for some extra boilerplate.This report evaluates the Winglang programming language for implementing one sequential stage of a more general Staged Event-Driven Architecture (SEDA). The assessment of how well Winglang supports the full-fledged Event-Driven part and asynchronous stage implementation (most likely for Handlers) will be the subject of future research. Stay tuned.

Wow its 2024, almost a quarter of the way through the 21st century, if you are reading this you probably should pat yourself on the back, because you did it! You have survived the crazy roller coaster ride that has lingered over the last several years, ranging from a pandemic to global insecurity with ongoing wars.
So finally 2024 is here, and we all get to ask ourselves, "Is this the year things finally start going back to normal?"... probably not! Though, as we all sit on the edge of our seats waiting for the next global crisis (my bingo card has mole people rising to the surface) we can take solace in one silver lining. Wing Custom Platforms are all the rage, and easier than ever to build!
In this blog series I'm going to be walking through how to build, publish, and use your own Wing Custom Platforms. Now before we get too deep, and since this is the first installment of what will probably be many procrastinated iterations, lets just do a quick level set.
A programming language for the cloud.
Wing combines infrastructure and runtime code in one language, enabling developers to stay in their creative flow, and to deliver better software, faster and more securely.

The purpose of the post is not to explain all the dry details of Wing Platforms, thats the job of the Wing docs (I'll provide reference links down below). Rather we want to get into the fun of building one, so Ill briefly explain.
Wing Custom Platforms offer us a way to hook into a Wing application's compilation process. This is done through various hooks that a custom platform can implement. As of the today, some of these hooks include:
postSynth hook and provides the same input, however the key difference is the passed config is immutable. Which is important for validation operationsThere are several other hooks that exist though, we wont go into all those in this blog.
One more bit of information we need before we start building our very own Custom Platform which is kind of important is, "what is our platform going to do?"
I'm glad you asked! We are going to build a Custom Platform that will enhance the developer experience when working with Terraform based platforms, some of which come builtin with Wing installation such as tf-aws, tf-azure, and tf-gcp.
The specific enhancement is we want to add is the functionality to configure how Terraform state files are managed through the use of Terraform backends. By default all of the builtin Terraform based platforms will use local state file configurations, which is nice for quick experimentation, but lacks some rigor for production quality deployments.
Build and publish a Wing Custom Platform that provides a way to configure your Terraform backend state management.
For the purpose of brevity we will focus on 3 backend types, s3, azurerm, and gcs
To begin lets just create a new npm project, I'm going to be a little bit more bare bones in this guide, so ill just create a package.json and tsconfig.json
Below is my package.json file, the only real interesting part about it is the dev dependency on @winglang/sdk this is so we can use some of the exposed Platform types, which we will see an example of soon.
{
  "name": "@wingplatforms/tf-backends",
  "version": "0.0.1",
  "main": "index.js",
  "repository": {
    "type": "git",
    "url": "https://github.com/hasanaburayyan/wing-tf-backends"
  },
  "license": "ISC",
  "devDependencies": {
    "typescript": "5.3.3",
    "@winglang/sdk": "0.54.30"
  },
  "files": ["lib"]
}
Here is the tsconfig.json Ive omitted a few other details for brevity since some other options are just personal preference. Whats worth noting here is how I have decided to structure the project. All my code will exist in a src folder and my expectations are that output of compilation will be in the lib folder. Now you might set your project up different and thats fine, but its worth explaining if you are just following along.
{
  "compilerOptions": {
    "target": "ES2020",
    "module": "commonjs",
    "rootDir": "./src",
    "outDir": "./lib",
    "lib": ["es2020", "dom"]
  },
  "include": ["./src/**/*"],
  "exclude": ["./node_modules"]
}
Then to prep our dependencies we can just run npm install
Okay now that that initial setup is out of the way, time to start writing our Platform!!
First Ill create a file src/platform.ts this will contain the main code for our Platform, which is used by the Wing compiler. The bare minimum code required for a Platform would look like this
import { platform } from "@winglang/sdk";

export class Platform implements platform.IPlatform {
  readonly target = "tf-*";
}
Here we create and export the our Platform class, which implements the IPlatform interface. All the platform hooks are optional so we don't actually have to define anything else for this to technically be valid.
Now the required bit is defining target this mechanism allows a platform to define the provisioning engine and cloud provider it is compatible with. At the time of this blog post there is not actually an enforcement of this compatibly but... we imagine it works :)
Okay, so we have a barebones Platform but its not actually useful yet, lets change that! First we will plan on using environment variables to determine which type of backend our users want to use, as well as what is the key for the state file.
So we will provide a constructor in our Platform:
import { platform } from "@winglang/sdk";

export class Platform implements platform.IPlatform {
  readonly target = "tf-*";
  readonly backendType: string;
  readonly stateFileKey: string;

  constructor() {
    if (!process.env.TF_BACKEND_TYPE) {
      throw new Error(`TF_BACKEND_TYPE environment variable must be set.`);
    }
    if (!process.env.TF_STATE_FILE_KEY) {
      throw new Error("TF_STATE_FILE_KEY environment variable must be set.");
    }

    this.backendType = process.env.TF_BACKEND_TYPE;
    this.stateFileKey = process.env.TF_STATE_FILE_KEY;
  }
}
Cool, now we are starting to get moving. Our Platform will require the users to have two environment variables set when compiling their Wing code, TF_BACKEND_TYPE and TF_STATE_FILE_KEY for now we will just persist this data as instance variables.
One more house keeping item we need to do is export our Platform code, to do this lets create an index.ts with a single line that looks like this:
export * from "./platform";
Before we get much further I just want to show how to test your Platform locally to see it working. In order to test this code we need to first compile it using the command npx tsc and since we already defined everything in our tsconfig.json we will conveniently have a folder named lib that contains all the generated JavaScript code.
Lets create a super simple Wing application to use this Platform with.
// main.w
bring cloud;

new cloud.Bucket();
The above Wing code will just import the cloud library and use it to create a Bucket resource.
Next we will run a Wing compile command using our Platform in combination with some other Terraform based Platform, in my case it will be tf-aws
wing compile main.w --platform tf-aws --platform ./lib
Note: We are providing two Platforms tf-aws and a relative path to our compiled Platform ./lib The ordering of these Platforms is also important tf-aws MUST come first since its a Platform that implements the newApp() API. We won't dive deeper into that in this post but the reference reading materials down below will provide links if you want to dive deeper.
Now running this code will result in the following error:
wing compile main.w -t tf-aws -t ./lib

An error occurred while loading the custom platform: Error: TF_BACKEND_TYPE environment variable must be set.
Now before you freak out, just know thats one of them good errors :) we can indeed see our Platform code was loaded and run because the Error was thrown requiring TF_BACKEND_TYPE as an environment variable. If we now rerun the compile command with the required variables we should get a successful compilation
TF_BACKEND_TYPE=s3 TF_STATE_FILE_KEY=mystate.tfstate wing compile main.w -t tf-aws -t ./lib
To be extra sure the compilation worked we can inspect the generated Terraform code in target/main.tfaws/main.tf.json
{
  "//": {
    "metadata": {
      "backend": "local",
      "stackName": "root",
      "version": "0.17.0"
    },
    "outputs": {}
  },
  "provider": {
    "aws": [{}]
  },
  "resource": {
    "aws_s3_bucket": {
      "cloudBucket": {
        "//": {
          "metadata": {
            "path": "root/Default/Default/cloud.Bucket/Default",
            "uniqueId": "cloudBucket"
          }
        },
        "bucket_prefix": "cloud-bucket-c87175e7-",
        "force_destroy": false
      }
    }
  },
  "terraform": {
    "backend": {
      "local": {
        "path": "./terraform.tfstate"
      }
    },
    "required_providers": {
      "aws": {
        "source": "aws",
        "version": "5.31.0"
      }
    }
  }
}
We should see that a single Bucket is being created, however it is still using the local Terraform backend and that is because we still have some work to do!
Since we want to edit the generated Terraform configuration file after the code has been synthesized, we will implement the postSynth hook. As I explained earlier this hook is called right after synthesis completes and passes the resulting configuration file.
What is more useful about this hook is it allows us to return a mutated version of the configuration file.
To implement this hook we will update our Platform code with this
export class Platform implements platform.IPlatform {
  // ...
  postSynth(config: any): any {
    if (this.backendType === "s3") {
      if (!process.env.TF_S3_BACKEND_BUCKET) {
        throw new Error(
          "TF_S3_BACKEND_BUCKET environment variable must be set."
        );
      }

      if (!process.env.TF_S3_BACKEND_BUCKET_REGION) {
        throw new Error(
          "TF_S3_BACKEND_BUCKET_REGION environment variable must be set."
        );
      }

      config.terraform.backend = {
        s3: {
          bucket: process.env.TF_S3_BACKEND_BUCKET,
          region: process.env.TF_S3_BACKEND_BUCKET_REGION,
          key: this.stateFileKey,
        },
      };
    }
    return config;
  }
}
Now we can see there is some control flow logic happening here, if the user wants to use an s3 backend we will need some additional input such as the name and region of the bucket, which we will use TF_S3_BACKEND_BUCKET and TF_S3_BACKEND_BUCKET_REGION to configure.
Assuming all of the required environment variables exist, we can then manipulate the provided config object, where we set config.terraform.backend to use an s3 configuration block. Finally the config object is returned.
Now to see this all in action we will need to compile our code (npx tsc) and provide all four required s3 environment variables. To make the commands easier to read Ill do it in multiple lines:
# compile platform code
npx tsc

# set env vars
export TF_BACKEND_TYPE=s3
export TF_STATE_FILE_KEY=mystate.tfstate
export TF_S3_BACKEND_BUCKET=myfavorites3bucket
export TF_S3_BACKEND_BUCKET_REGION=us-east-1

# compile wing code!
wing compile main.w -t tf-aws -t ./lib
And viola! We should now be able to look at our Terraform config and see that a remote s3 backend is being used:
// Parts of the config have been omitted for brevity
{
  "terraform": {
    "required_providers": {
      "aws": {
        "version": "5.31.0",
        "source": "aws"
      }
    },
    "backend": {
      "s3": {
        "bucket": "myfavorites3bucket",
        "region": "us-east-1",
        "key": "mystate.tfstate"
      }
    }
  },
  "resource": {
    "aws_s3_bucket": {
      "cloudBucket": {
        "bucket_prefix": "cloud-bucket-c87175e7-",
        "force_destroy": false,
        "//": {
          "metadata": {
            "path": "root/Default/Default/cloud.Bucket/Default",
            "uniqueId": "cloudBucket"
          }
        }
      }
    }
  }
}
If you have been following along, pat yourself on the back again! Now on top of surviving the early 2020s you have also written your first Wing Custom Platform!
Now before we go into how to make it available for use to other Wingnuts, lets actually make our code a little cleaner, and a bit more usefully robust.
In order to live up to its name tf-backends it should probably support multiple backends! To accomplish this lets just use some good ol' coding chops to abstract a bit.
We want our Platform to support s3, azurerm, and gcs to accomplish this we just have to define different config.terraform.backend blocks based on the desired backend.
To make this work I'm going to create a few more files:
src/backends/backend.ts
// simple interface to define a backend behavior
export interface IBackend {
  generateConfigBlock(stateFileKey: string): void;
}
Now several backend classes that implement this interface
src/backends/s3.ts
import { IBackend } from "./backend";

export class S3 implements IBackend {
  readonly backendBucket: string;
  readonly backendBucketRegion: string;

  constructor() {
    if (!process.env.TF_S3_BACKEND_BUCKET) {
      throw new Error("TF_S3_BACKEND_BUCKET environment variable must be set.");
    }

    if (!process.env.TF_S3_BACKEND_BUCKET_REGION) {
      throw new Error(
        "TF_S3_BACKEND_BUCKET_REGION environment variable must be set."
      );
    }

    this.backendBucket = process.env.TF_S3_BACKEND_BUCKET;
    this.backendBucketRegion = process.env.TF_S3_BACKEND_BUCKET_REGION;
  }

  generateConfigBlock(stateFileKey: string): any {
    return {
      s3: {
        bucket: this.backendBucket,
        region: this.backendBucketRegion,
        key: stateFileKey,
      },
    };
  }
}
src/backends/azurerm.ts
import { IBackend } from "./backend";

export class AzureRM implements IBackend {
  readonly backendStorageAccountName: string;
  readonly backendStorageAccountResourceGroupName: string;
  readonly backendContainerName: string;

  constructor() {
    if (!process.env.TF_AZURERM_BACKEND_STORAGE_ACCOUNT_NAME) {
      throw new Error(
        "TF_AZURERM_BACKEND_STORAGE_ACCOUNT_NAME environment variable must be set."
      );
    }

    if (!process.env.TF_AZURERM_BACKEND_STORAGE_ACCOUNT_RESOURCE_GROUP_NAME) {
      throw new Error(
        "TF_AZURERM_BACKEND_STORAGE_ACCOUNT_RESOURCE_GROUP_NAME environment variable must be set."
      );
    }

    if (!process.env.TF_AZURERM_BACKEND_CONTAINER_NAME) {
      throw new Error(
        "TF_AZURERM_BACKEND_CONTAINER_NAME environment variable must be set."
      );
    }

    this.backendStorageAccountName =
      process.env.TF_AZURERM_BACKEND_STORAGE_ACCOUNT_NAME;
    this.backendStorageAccountResourceGroupName =
      process.env.TF_AZURERM_BACKEND_STORAGE_ACCOUNT_RESOURCE_GROUP_NAME;
    this.backendContainerName = process.env.TF_AZURERM_BACKEND_CONTAINER_NAME;
  }

  generateConfigBlock(stateFileKey: string): any {
    return {
      azurerm: {
        storage_account_name: this.backendStorageAccountName,
        resource_group_name: this.backendStorageAccountResourceGroupName,
        container_name: this.backendContainerName,
        key: stateFileKey,
      },
    };
  }
}
src/backends/gcs.ts
import { IBackend } from "./backend";

export class GCS implements IBackend {
  readonly backendBucket: string;

  constructor() {
    if (!process.env.TF_GCS_BACKEND_BUCKET) {
      throw new Error(
        "TF_GCS_BACKEND_BUCKET environment variable must be set."
      );
    }

    if (!process.env.TF_GCS_BACKEND_PREFIX) {
      throw new Error(
        "TF_GCS_BACKEND_PREFIX environment variable must be set."
      );
    }

    this.backendBucket = process.env.TF_GCS_BACKEND_BUCKET;
  }

  generateConfigBlock(stateFileKey: string): any {
    return {
      gcs: {
        bucket: this.backendBucket,
        key: stateFileKey,
      },
    };
  }
}
Now that we have our backend classes defined, we can update our Platform code to use them. My final Platform code looks like this:
import { platform } from "@winglang/sdk";
import { S3 } from "./backends/s3";
import { IBackend } from "./backends/backend";
import { AzureRM } from "./backends/azurerm";
import { GCS } from "./backends/gcs";
import { Local } from "./backends/local";

// TODO: support more backends: https://developer.hashicorp.com/terraform/language/settings/backends/local
const SUPPORTED_TERRAFORM_BACKENDS = ["s3", "azurerm", "gcs"];

export class Platform implements platform.IPlatform {
  readonly target = "tf-*";
  readonly backendType: string;
  readonly stateFileKey: string;

  constructor() {
    if (!process.env.TF_BACKEND_TYPE) {
      throw new Error(
        `TF_BACKEND_TYPE environment variable must be set. Available options: (${SUPPORTED_TERRAFORM_BACKENDS.join(
          ", "
        )})`
      );
    }
    if (!process.env.TF_STATE_FILE_KEY) {
      throw new Error("TF_STATE_FILE_KEY environment variable must be set.");
    }
    this.backendType = process.env.TF_BACKEND_TYPE;
    this.stateFileKey = process.env.TF_STATE_FILE_KEY;
  }

  postSynth(config: any): any {
    config.terraform.backend = this.getBackend().generateConfigBlock(
      this.stateFileKey
    );
    return config;
  }

  /**
   * Determine which backend class to initialize based on the backend type
   *
   * @returns the backend instance based on the backend type
   */
  getBackend(): IBackend {
    switch (this.backendType) {
      case "s3":
        return new S3();
      case "azurerm":
        return new AzureRM();
      case "gcs":
        return new GCS();
      default:
        throw new Error(
          `Unsupported backend type: ${
            this.backendType
          }, available options: (${SUPPORTED_TERRAFORM_BACKENDS.join(", ")})`
        );
    }
  }
}
BOOM!! Our Platform now supports all 3 different backends we wanted to support!
Feel free to build and test each one.
Now I'm not going to explain all the intricate details about how npm packages work, since I would do a poor job of that as indicated by the fact my below examples will use a version 0.0.3 (third times the charm!)
However if you have followed along thus far you will be able to run the following commands Note: in order to publish this library you will need to have defined a package name that you are authorized to publish to. If you use mine (@wingplatforms/tf-backends) you're gonna have a bed time
```bash
# compile platform code again
npx tsc

# package your code
npm pack

# publish your package
npm publish
If done right you should see something along the lines of
npm notice === Tarball Details ===
npm notice name:          @wingplatforms/tf-backends
npm notice version:       0.0.3
npm notice filename:      wingplatforms-tf-backends-0.0.3.tgz
npm notice package size:  36.8 kB
npm notice unpacked size: 119.5 kB
npm notice shasum:        0186c558fa7c1ff587f2caddd686574638c9cc4c
npm notice integrity:     sha512-mWIeg8yRE7CG/[...]cT8Kh8q/QwlGg==
npm notice total files:   17
npm notice
npm notice Publishing to https://registry.npmjs.org/ with tag latest and default access
With the Platform created lets try it out. Note: I suggest using a clean directory for playing with it
Using the same simple Wing application as before
// main.w
bring cloud;

new cloud.Bucket()
We need to add one more thing to use a Custom Platform, a package.json file which only needs to define the published Platform as a dependency:
{
  "dependencies": {
    "@wingplatforms/tf-backends": "0.0.3"
  }
}
With both those files create lets install our custom Platform using npm install
Finally we lets set up all the environment variables for GCS and run our Wing compile command. Note: since we are using a installed npm library we will provide the package name and not ./lib anymore!
export TF_BACKEND_TYPE=gcs
export TF_STATE_FILE_KEY=mystate.tfstate
export TF_GCS_BACKEND_BUCKET=mygcsbucket

wing compile main.w -t tf-aws -t @wingplatforms/tf-backends
Now we should be able to see that the generated Terraform config is using the correct remote backend!
{
  "terraform": {
    "required_providers": {
      "aws": {
        "version": "5.31.0",
        "source": "aws"
      }
    },
    "backend": {
      "gcs": {
        "bucket": "mygcsbucket",
        "key": "mystate.tfstate"
      }
    }
  },
  "resource": {
    "aws_s3_bucket": {
      "cloudBucket": {
        "bucket_prefix": "cloud-bucket-c87175e7-",
        "force_destroy": false,
        "//": {
          "metadata": {
            "path": "root/Default/Default/cloud.Bucket/Default",
            "uniqueId": "cloudBucket"
          }
        }
      }
    }
  }
}
Now that we have built and published our first Wing Custom Platform, the sky is the limit! Get out there and start building the Custom Platforms to your hearts content <3 and keep a look out for the next addition to this series on Platform building!
In the meantime make sure you to join the Wing Discord community: https://t.winglang.io/discord and share what you are working on, or any issues you run into.
Want to read more about Wing Platforms? Check out the Wing Platform Docs
Check out the Wing Platform Docs
Feel free to checkout the full source code at: https://github.com/hasanaburayyan/wing-tf-backends
If you enjoyed this article Please star ⭐ Wing